Microsoft Entra ID
Overview
This document covers the setup of SAML (Security Assertion Markup Language) federation between Nile (Okta) as a Service Provider (SP) and Azure Entra ID as an Identity Provider (IdP).
Requirements
· Have administrator rights to the Nile Portal.
· Have administrator rights to Entra ID.
· The same Nile Portal administrator needs to be a user in Entra ID.
Configuration
Entra ID Groups
The purpose of this section is to create/highlight Entra ID groups to be subscribed to the Nile SAML enterprise app. Two group categories are to be created/reviewed:
A. Groups to be newly created whose members are granted administrator privileges (read/write, read-only) to the Nile Portal
B. Group(s) of employees to be identified that can leverage the Nile SSO feature
Nile-Admin and Nile-Monitor group creation
- Sign in to the Microsoft Entra Portal: https://entra.microsoft.com
- Navigate to the Groups page and click on ‘New group’
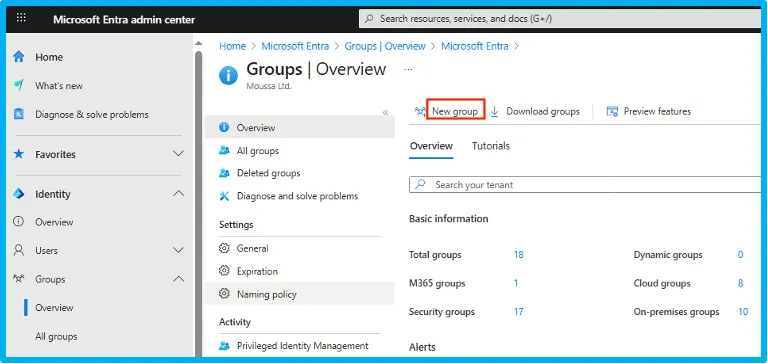
-
- Fill up the group name (ex: Nile-Admin), group description, and select the desired members of this group; then click on Create

- Repeat the previous group creation operation to create a second group (ex: Nile-Monitor) that could be displayed afterward as illustrated
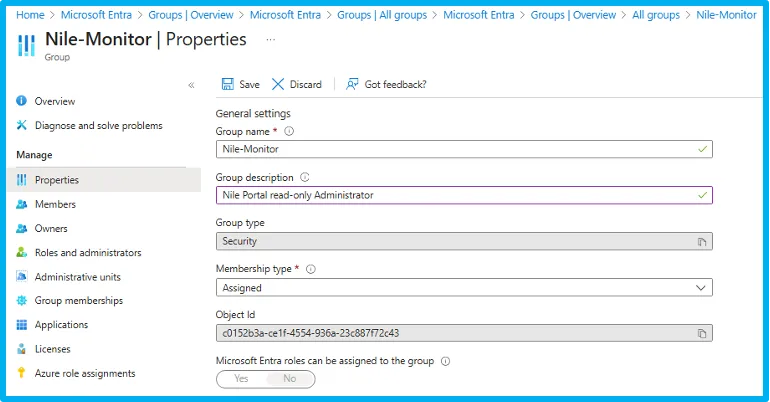
- An existing group (Nile-SSO) with 4 members that represent the employees that can sign-in to the Nile SSO SSID is presented for illustration:

Entra ID Enterprise App Configuration
- Nile app creation
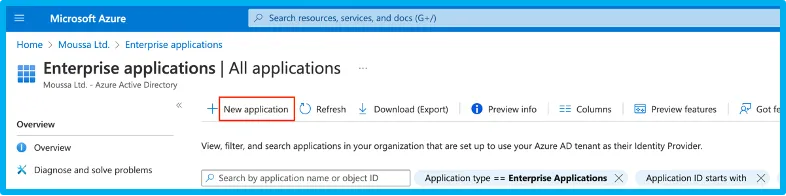
- ·On the Microsoft Entra admin Center or Entra ID accessed through the Azure portal, navigate to the ‘Enterprise applications’ page
- Click on ‘New application’
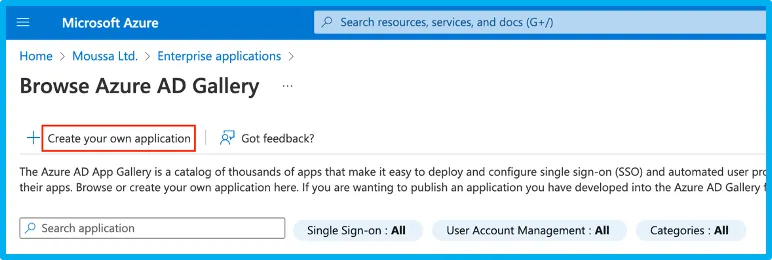
- On the Browse Microsoft Entra Gallery page, click the Create your own application link
Enter the following Name: “Nile”
radio button: Select “Integrate any other application…”

- Click the Create button
Assign users and groups
- On the Nile Overview page:
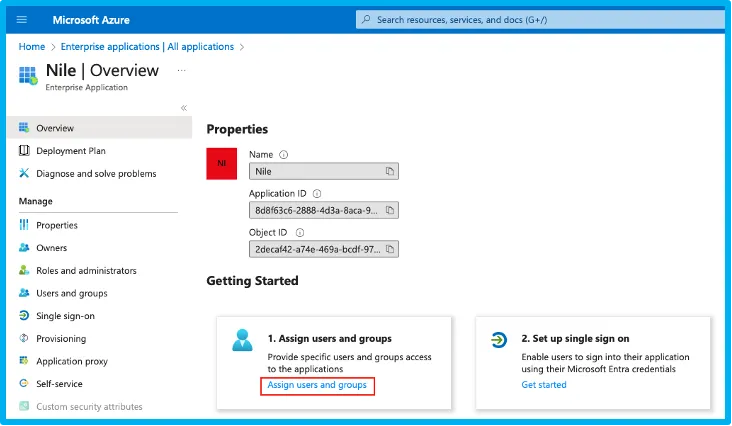
- Click the Assign users and groups link
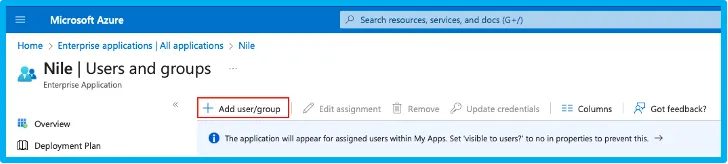
- On the Users and groups page, click on the +Add user/group link
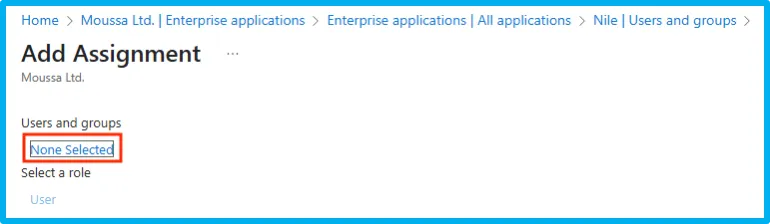
- On the Add Assignment page, click the None Selected hyperlink to users and/or groups to assign to the app Nile:
- Click the Groups tab and enter ‘Nile-’ in the Search field to display the groups that contain the string ‘Nile-’

- Check off those groups, namely ‘Nile-Admin’ and ‘Nile-Monitor’, as well as any user groups that will be signing in to the Nile SSO SSID. In this document, the Nile-SSO is one example of such groups and click on the Select button to confirm the selection.
- Click the Assign button to complete the addition of the groups to the Nile app. Note: Individual users can also be assigned to the Nile SAML app by selecting the Users tab in the illustration above.
Set up single sign on
- Click Single sign-on in the left menu
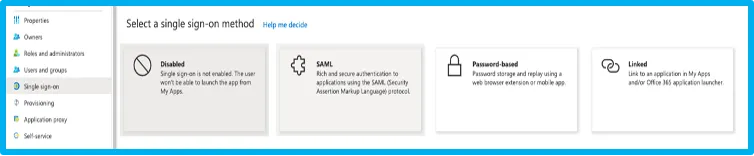
- Click the SAML panel
- On the Set UP Single Sign-On with SAML page, in the Basic SAML Configuration section, click the Edit link

- Enter temporary values for Identifier (Entity ID) and Reply URL (Assertion Consumer Service URL) to generate the certificate for download.
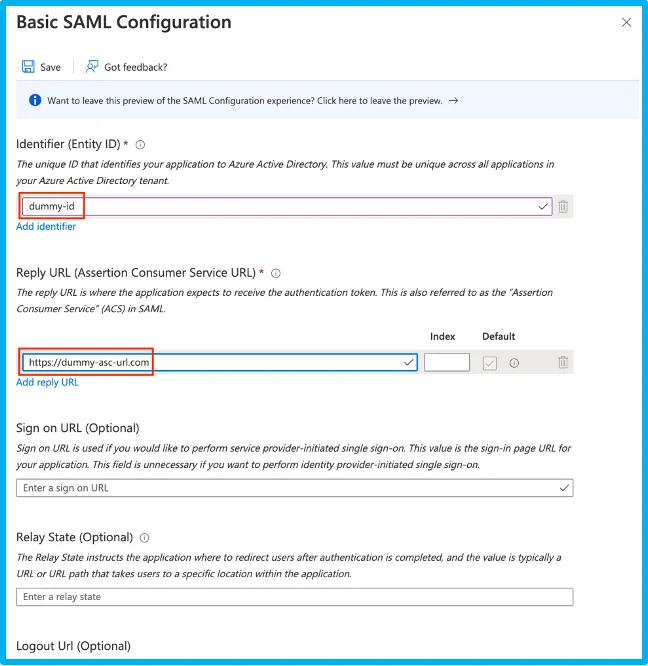
- Click on Save (top bar, left) to save the changes. Note: After Entra ID is made an identity provider in the next section, the actual values for Identifier and Reply URL can be updated.
- Back on the Set up Single Sign-On with SAML page, in the Attributes & Claims section, click the Edit button
- The Attributes & Claims page is presented
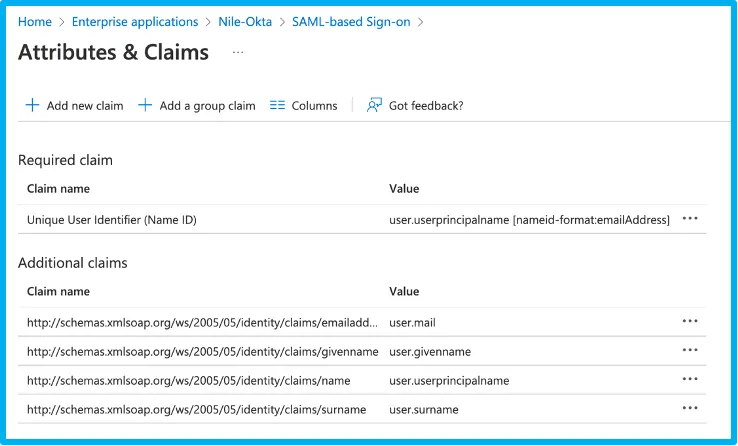
Edit each claim one by one as follows:
- Click on the user.mail claim line to open it for editing, delete the contents of Namespace and change the Name to “mail”. Then click the Save button (top, left)

- Similarly, edit user.givenname: delete the contents of Namespace, change Name from “givenname” to “firstName”. Then click the Save button

- Edit user.userprinciplename by deleting the contents of Namespace, and click the Save button

- Edit user.surname by deleting the contents of Namespace, and changing the Name from ‘surname’ to ‘lastName’. Click the Save button

- Click + Add New Claim link, add a new claim for the mobile attribute as shown. Click the Save button

- Click + Add New Claim link, add a new claim for the displayName attribute. Then click the Save button

- Click + Add a Group Claim link, and add a group claim for the memberOf attribute as illustrated. Then click the Save button

SAML Certificate
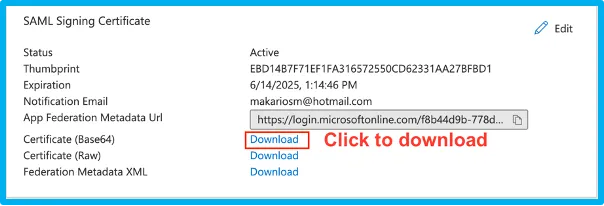
- ·Back on the Set up Single Sign-On with SAML page, in the SAML Certificates section
- Download the ‘SAML Signing Certificate’ (to be uploaded later to the Nile Portal when adding Entra ID as a provider):|
Microsoft Entra ID and Login URL
- Make a note of the Microsoft Entra Identifier and the Login URL (to be used on the Nile Portal provider setup):

To be done after completing the next section: Update the ‘Identifier’ and ‘reply URL’ in the ‘Basic SAML Configuration’ section of the Nile app from the metadata.xml file downloaded after completing the Nile Portal provider configuration in the next section.

Nile Portal Identity Provider Configuration
- Log in to the Nile Portal (https://www.nile-global.cloud) as an administrator.
Note: It is assumed that the administrator credentials belong to a domain in Microsoft Entra ID. This domain would already be an allowed domain on the Nile Portal.
- Navigate to Global Settings → Identity

- Click on ADD A NEW PROVIDER link

Fill up the fields in the new provider window as follows:
IdP Issuer URI: Microsoft Entra Identifier noted in the previous section IdP SSO URL: Login URL noted in the previous section Destination URL:Login URL noted in the previous section SELECT CERTIFICATE: Upload the text content of the downloaded SAML Base64certificate

Click the SUBMIT button to save the changes and add the new Microsoft Entra ID provider

- Click the METADATA button to download the file.
- Open the downloaded file with a text editor, and search for the ‘entityID’ and ‘Location’ strings.
- NOTE: Save the entityID and Location values. Those values are used later to complete the Entra ID enterprise app configuration For illustration purposes only, the values used in this example: entityID: https://www.okta.com/saml2/service-provider/spchehmcqiylhitxumru Location: https://login.u1.nile-global.cloud/sso/saml2/0oaah83qpuT5TRtMY5d7
- Go back to the enterprise app (Nile) created on Microsoft Entra ID to edit the ‘Basic SAML Configuration’:
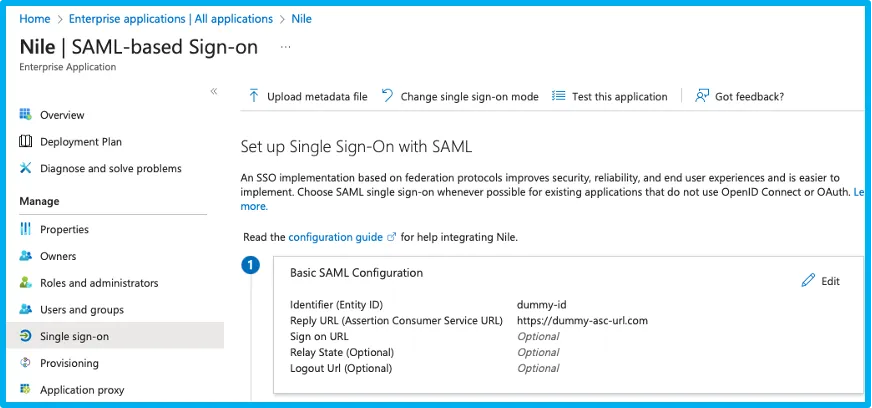
- Click on Edit
- Replace the temporary values of Entity ID and Reply URL with the values of entityID and Location collected earlier

- Click the Save button to save the changes and thus complete the Azure Entra ID enterprise app (Nile) configuration.
- Verify your changes:

Notes: 1. The Entra ID provider configuration is completed for SSO users to gain Internet access after signing-in using their Entra ID credentials. 2. Entra ID user profiles should contain all previously mapped attributes including emails and mobile phones in order to connect successfully to the Nile SSO SSID.
Group Mapping
The group mapping is used to map a designated Entra ID group to the Nile Portal Administrator group. A Group rule is needed and can be added on the Nile Portal as illustrated in the following steps.
The example that follows maps an AD admin group “Nile-Admin” to the Nile Portal Administrator group, and a ‘Nile-Monitor’ group to the Nile Portal Monitor Admin group
Click the Group rules tab:

Click ADD GROUP MAPPING button

- Add ‘memberOf’ as “Friendly name” and “External name” of type “ARRAY”
- Press the SAVE button
- Click the ADD GROUP RULE link

Add the first of two group rules to map Entra ID desired Nile Portal admin users
,
members of two Entra ID groups (Nile-Admin and Nile-Monitor in this example) to the Nile Portal Administrator and Monitor groups respectively, by evaluating the ‘memberOf’ attribute value received in the SAML assertion from Entra ID:
Name: An appropriate rule name Mapping Value: Entra ID Group object ID Assigned groups:Select “Administrator” from the drop-down list
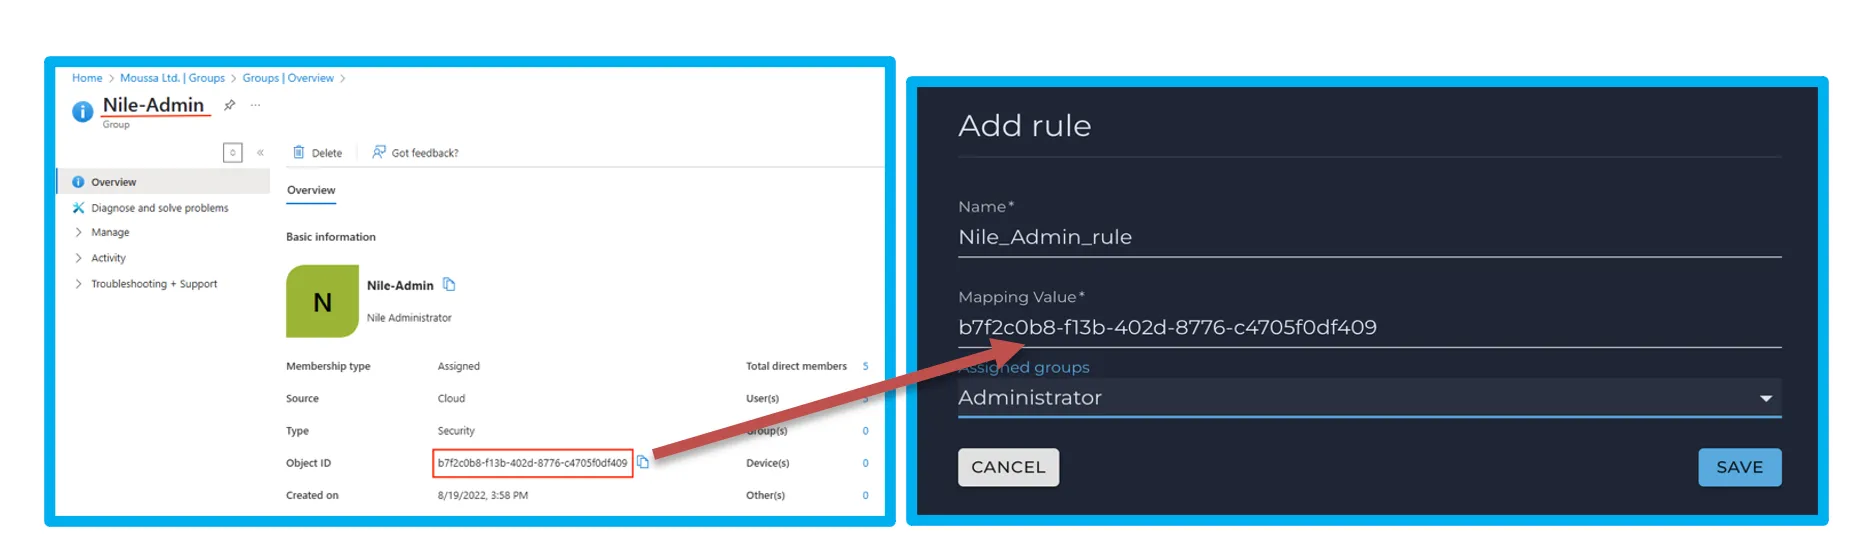
Click the SAVE Button
Add the second group (Nile Monitor in this example) to map it to the Nile Portal Monitor group:
Name: An appropriate rule name Mapping Value: Entra ID Group object ID Assigned groups: Select “Monitor” from the drop-down list

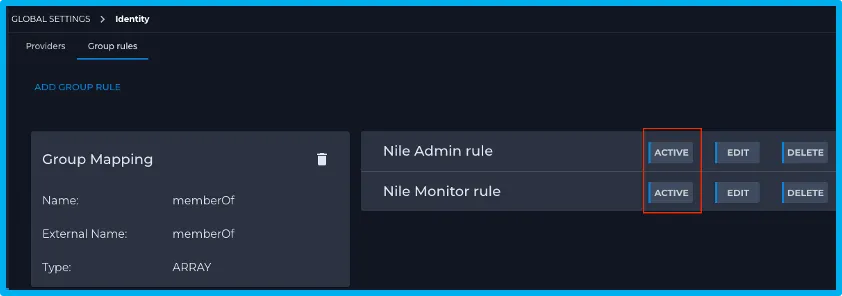
Click the SAVE button After adding the two rules, this pane is displayed:

Activate the two rules by clicking on the INACTIVE button to change the state to ACTIVE
PSK-SSO SSID Configuration
- Log back in to the Nile Portal
- Go to the NETWORK SETUP ->Segments tab page to create the PSK SSO Segment:
- Click on the + sign to add a new segment
- Type a meaningful segment name (Demo PSK SSO)

- Click the Service area tab to select the DHCP server and scope:

Go to the ‘Advanced’ tab and check off the ‘URL Allow List’ and click on + to add the following DNS names one at a time:
azure.microsoft.com amp.azure.net dev.azure.com *.amcdn.msftauth.net *.trafficmanager.net *.omegacdn.net *.azureedge.net *.aadcdn.msftauth.net *.msidentity.com *.dev.azure.com *.aadcdn.msauth.net *.t-msedge.net
- When finished, this is what the page looks like

- Click the SAVE button to complete the addition of the new segment
- Go to NETWORK SETUP-->Wireless page to create the PSK SSO SSID
- Click onthe + sign to add a SSID

- Enter this data Type: Personal (radio button) Name: Type the desired SSID name Security: Select WPA2 from pull-down list Enable SSO:Click checkbox to Checked Passkey: Enter the Pre-shared key Segments: Select the previously created PSK-SSO segment from the pull-down list

- Click the SAVE button to complete the PSK-SSO SSID creation.