Setup Guide for Nile Cloud RADIUS
1. Introduction
1.1 Purpose of This Guide
This guide provides step-by-step instructions for deploying the Nile RADIUS Service to enable secure 802.1X authentication on wired and wireless networks using EAP-TLS.
This guide covers
- Uploading the server certificate (PKCS#12) and trusted CA certificates into the Nile portal
- Creating Nile RADIUS policies (segment assignment, Palo Alto tags, accept/reject)
- Configuring Windows, macOS, iOS, and Android supplicants for EAP-TLS
1.2 Key Terminology
Term | Definition |
|---|---|
Supplicant | Endpoint (laptop, phone, IoT device) running an 802.1X EAP client. |
Authenticator / NAS | Nile APs and switches in the Nile Service Block (NSB). The headend (HE) relays EAP frames as RADIUS to the cloud. |
Authentication Server | Nile RADIUS — the cloud service that performs EAP authentication and returns authorization attributes. |
EAP | Extensible Authentication Protocol, used over 802.1X. |
EAP-TLS | Certificate-based EAP method providing mutual TLS between supplicant and RADIUS server. Only the EAP method is supported by Nile RADIUS today. |
Segment | Nile's Layer 3 construct that replaces VLANs. A segment maps to a subnet and a DHCP pool. |
Nile RADIUS Policy | Authorization rule inside the Nile RADIUS service. Matches on SSID, SCIM group, Intune compliance, certificate attributes, etc., and returns Accept (with segment assignment and/or Palo Alto tag) or Reject. |
SCIM | Standard used to sync user identities and group membership from IdPs (Entra ID, Okta) into Nile in real time. |
Intune Compliance | Device compliance state pulled from Microsoft Intune and usable as a match condition in Nile RADIUS policies. |
1.3 Prerequisites
Before enabling Nile RADIUS, ensure the following are in place:
- Nile Access Service deployed. Sites are onboarded, segments are defined, and each segment is mapped to a DHCP pool.
- Cloud RADIUS feature enabled on the tenant. Engage your Nile CSM/SE to enable the Cloud RADIUS service on your tenant before you start configuration.
- Identity provider integrated. SAML/OIDC IdP (Entra ID, Okta, Authentik) integrated for user SSO, with SCIM provisioning enabled if you plan to use IdP groups in RADIUS policies.
- PKI ready for EAP-TLS. Nile RADIUS expects:
- A server certificate plus its matching private key for the RADIUS server, with the following properties:
- Key type: RSA, 2048 / 3072 / 4096 bits (WPA3-Enterprise mandates ≥ 3072). ECDSA keys are not supported today.
- KeyUsage: digitalSignature and keyEncipherment.
- ExtendedKeyUsage (EKU): serverAuth (TLS Web Server Authentication).
- Subject Alternative Name (SAN): Optional but recommended. Whatever DNS name your supplicants are configured to trust as the RADIUS server name must be present in the SAN.
- The server certificate, its matching private key, and the issuing CA chain (root + any intermediates) packaged into a single PKCS#12 (.p12 / .pfx) bundle, password-protected.
- The CA chain that issued your client certificates as one or more PEM files. If client certificates chain to the same CA as the server cert, the chain in the PKCS#12 is sufficient; if they chain to a different CA, upload that CA separately as a PEM into the Trust Certificates section.
Nile does not operate a CA and does not generate CSRs. Use your existing PKI (AD CS, Sectigo, Entra Certificate Service, SCEPman, etc.) to issue both the RADIUS server certificate and the client certificates, then upload the final artifacts into Nile.
- Optional — Microsoft Intune integration. Required only if you intend to use Intune device-compliance state as a match condition in Nile RADIUS policies.
- Review Technical Documentation: Read the Nile RADIUS Documentation to understand key concepts
2. Getting Ready: Identity, Certificates, and Integrations
2.1 Identity Providers and SCIM
Integrate Nile with your IdP so the user and group context is available to Nile RADIUS for policy evaluation:
- Identity sync via SCIM — Automatically sync user identities and group membership from Entra ID, Okta, or any SCIM-capable IdP into Nile.
- Group-based policy assignment — Reference IdP groups (for example, Employees, Contractors, Sales) directly in Nile RADIUS policies to drive segment assignment, Palo Alto tag assignment, or accept/reject decisions.
- Real-time access revocation — When a user is disabled or removed from a group in the IdP, the SCIM event reaches Nile within seconds, and the next authentication attempt is denied. Existing sessions are terminated via Change-of-Authorization (CoA).
For step-by-step IdP and SCIM integration instructions, refer to the relevant integration guide on Nile Docs.
2.2 Certificate Authority and PKI (for EAP-TLS)
For EAP-TLS, the customer is responsible for the full certificate lifecycle. This includes operating (or leveraging) a CA/PKI, issuing the Nile RADIUS server certificate, and issuing and distributing client certificates to devices — typically via an MDM such as Microsoft Intune.
Nile does not issue or renew certificates. Nile only generates expiry alerts at 90, 60, 30, and 10 days before the server cert expires.
Server certificate preparation
Generate the RADIUS server certificate using one of the following approaches:
- Option A — External CSR: Generate a CSR on a workstation (OpenSSL, XCA) with the required Subject, SANs, KeyUsage (digitalSignature, keyEncipherment) and EKU (serverAuth), submit it to your CA, then combine the signed certificate, private key, and CA chain into a single PKCS#12 bundle.
- Option B — Issue directly from your CA: Issue the certificate directly from your CA (for example, an AD CS template configured for "Server Authentication") and export it together with the private key as PKCS#12.
Either way, the artifact you upload to Nile is a single password-protected .p12 / .pfx bundle containing:
- The server certificate
- It's matching the private key
- The signing CA chain (root and any intermediates)
CA chain for client certificate validation:
If your client certificates are issued by a different CA than the one that signed the Nile RADIUS server certificate, export the root and any intermediates of the client-issuing CA and upload them separately as PEM into the Trust Certificates section of Nile RADIUS. Each PEM file can contain one CA cert or multiple CA certs as concatenated PEM blocks; Nile internally chains them in the correct order regardless of upload order.
Multiple client-issuing CAs are supported — for example, IoT devices issued by one CA and laptops/phones issued by another. Upload each CA's chain, and Nile RADIUS will validate any client cert that terminates at one of the uploaded trust anchors.
Client requirements:
Each client device must:
- Trust the CA chain (root and intermediates) that signed the Nile RADIUS server certificate — install the chain in the device's trust store so the supplicant validates the RADIUS server during the EAP-TLS handshake.
- Present a valid client certificate whose chain terminates at one of the CAs uploaded to Nile RADIUS, with clientAuth EKU and the identity (typically CN=<user-or-device> and/or SAN email / UPN) you plan to match in your policies.
2.3 Intune Integration (Optional)
To enforce RADIUS authentication decisions based on device compliance — such as restricting corporate SSID access to Intune-managed or compliant devices only — integrate Intune with Nile RADIUS by following the steps outlined in the Intune Integration Guide
3. Configure the Nile RADIUS Service
This section configures Nile RADIUS itself and wires it into your segments, SSIDs, and policies.
3.1 Upload the Server Certificate and Trust Certificates
- Navigate to the Nile RADIUS configuration. In the Nile portal, go to Network Setup → Authentication → Nile RADIUS.

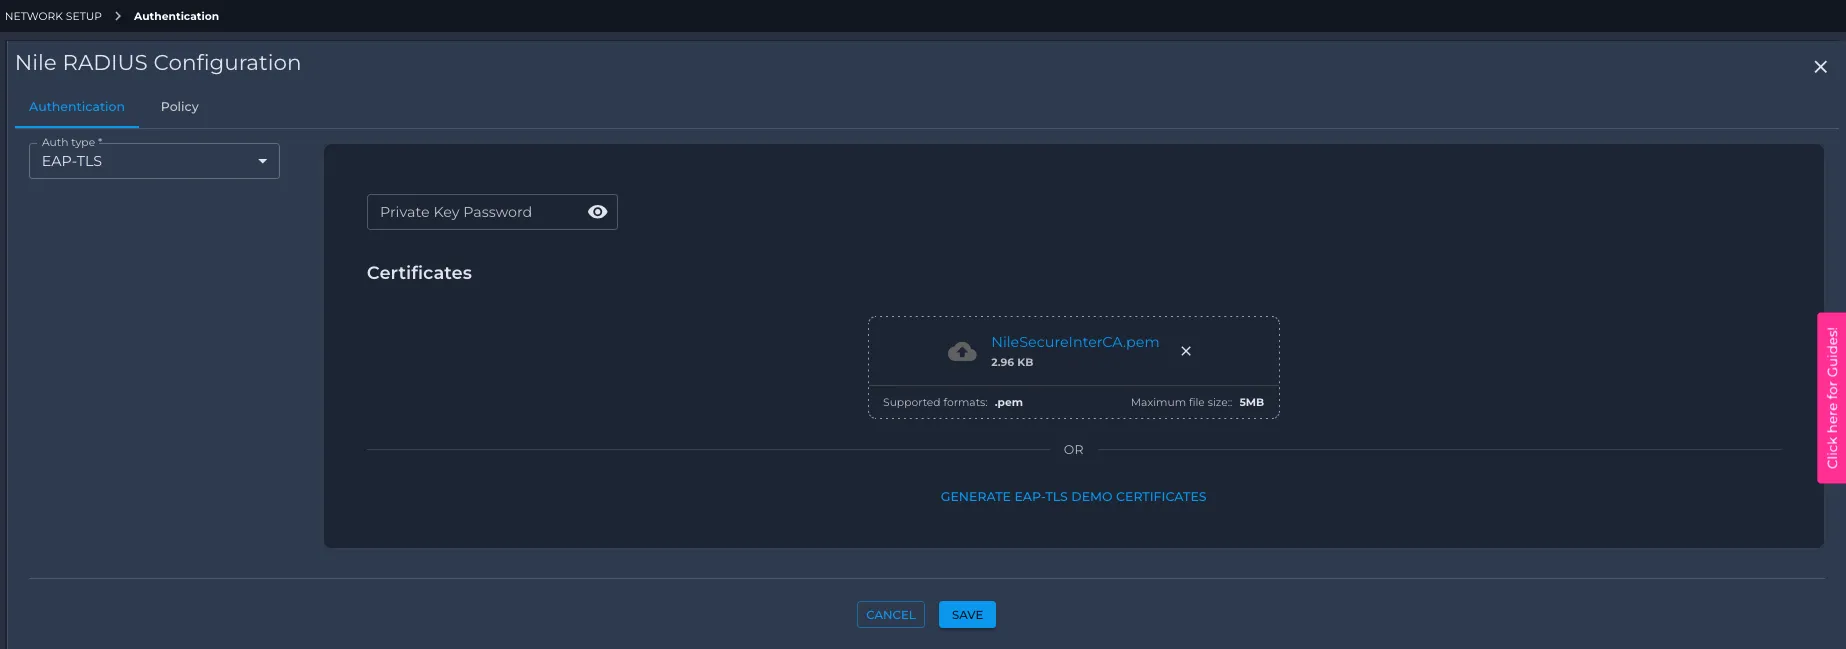
- Select the authentication type. Under Auth Type, choose EAP-TLS (the only production option today).
- Upload the server Certificate (PKCS#12)
- In the Server Certificate section, click Upload and select your .pkcs12 / .pfx bundle.
- Enter the password that protects the bundle. The password may contain letters and digits.
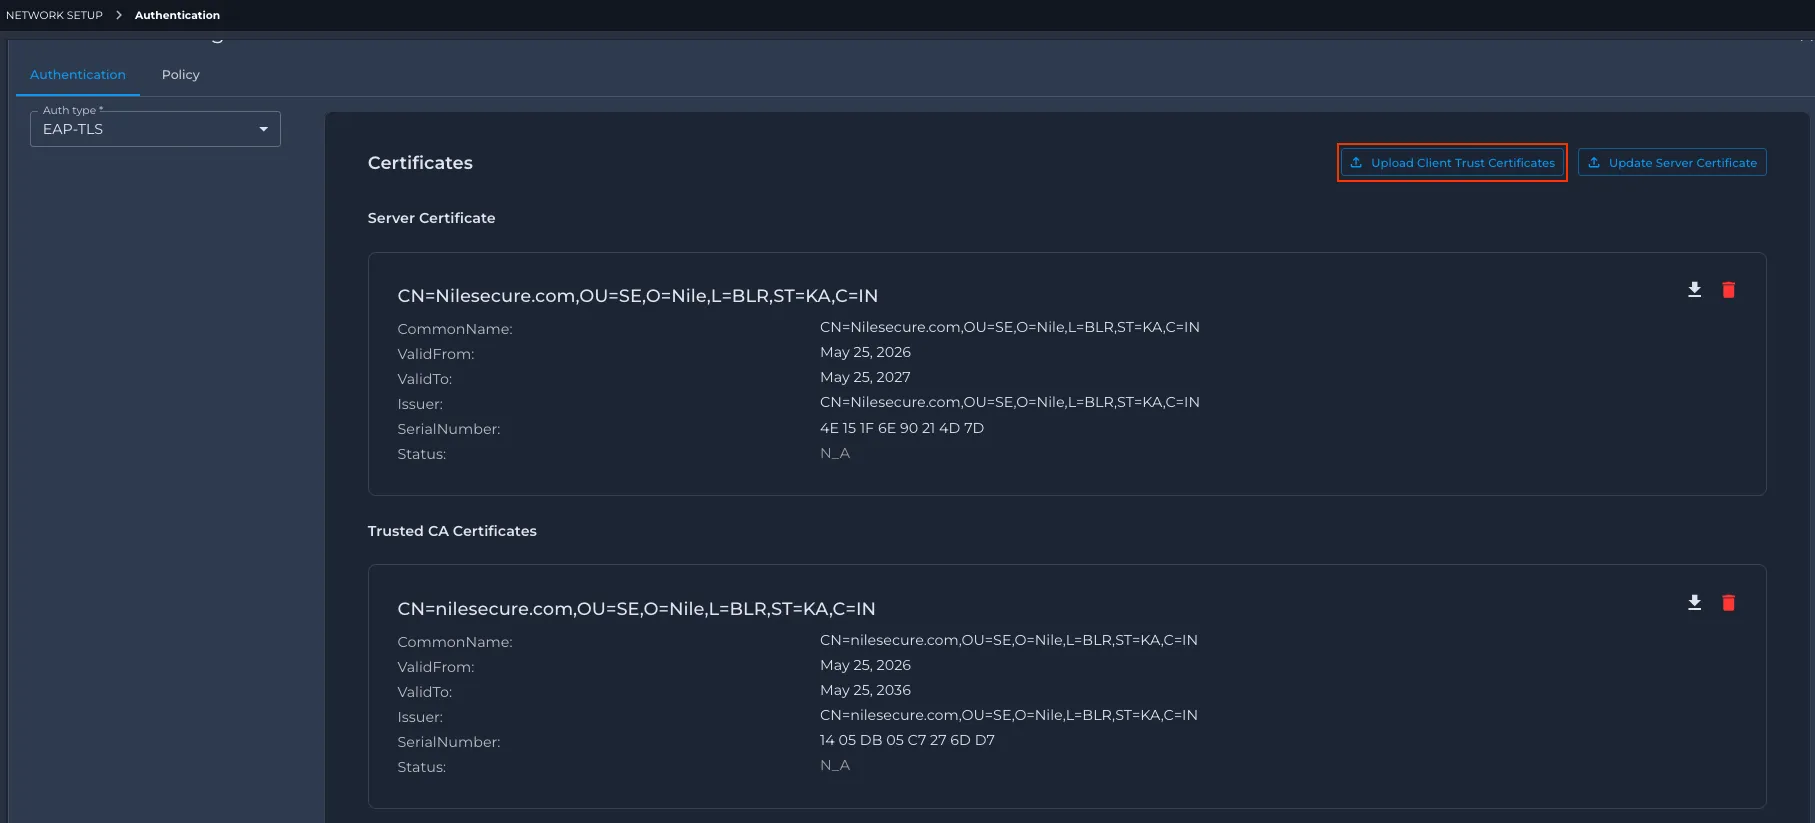
- On success, Nile parses the bundle and displays the server certificate Subject, SAN list, Issuer, and expiration date.
- Upload trusted client CAs (Trust Certificates). In the Trust Certificates section, upload one PEM file per client-issuing CA (or a single PEM containing multiple concatenated CA blocks). Repeat for each independent client CA chain. This step is required unless your client certificates are issued by the same CA that signed your server certificate (in which case, the chain is already present from step 3).
- Optionally, enable Demo Mode for evaluation only. Toggle Demo Mode to have Nile auto-generate:
- One RADIUS server certificate
- Three client certificates with the fixed identities sales, marketing, and hr (different CN/email, so different policies can be matched). The certificates are valid for 7 days and can be regenerated at any time. Demo Mode and production certificates are mutually exclusive — only one mode is active per tenant. Demo client certs are exported as .p12 bundles with no password (you do not set a password on the portal). Demo Mode is for PoC and lab validation only; production deployments must use your own PKI.
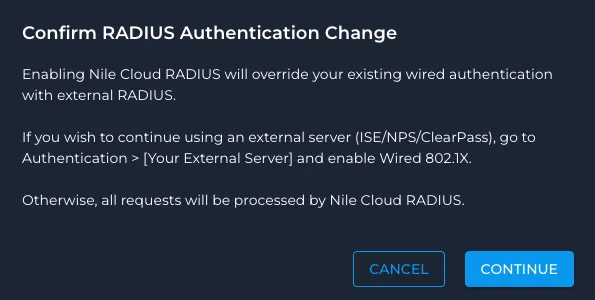
- Wired 802.1X: If you are co-existing with a legacy NAC (ISE / ClearPass) on wired ports, enable the Wired Dot1x checkbox to have Nile RADIUS take over wired 802.1X. Leave it unchecked to keep wired authentication on your legacy RADIUS while you cut over wireless first. Wireless authentication always follows the per-segment RADIUS server configuration.
- Save Click Save. Nile RADIUS is now ready to accept EAP-TLS authentications once segments and SSIDs are pointed at it.
3.2 Wire RADIUS into Segments and SSIDs
Nile RADIUS works alongside segments and SSIDs. There is no hard requirement to map an SSID to multiple segments or to slice users across multiple SCIM groups — a single-segment SSID with a single user group is a perfectly valid (and common) starting point. Use multiple segments or multiple groups only when you actually need differentiated access via RADIUS CoA.
Create or verify segments
- In the Nile portal, go to Network Setup → Segments and confirm that the segments you need exist. A typical greenfield deployment might start with just one or two:
- A single corporate segment (for example, corp), or
- A small set such as employee-prod, contractor, iot, guest if you already know you want differentiated access.
- Each segment must have:
- DHCP configuration (subnet, pool, lease, DNS).
- Optional mapping to downstream security constructs such as firewall zones.
Segments replace VLANs — each segment is an L3 subnet, and a device's segment assignment determines its IP, default gateway, and which Trust Engine policies apply.
Point segments at Nile RADIUS
- In each segment that requires 802.1X, set the authentication server to Nile RADIUS. (Segments that should continue to use an external RADIUS — ISE / ClearPass — keep their existing setting for hybrid migration.)
- Wireless SSIDs that use these segments will use Nile RADIUS automatically once the SSID security type is Enterprise (see below). Wired 802.1X on Nile switches follows the Wired Dot1x knob in section 3.1.
Configure SSIDs and wired access
- Wireless SSIDs
- Go to Network Setup → Wireless and create or edit your corporate SSID (for example, corp-dot1x).
- Set Security to WPA2-Enterprise (or WPA3-Enterprise where supported by your client fleet; WPA3-Enterprise requires ≥ 3072-bit RSA on the server cert).
- Map the SSID to at least one segment. The segment(s) mapped to an SSID determine the default landing zone for any device that gets an Access-Accept from Nile RADIUS:
- Single-segment SSID — every accepted device lands in that segment. No segment assignment is needed in the RADIUS policy; SCIM groups can still be used as match criteria for accept/reject decisions or Palo Alto tagging without changing the segment.
- Multi-segment SSID — devices land in the default segment configured on the SSID unless a Nile RADIUS policy explicitly overrides the segment as part of its Accept action. This is how you steer different SCIM groups, Intune compliance states, or certificate attributes into different segments behind a single SSID.
- Wired 802.1X
- Wired 802.1X follows the Wired Dot1x knob set in section 3.1 — no per-SSID configuration is needed.
- Each wired port (or port profile) is mapped to a segment that acts as the default for accepted devices. A RADIUS policy can override the segment when multiple segments are eligible, exactly as with wireless.
3.3 Policy Groups vs. RADIUS Policies — Understand the Distinction
This is the most common point of confusion when first configuring Nile RADIUS. Nile has two distinct policy frameworks that operate at different points in the flow:
Framework | Where it runs | What it decides | Typical match criteria | Typical actions |
|---|---|---|---|---|
Nile RADIUS policies | Inside the Nile RADIUS service, during the EAP-TLS authentication | Whether the device is allowed onto the network and which segment / tag it lands in | SSID, SCIM/IDP group, Intune compliance state, certificate CN/OU/SAN, MAC, "active user" flag | Accept + segment assignment, Accept + Palo Alto tag, Reject |
Nile Trust Engine policies | Inside the Nile Service Block, on every packet after the device is on the network | Whether traffic between two endpoints (east-west) or to/from the outside (north-south) is allowed, denied, or forwarded to an upstream firewall | Policy group membership (User / Device / App), source, destination, service profile | Allow, Deny, Forward to firewall / SSE |
You configure both, but they live in different places in the portal. Nile RADIUS policies live under Network Setup → Authentication → Nile RADIUS → Policies. Trust Engine constructs live under Security → Trust Engine.
For the rest of this guide:
- Section 3.4 covers Nile RADIUS policies — required for any RADIUS deployment.
- Section 3.5 explains how RADIUS-assigned segments feed into Trust Engine policy groups, and points you to the full Trust Service setup workflow.
3.4 Create Nile RADIUS Policies
Navigate to Network Setup → Authentication → Nile RADIUS → Policies and create one policy per authorization outcome you need. Policies are evaluated top-down at authentication time; place more specific policies first.
Each policy has:
- Name and description.
- Match expression — combine one or more of: SSID == "<name>", SCIM.Group == "<group>" or SCIM.Group in (...), Active == true, Intune.ComplianceStatus == "Compliant", Certificate.CN == "<value>" or Certificate.CN contains "<substring>", Certificate.OU == "<value>", Calling-Station-Id == "<mac>". Conditions can be combined with && / ||.
- Action — ACCEPT (with optional segment assignment, optional Palo Alto tag) or REJECT.
Example policies for the use cases in the Nile RADIUS docs:
Example A — Employees vs. contractors on the same corporate SSID
Example B — Disabled users are denied immediately
Because SCIM updates are pushed in near real time, a single policy that requires Active == true is enough — as soon as the user is disabled in the IdP, the next authentication fails.
Example C — IoT device segmentation by certificate CN
Example D — Palo Alto tag assignment for upstream firewall enforcement
The tag is delivered to the Palo Alto firewall via the XML API, so existing firewall policies that key on user-id tags work without modification.
RADIUS-derived user/device identity (the certificate CN, SCIM group, Intune state) is available in the Nile RADIUS transaction record and on the device's detail page in the portal — useful for validating that a given device matched the policy you expected.
3.5 Trust Engine Policy Groups for RADIUS-Authenticated Endpoints (Optional but Recommended)
After Nile RADIUS authorizes a device and assigns it to a segment, the Nile Trust Engine governs what that device can talk to — both east-west inside the Nile Service Block and north-south toward the internet, data center, or upstream firewall. Trust Engine policies are an entirely separate workflow from RADIUS policies and live under Security → Trust Engine.
For most RADIUS-driven deployments you will want to create:
- User policy groups matched on the same SCIM/IDP groups you use in RADIUS (for example, Employees, Contractors, Admins) — note that RADIUS-derived identity as a direct match criterion is on the roadmap; today the cleanest pattern is to align the segment that RADIUS assigns with a segment-based or IDP-group-based policy group.
- Device policy groups matched on fingerprint or segment (for example, Printers, Cameras) for IoT devices RADIUS placed into IoT segments.
- Service profiles defining the protocols and ports each group is allowed to use (for example, "Printing" = TCP/9100 only, "Internet" = HTTPS only).
- Policy sets binding source group → service profile → destination group with an action (Allow / Deny / Forward to firewall).
Trust Engine setup is its own end-to-end workflow that goes beyond the scope of a RADIUS guide. For the full step-by-step — creating policy groups, service profiles, policy sets, working with the matrix view, and reading policy logs — follow the Setup Guide for Nile Trust Service.
4. Endpoint Configuration — EAP-TLS
This section covers typical supplicant configuration. Cross-check with OS-specific docs for UI changes between releases. The recommended path for any fleet larger than a few devices is to push the Wi-Fi / wired profile and the client certificate together via MDM.
4.1 Windows — Wireless 802.1X (EAP-TLS)
Assuming the client certificate is deployed via Intune (or GPO / AD CS auto-enrollment):
- Confirm the target SSID is configured as WPA2-Enterprise (or WPA3-Enterprise) in Nile.
- On Windows:
- Ensure the WLAN AutoConfig service is running.
- Add or edit the wireless profile:
- Network name: match the SSID configured in Nile.
- Security type: WPA2-Enterprise.
- EAP method: Microsoft: Smart Card or other certificate (this is Windows' name for EAP-TLS).
- In the EAP-TLS settings, select Use a certificate on this computer and ensure the correct client certificate is available (issued by your CA, with clientAuth EKU).
- Enable Verify the server's identity by validating the certificate and select the root/intermediate CA(s) that signed your Nile RADIUS server certificate. Optionally tick Connect to these servers and list the SAN(s) on the Nile RADIUS server certificate.
- Connect and verify in the Nile portal that:
- The device appears under Devices with auth method EAP-TLS.
- The Nile RADIUS transaction log shows a successful EAP-TLS handshake and the expected policy match.
4.2 Windows — Wired 802.1X (EAP-TLS)
Wired 802.1X uses the same EAP-TLS method as wireless in the current release. EAP-PEAP support for wired AD-credential authentication is on the roadmap.
- Confirm the target switch port is configured for 802.1X in Nile (covered by the Wired Dot1x knob in section 3.1).
- On Windows:
- Open Network Connections, right-click the Ethernet adapter, and choose Properties.
- If the Authentication tab is missing, start the Wired AutoConfig service (services.msc) and re-open the adapter properties.
- On the Authentication tab:
- Enable IEEE 802.1X authentication.
- Set the network authentication method to Microsoft: Smart Card or other certificate (EAP-TLS).
- In Settings, select the correct client certificate and configure server validation against the CA that signed your Nile RADIUS server certificate.
- In Additional Settings, choose User authentication (or User or computer authentication depending on your cert template).
- Connect the cable and verify the device shows up under Devices in the Nile portal with a successful EAP-TLS transaction.
4.3 macOS, iOS, Android
Nile RADIUS terminates EAP-TLS using a standard supplicant flow, so any modern supplicant works. General guidance:
- Import the client certificate and private key into the system keychain (.p12 import on macOS / iOS; .pfx on Android).
- Configure the 802.1X profile to use EAP-TLS and select the imported identity.
- Enable server certificate validation against the Nile RADIUS server's CA chain.
- For fleets, push the Wi-Fi profile and the certificate together via MDM (Intune, Jamf, Workspace ONE) — manual configuration does not scale and is error-prone.
5. Validation and Troubleshooting
5.1 Verify 802.1X Activity in Nile
- In the Nile portal, go to Devices.
- Filter by MAC address or username to see:
- Authentication method (EAP-TLS).
- Segment assignment (matches the policy that fired).
- Recent events and timestamps.
- For the full RADIUS transaction (EAP method, certificate CN, matched policy, policy expression, returned attributes), open the device detail page and switch to the RADIUS tab, or use Infrastructure → Nile RADIUS → Monitoring for a service-wide view.
5.2 Common Issues and Checks
No device entry in Nile for the MAC address. The supplicant is not sending 802.1X at all. Check supplicant services (WLAN AutoConfig / Wired AutoConfig), the wireless/wired profile configuration, and that the SSID or port is 802.1X-enabled in Nile.
Wired device falls into MAB (MAC-auth) flow. This means 802.1X did not start or timed out, so the switch fell back to MAB. The device appears in the MAB pending list — fix the supplicant configuration and retry.
Upload error: "server certificate should have key encipherment enabled." The server certificate was issued without keyEncipherment in KeyUsage. Reissue the certificate with both digitalSignature and keyEncipherment (and EKU serverAuth), rebuild the PKCS#12, and re-upload.
Upload error: "wrong password." Re-type the PKCS#12 password rather than copy-pasting (some non-ASCII or whitespace characters break in the upload field). Verify the password independently with openssl pkcs12 -in <file>.p12 -info or certutil -p <password> -dump <file>.pfx.
Upload error: "This certificate already exists." The same server cert + CA chain has already been uploaded for this tenant (Nile deduplicates by SHA-256). Delete the old keystore before re-uploading, or skip the upload.
Could not verify Client Certificate. The client cert chains to a CA that is not in the Trust Certificates section. Upload the client-issuing CA (root + any intermediates) as PEM under Trust Certificates and retry.
NAK [25] or NAK [25 21] in logs. The supplicant is proposing PEAP (25) or PEAP/TTLS (25, 21) instead of EAP-TLS (13). Re-check the supplicant profile and switch the EAP method to EAP-TLS.
failed to verify certificate: x509: certificate has expired or is not yet valid. The client (or server) certificate has expired or has a notBefore in the future. Reissue or correct the system clock.
Server certificate validation fails on the client side. The supplicant does not trust the CA that issued the Nile RADIUS server cert. Install the CA root (and intermediates) into the device's trust store, and — if you ticked "Connect to these servers" — make sure the configured server name matches a SAN on the Nile RADIUS server certificate.
5.3 RADIUS Alerts
Nile automatically generates tenant-level RADIUS failure alerts when the percentage of clients seeing failures in a rolling 15-minute window crosses defined thresholds:
- 5–10% failure rate: low-severity alert
- 10–25% failure rate: medium-severity alert
- 25–100% failure rate: high-severity alert
Server certificate expiration alerts are raised 90, 60, 30, and 10 days before the cert expires. Plan renewal accordingly — Nile does not renew the cert for you.
Clicking an alert takes you directly to the Devices page filtered to the affected clients, simplifying bulk troubleshooting. Alerts auto-close once the failure rate drops below 5%.
6. Day-2 Operations and Monitoring
6.1 Continuous Monitoring
Nile RADIUS is:
- Probed every minute from every site for availability and round-trip latency.
- Backed by cloud-scale HA and auto-scaling infrastructure; failover is automatic and transparent to the NSB.
Use:
- Infrastructure → Nile RADIUS → Monitoring for service health, transaction rates, and latency.
- Device detail → RADIUS for per-session troubleshooting.
- Security → Trust Engine → Policy Logs to confirm which Trust Engine policy is being applied to traffic from a RADIUS-authenticated device once it is on the network.
6.2 What Happens When the Internet Goes Down
Existing authenticated sessions remain active. Devices continue roaming seamlessly thanks to locally cached PMK. New authentications and re-authentications fail until cloud connectivity is restored — plan supplicant session and reauth timers accordingly for sites with unreliable WAN.
6.3 Policy and Certificate Changes
When changing SCIM mappings, Intune integration, certificate-CN-based policies, or rolling out a new RADIUS server certificate:
- Stage changes on a single test segment or a subset of users / devices first.
- Use the RADIUS transaction logs to confirm the expected policy fires and the expected segment/tag is assigned.
- For new server certs, upload the new PKCS#12 alongside the existing one (where supported) or schedule the switch during a maintenance window — every active EAP-TLS session will need to reauthenticate against the new server cert chain.
- For new client-issuing CAs, upload the new CA's chain to the Trust Certificates section before any client begins presenting certs signed by it.
This guide provides step-by-step instructions for deploying the Nile RADIUS Service to enable secure 802.1X authentication on wired and wireless networks using EAP-TLS.
This guide covers:
- Configuring Nile RADIUS for certificate-based EAP-TLS authentication
- Uploading the required certificates — RADIUS server certificate, root CA, and optionally the client root CA (when the client and RADIUS server chain to different roots)
- Validating, monitoring, and troubleshooting RADIUS authentication end-to-end
1.2 Key Terminology
Use this section as a quick reference while reading the rest of the guide.
- Supplicant – Endpoint (e.g., laptop, phone, IoT device) running an 802.1X EAP client.
- Authenticator / NAS – Nile APs and switches (via the Nile Service Block / HE) that relay EAP to RADIUS.
- RADIUS Server – Nile RADIUS cloud service performing authentication and returning authorization attributes.
- EAP – Extensible Authentication Protocol, used over 802.1X.
- EAP‑TLS – Certificate‑based EAP method providing mutual TLS between client and RADIUS server; primary method in Nile RADIUS.
- Segment – Nile’s L3 construct replacing VLANs; segments map to subnets and define where endpoints land in the network.
- Policy Group – Logical grouping (User, Device, App, System) used by Trust Service to make access decisions.
- Service Profile – L4 service definition (protocol/ports), defining which traffic is allowed once a policy is “Allow” or “Forward”.
- Policy Set – An ordered collection of policies mapping source groups to destination groups with a Service Profile and action (Allow/Deny/Forward).
- SCIM – Standard used to sync identities and groups from IdPs (Azure AD/Entra ID, Okta) into Nile.
- Intune Compliance – Device compliance state retrieved from Microsoft Intune and usable in RADIUS policies.
1.3 Prerequisites
Before enabling Nile RADIUS, ensure the following:
- Nile Access Service deployed
- Sites onboarded, segments defined, and segments mapped to DHCP pools.
- Identity provider
- SAML/OIDC IdP (Azure AD, Okta) integrated for user SSO and SCIM group sync if needed.
- PKI and certificates for EAP‑TLS
- Nile RADIUS expects:
- A server certificate and corresponding private key for the RADIUS server.
- Key properties on that cert:
- KeyUsage: digitalSignature, keyEncipherment
- ExtendedKeyUsage (EKU): serverAuth
- SANs as required by the customer (optional, but if they want them, they must be in the CSR).
- The cert + private key is packaged into a PKCS#12 (.pfx / .p12) file, password-protected.
- The issuing CA chain (root + intermediates) is uploaded separately into the Nile RADIUS Trust Certificates section, as PEM blocks.
- Optional: Microsoft Intune integration
- Required if Intune compliance state will be part of RADIUS policies.
- Review Technical Documentation:
- Read the Nile Radius Documentation to understand key concepts
2. Getting Ready: Identity, Certificates, and Integrations
3.1 Identity Providers and SCIM
Integrate Nile with your IdP to sync user and group data into the platform:
- Identity sync via SCIM — Automatically sync user identities and group membership from Azure AD or Okta into Nile.
- Group-based policy assignment — Reference IdP groups (e.g., "Employees", "Contractors") directly in Nile policies for segment assignment and tagging.
- Real-time access revocation — When a user is disabled in the IdP, SCIM events instantly terminate active sessions and revoke network access.
For step-by-step integration instructions, refer to the relevant guide on Nile Docs.
3.2 Certificate Authority and PKI (for EAP‑TLS)
For EAP-TLS authentication, the customer is responsible for managing the full certificate lifecycle. This includes operating or leveraging an existing CA/PKI infrastructure and issuing client certificates to devices — typically via an MDM such as Microsoft Intune or equivalent.
Note: Nile does not manage certificate issuance or renewal.
Server Certificate Preparation
Obtain a signed server certificate for the Nile RADIUS server using one of the following methods:
- Option A: Generate a CSR externally and submit it to your CA for signing.
- Option B: Issue the server certificate directly from your existing CA.
Once signed, export the certificate in one of the following formats:
- A .p12 / .pfx bundle containing the signed server certificate, its encrypted private key, and the complete CA chain that signed it.
- Separately as the server certificate and root/intermediate CA certificates.
CA Chain for Client Certificate Validation
If the client certificates are issued by a different CA than the one that signed the Nile RADIUS server certificate, export the separate CA chain (root and any intermediates) that issues client certificates. This allows Nile RADIUS to validate client identity during authentication
Client Requirements
Each client device must:
- Trust the CA chain (root and intermediates) that signed the Nile RADIUS server certificate.
- Present a valid client certificate whose chain terminates at one of the uploaded trusted CAs.
3.3 Intune Integration (If applicable)
To enforce RADIUS authentication decisions based on device compliance — such as restricting corporate SSID access to Intune-managed or compliant devices only — integrate Intune with Nile RADIUS by following the steps outlined in the Intune Integration Guide
4. Step 1 – Configure Nile RADIUS Service
This step configures Nile RADIUS itself and wires it into your network context.
4.1 Enable Nile RADIUS for EAP‑TLS
- Navigate to the Nile RADIUS configuration
- In Portal, go to: Network Setup → Authentication → Nile RADIUS.
- Select authentication method
- Under Auth Type, choose EAP‑TLS (if not already selected).
- Upload certificates. Fill in the following fields:
- Server Certificate – Upload the X.509 certificate that Nile RADIUS will present to clients.
- Private Key – Upload the private key corresponding to the server certificate.
- CA Certificate (optional but recommended) – Upload the root and intermediate CA certificates used to issue client certificates so that Nile can validate client cert chains.
- Optionally Use Demo Mode for evaluation. Use this only for PoCs and lab validation; production deployments must use your own PKI.
- Toggle Demo Mode to have Nile automatically generate:
- One RADIUS server certificate
- Three client certificates (each with unique email identifiers), downloadable for testing
- Demo certificates are valid for 7 days, and you can regenerate them as needed.
- Only one mode (Demo vs Production certificates) can be active at a time.
- Please note that password encription is not supported for demo mode client certs.
- Save configuration
- Click Save. Nile RADIUS is now ready to accept EAP‑TLS authentications once wired into segments and SSIDs.
4.2 Enable Nile RADIUS for EAP‑PEAP with AD Integration
This section assumes you want to support username/password authentication against AD/LDAP using EAP‑PEAP/MSCHAPv2.
- Prepare AD / LDAP
- Ensure AD/LDAP is reachable from Nile RADIUS, and you have:
- LDAP URI (e.g., ldaps://dc1.example.com)
- Bind account (username + password)
- Base DN (e.g., DC=example,DC=com)
- Configure AD servers in Nile
- Define AD server objects in Nile (per existing AD integration workflow) and validate connectivity for each site.
- Configure EAP‑PEAP in the Nile RADIUS
- In Nile Control Center, navigate to: Network Setup → Authentication → Nile RADIUS.
- Under Auth Type, select EAP‑PEAP.
- In the Select AD Servers section:
- Choose one or more AD servers to associate with this configuration.
- Selected servers appear as tags in the field.
- Under the hood, configuration includes:
- LDAP URI
- LDAP Credentials (username/password)
- LDAP DN for user lookup
- Understand security properties
- Nile supports EAP‑PEAP MSCHAPv2 and integrates with your existing AD infrastructure.
- Nile RADIUS does not store passwords; it proxies authentication to AD.
- Save configuration
- Click Save. AD‑backed EAP‑PEAP is now enabled for 802.1X authentication.
4.3 Site‑Aware AD Routing (Optional)
If you operate per‑site AD servers, enable site‑aware AD:
- When this option is enabled, Nile RADIUS routes EAP‑PEAP requests to AD servers bound to the site the request originates from, improving latency and resilience.
You would typically enable this when:
- Large distributed deployment
- Different regions use local AD domain controllers
5. Step 2 – Map RADIUS to Segments and SSIDs
Nile RADIUS works hand‑in‑hand with segments and SSIDs.
5.1 Create/Verify Segments
- In Nile Control Center, ensure that segments exist for the desired logical zones, e.g.:
- employee-prod
- contractor
- camera
- guest
- Each segment should have:
- DHCP configuration (subnet, pool).
- Optional mapping to downstream security constructs (e.g., firewall zones).
Segments replace VLANs—each segment is essentially an L3 subnet.
5.2 Map Segments to Nile RADIUS
- For segments where access is controlled via 802.1X:
- Associate the segment with Nile RADIUS as the authentication backend.
- Ensure any legacy external RADIUS mappings (ISE/ClearPass) are updated or left in place only where you intentionally keep hybrid mode (see migration section).
5.3 Configure SSIDs and Wired Access
- Wireless SSIDs
- Go to Network Setup → Wireless.
- Create or edit a corporate SSID (e.g., corp-dot1x).
- Security: WPA2‑Enterprise (dot1x).
- Map SSID to one or more segments that will be used for RADIUS users.
- Wired 802.1X
- For wired ports, 802.1X behavior is controlled per port or per policy.
- Segment mapping is per port or per access profile; no SSID is needed.
When multiple segments are associated with a single SSID, segment selection is driven by authorization (SCIM groups, Intune compliance, certificate attributes, etc.) rather than static VLAN assignments.
6. Step 3 – Define Identity and Device Groups for RADIUS
This step mirrors the TS guide’s “Create Policy Group definitions”, but focuses on RADIUS‑driven identities.
6.1 RADIUS‑Relevant User Groups
Navigate to Security → Trust Engine → Policy Groups → User Groups.
Create user groups such as:
- Employees (EAP‑TLS)
- Match criteria: SCIM Group = Employees; optionally require Intune compliance = compliant.
- Contractors (EAP‑TLS or EAP‑PEAP)
- Match criteria: SCIM Group = Contractors; optionally separate segments from employees.
- AD Users (EAP‑PEAP)
- Match criteria: attributes from AD via SCIM or mapped attributes once AD integration is in place.
- Guests / BYOD
- Match criteria: segment or onboarding method (e.g., UPSK/self‑registration).
For each:
- Click + under User Groups.
- Fill Group Name, Description.
- Select Match Criteria (e.g., IdP Group, Segment).
- Enter one or more Values.
- Click Create.
6.2 Device and Application Groups
For IoT and infrastructure devices authenticated via 802.1X (often using EAP‑TLS):
- Device Groups – e.g., Printers, Cameras, Zoom Rooms
- Match by fingerprint, segment, or certificate attributes (e.g., CN contains “camera”).
- Application Groups – e.g., DVR, Call Manager
- Match by IP/Subnet.
The UI workflow is analogous to the TS guide:
- Navigation: Security → Trust Engine → Policy Groups → Device Groups or App Groups.
- Click +; fill name/description.
- Choose Match Criteria (fingerprint, segment, IP/subnet, etc.).
- Enter values, then Create.
7. Step 4 – Configure RADIUS‑Aware Policies
Policies tie together:
- Source groups (users/devices)
- Destination groups (apps/segments)
- Service Profiles (allowed protocols)
- Actions (Allow / Deny / Forward)
7.1 Create Service Profiles
Navigate to Security → Service Profiles.
Create profiles such as:
- Employee‑Internet‑Only
- Allows HTTPS (TCP 443) and denies all else.
- Camera‑to‑VMS
- Allows only necessary protocols/ports between cameras and the VMS.
- Employee‑Full‑Corp
- Allows a broader set (e.g., HTTPS, SSH, RDP, database ports) as appropriate.
The general workflow:
- Click + to create a Service Profile.
- Enter Name and Description.
- Add rules specifying Name, Protocol, Port(s), and Action (Allow/Deny).
- End with a Deny All rule to enforce least privilege.
7.2 Create Policy Sets for RADIUS Users
Navigate to Security → Trust Engine → Policy Sets.
You can create policies either via the list view or the global matrix.
Example policy set for EAP‑TLS users:
- Employees (EAP‑TLS) → Intranet Apps → Employee‑Full‑Corp → Allow
- Employees (EAP‑TLS) → Internet → Employee‑Internet‑Only → Allow
- Contractors → Intranet Apps → Deny
- Contractors → Internet → Employee‑Internet‑Only → Allow
Each policy is created via a wizard:
- Basic Information – Policy name + description.
- Source & Destination – Select the source group and destination group.
- Action & Service Profile – Choose Allow/Deny/Forward, select Service Profile.
- Review & Save – Confirm and save.
Default‑deny: Ensure that flows you want to permit are explicitly covered; otherwise, they will be denied.
8. Endpoint Configuration – EAP‑TLS and EAP‑PEAP
This section covers typical supplicant configuration steps. Always cross‑check with OS‑specific docs for UI changes.
8.1 Windows – Wireless 802.1X (EAP‑TLS)
Assuming certificates are deployed via MDM:
- Confirm the target SSID is configured as WPA2‑Enterprise in Nile.
- On Windows:
- Ensure WLAN AutoConfig service is running.
- Add or edit the wireless profile:
- Network name: match SSID in Nile.
- Security type: 802.1X / WPA2‑Enterprise.
- Under Security:
- Choose an EAP method appropriate for EAP‑TLS (e.g., “Smart Card or other certificate” or “EAP‑TLS” depending on OS version).
- Ensure the correct client certificate is selected.
- Configure server validation to trust the CA that issued the Nile RADIUS server certificate.
- Connect and verify that:
- The device appears under Devices in Nile with EAP‑TLS.
- RADIUS logs show a successful EAP‑TLS handshake.
8.2 Windows – Wireless 802.1X (EAP‑PEAP)
Based on Nile’s troubleshooting docs for wireless 802.1X with PEAP:
- Make sure the SSID is configured as WPA2‑Enterprise in Nile.
- On the Windows client:
- Check the WLAN AutoConfig service is running.
- From Control Panel → Network and Sharing Center:
- Choose Set up a new connection or network.
- Select Manually connect to a wireless network.
- Enter:
- Network name: SSID from Nile.
- Security type: 802.1X.
- After creating the profile, open its Properties → Security tab:
- Choose network authentication method: Microsoft Protected EAP (PEAP).
- Click Settings:
- Inner method: Secured password (EAP‑MSCHAPv2).
- Click Advanced settings:
- Authentication mode: User authentication.
- Attempt connection and verify successful PEAP authentication in Nile Devices and RADIUS logs.
8.3 Windows – Wired 802.1X (EAP‑PEAP)
From Nile’s wired 802.1X troubleshooting guide:
- Ensure that the relevant switch port is configured for 802.1X in Nile.
- On Windows:
- Open Network Connections, right‑click the Ethernet adapter, and choose Properties.
- If the Authentication tab is missing:
- Start the Wired AutoConfig service (services.msc).
- Re‑open the adapter properties; the Authentication tab should appear.
- On the Authentication tab:
- Enable IEEE 802.1X authentication.
- Set the network authentication method to Microsoft Protected EAP (PEAP).
- In PEAP settings, choose Secured password (EAP‑MSCHAPv2).
- In Advanced settings, select User authentication only.
- Connect the cable and verify 802.1X success in Nile’s Devices view and events.
8.4 macOS, iOS, Android
Nile docs reference macOS native supplicants but generally defer to vendor documentation.
General guidance:
- EAP‑TLS:
- Import the client certificate and private key into the system keychain.
- Configure the 802.1X profile to use TLS or “Certificate” authentication and select the identity.
- Enable server certificate validation against your Nile RADIUS server CA.
- EAP‑PEAP:
- Configure the Wi‑Fi network with PEAP and inner MSCHAPv2.
- Ensure server certificate validation is enabled and trusts your Nile RADIUS server CA.
For large fleets, use MDM (e.g., Intune, Jamf) to push Wi‑Fi profiles.
9. Validation and Troubleshooting
9.1 Verifying 802.1X Activity in Nile
- In the Nile Control Center, go to Devices.
- Filter by MAC address or username to see:
- Authentication method (EAP‑TLS vs EAP‑PEAP).
- Segment assignment.
- Recent events and timestamps.
- For deeper policy‑layer validation, use Security → Trust Engine → Policy Logs to see:
- Source/destination groups
- Applied Service Profile
- Action (Allow / Deny / Forward)
- Flow metadata (IPs, ports, timestamps)
9.2 Common Issues and Checks
No device entry in Nile for the MAC address
- Indicates the supplicant is not sending 802.1X at all.
- Check supplicant services (WLAN/Wired AutoConfig), profile configuration, and that the SSID/port is 802.1X‑enabled.
Wired device falls into MAB (MAC‑auth) flow
- Mean 802.1X failed to start; the device shows up in the MAB pending list.
- Fix the wired supplicant configuration and retry.
Certificate‑related failures (EAP‑TLS)
- Confirm:
- Correct CA chain uploaded to Nile RADIUS.
- Client certs issued by one of these CAs.
- Clients trust the RADIUS server certificate chain.
Username/password failures (EAP‑PEAP)
- Check Nile RADIUS → AD connectivity.
- Verify user credentials against AD.
- Ensure correct AD servers and site‑aware settings are chosen in Nile.
9.3 RADIUS Alerts
Nile automatically generates RADIUS failure alerts when a significant percentage of clients see failures in a rolling 15‑minute window:
- 5–10% failures: “RADIUS alert 5% ≤ clients < 10% …”
- 10–25% failures: “RADIUS alert 10% ≤ clients < 25% …”
- 25–100% failures: “RADIUS alert 25% ≤ clients ≤ 100% …”
Clicking an alert takes you directly to the Devices page filtered to affected clients, simplifying bulk troubleshooting.
Alerts auto‑close when failures drop below 5%.
10. Day‑2 Operations and Monitoring
10.1 Continuous Monitoring
Nile RADIUS is:
- Monitored regularly from every site for availability and performance.
- Backed by cloud‑scale HA and auto‑scaling infrastructure.
Use:
- RADIUS monitoring pages and device session views to troubleshoot individual logins.
- Policy Logs to understand segment and policy assignment decisions.
10.2 Policy Changes and Audits
When changing SCIM mappings, Intune usage, or certificate mappings (CN/OU‑based policies), always:
- Stage changes in a limited scope (test site or subset of groups).
- Use logs to verify correct behavior before broad rollout.
10.3 Handling Non‑802.1X or Headless Devices
For devices that cannot run 802.1X:
- Use UPSK and Self‑Registration:
- Headless devices can be onboarded with per‑device pre‑shared keys.
- UPSK can work with external RADIUS (e.g., ISE/ClearPass) or Nile Cloud RADIUS as a backend.
This allows Nile RADIUS to focus on 802.1X‑capable endpoints while still securing legacy or constrained devices.
11. Migration and Co‑Existence with Legacy NAC
Many customers migrate from Cisco ISE, Aruba ClearPass, or similar legacy NAC solutions.
11.1 Migration Patterns
Wireless
- New sites: map SSIDs directly to Nile RADIUS from day one.
- Existing sites: keep SSIDs mapped to legacy RADIUS until ready; migrate site‑by‑site.
Wired
- Use the “wired dot1x” option (where available) to choose whether legacy NAC or Nile RADIUS handles wired 802.1X, enabling controlled migration rather than big‑bang cutovers.
11.2 Reusing Legacy Policies
External integration docs (ISE/ClearPass) show how:
- Legacy NAC returns Nile VSAs like netseg to drive segment assignment.
- BYOD flows can start with EAP‑PEAP for onboarding and move to EAP‑TLS once certs are installed.
When you move to Nile RADIUS:
- The same segment semantics are reused; only the control point (who runs RADIUS and where policies are evaluated) changes.