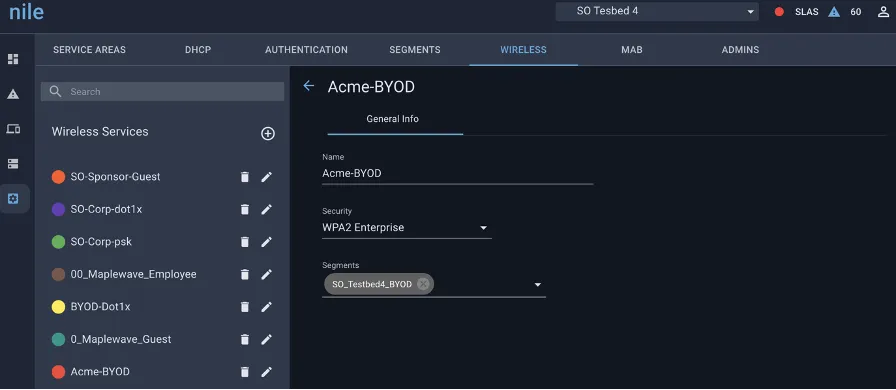
Cisco Identity Service Engine (ISE) - RADIUS
Introduction
This document describes Cisco Identity Services Engine (ISE) integration configuration with Nile Service Blocks (NSB).
Overview
Cisco Identity Services Engine (ISE) is an identity-based network access control and policy enforcement system. Nile service Block can be integrated with ISE using RADIUS protocol for Wireless authentication 802.1x, MAB, Guest Portal and BYOD Certificate of Authenticity (CoA) authentication.
Prerequisites
- Cisco Identity Services Engine (ISE) version 2.7 or higher.
- Connectivity between Nile Gateway over RADIUS port and ISE.
1) ISE pre-configurations
a) Import Nile vendor dictionary
- Add the VSA dictionary tells Cisco ISE how to send attributes Nile understands.
- Copy the contents below into a text file and save it as “Nile.dictionary” to create a Microsoft Personal Dictionary file.
To import the file:
- Login to ISE GUI as an administrator.
- Navigate to Policy menu > Policy Elements > Dictionaries > RADIUS > RADIUS Vendors then Click Import button.
- Click Browse to choose the “Nile.dictionary” from the file system running on your client browser.
- Click Import to import the Nile vendor dictionary.
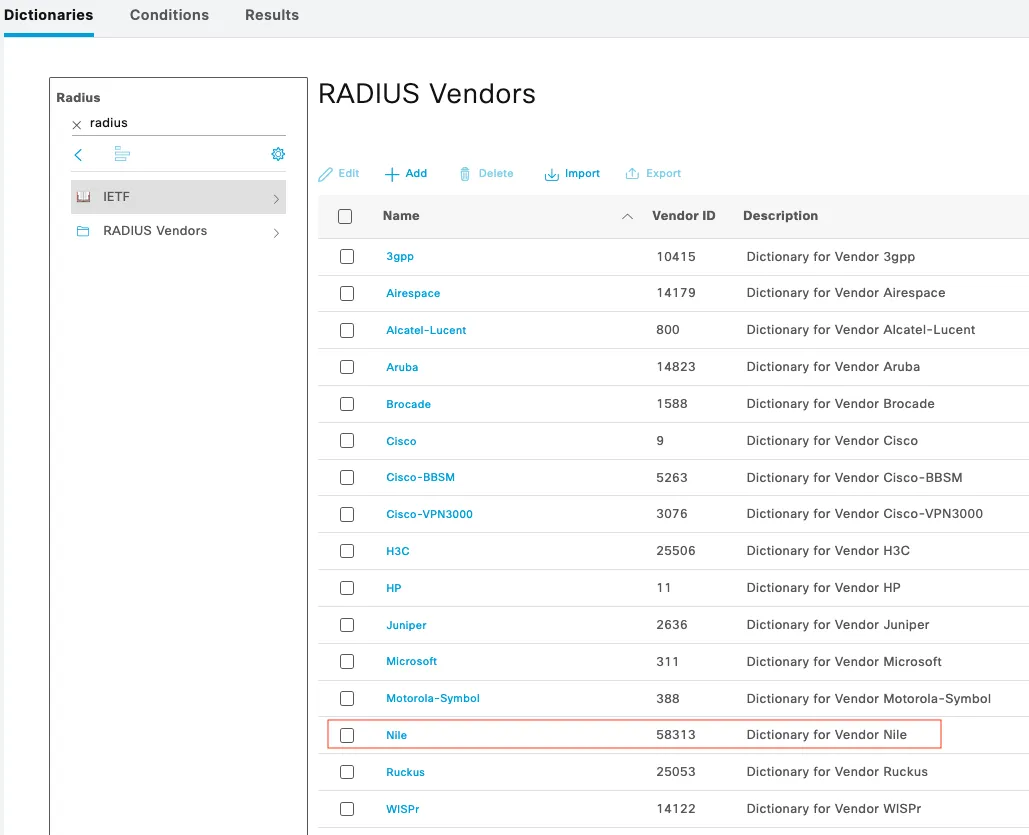
- Expand RADIUS and select RADIUS Vendors as in below screenshot and verify Nile dictionary is listed under RADIUS vendors list.
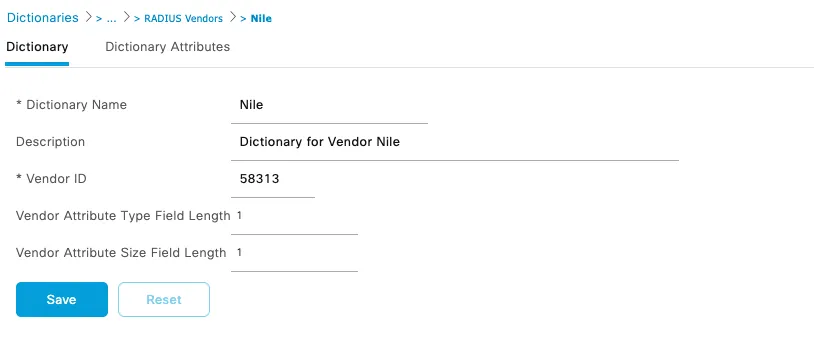
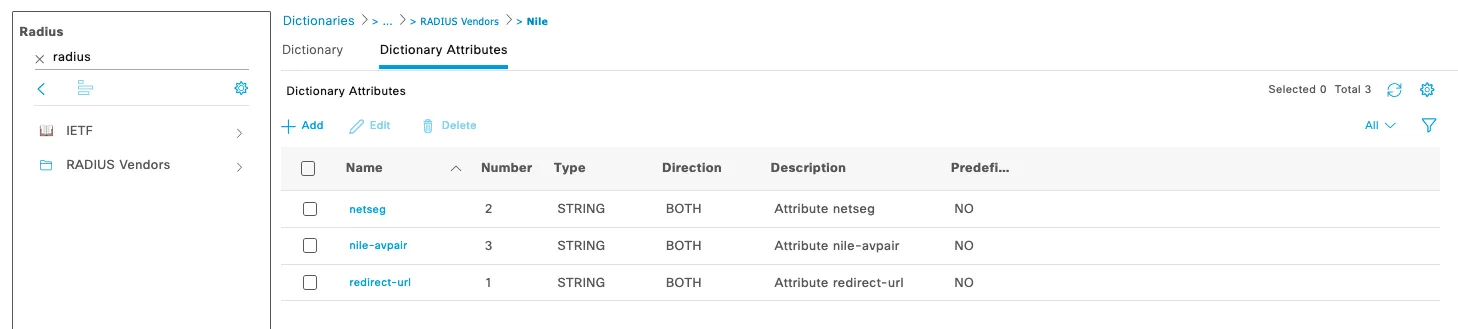
- Double-click the Nile VSA file and verify that its attributes match those shown in the screenshots below.
b) Add a new RADIUS network device profile
A Network Device Profile tells ISE if there are vendor specific configurations (like a VSA dictionary) that should be used when communicating with an 802.1X authenticator (i.e. Nile HE).
- Login to ISE GUI as an administrator.
- Navigate to Administration > Network Resources > Network Device Profiles.
- Add a new device profile using the configuration paramaters highlighted in below screenshot.
Note: If a dropdown is unavailable for any parameter, manually enter the value to match the screenshots provided below.
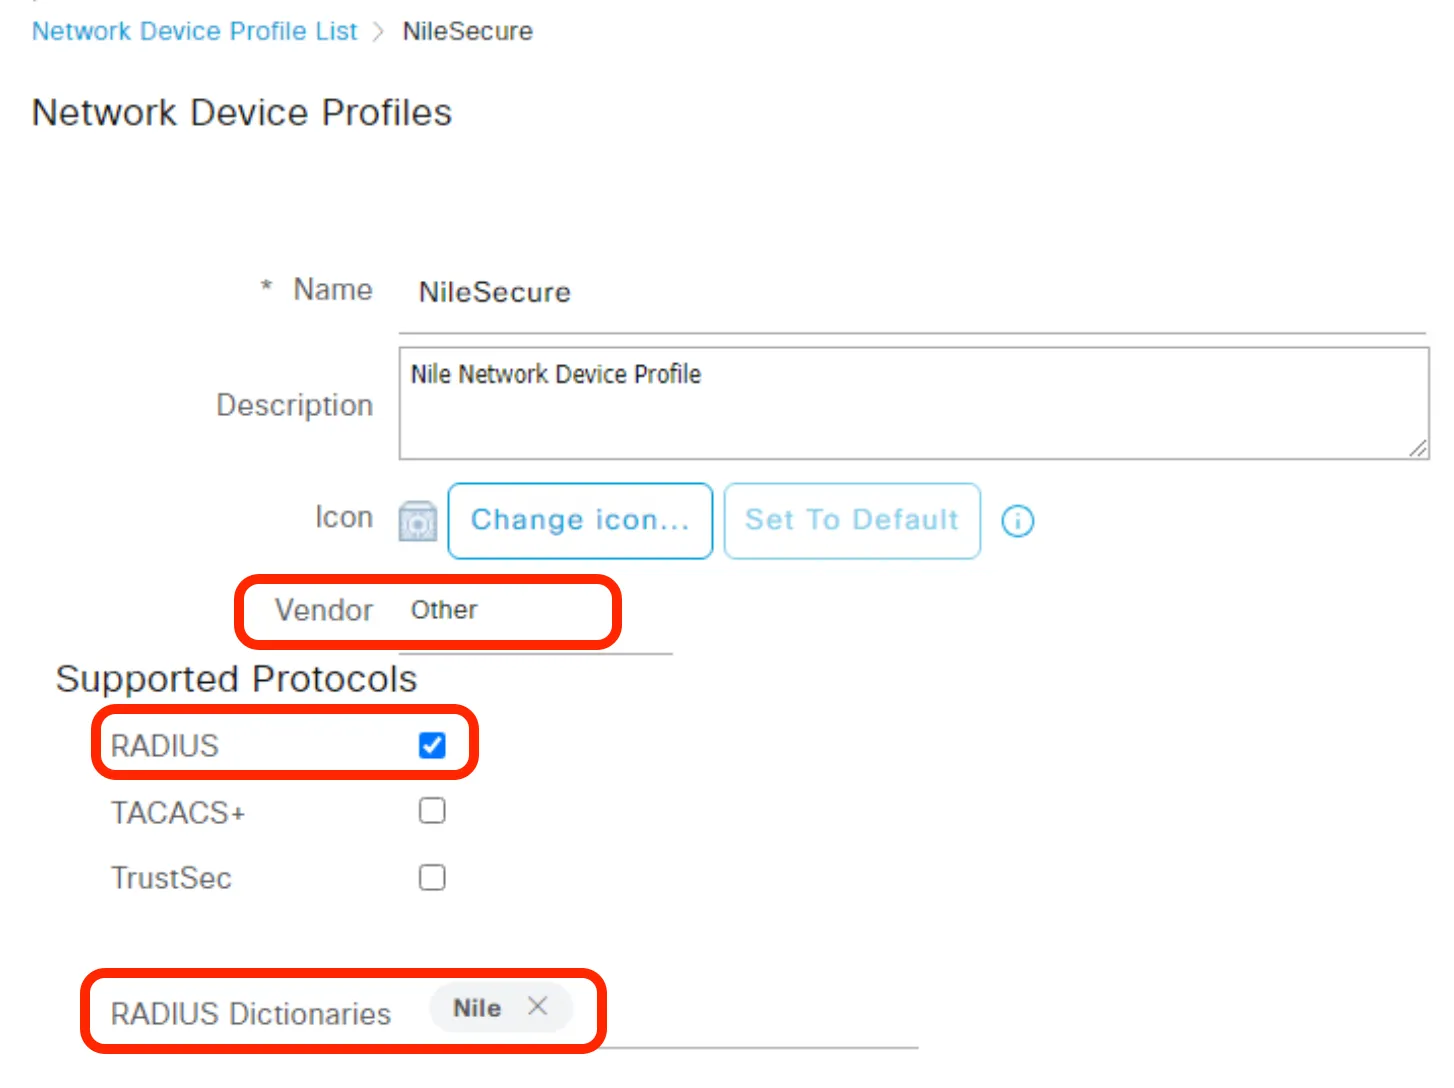
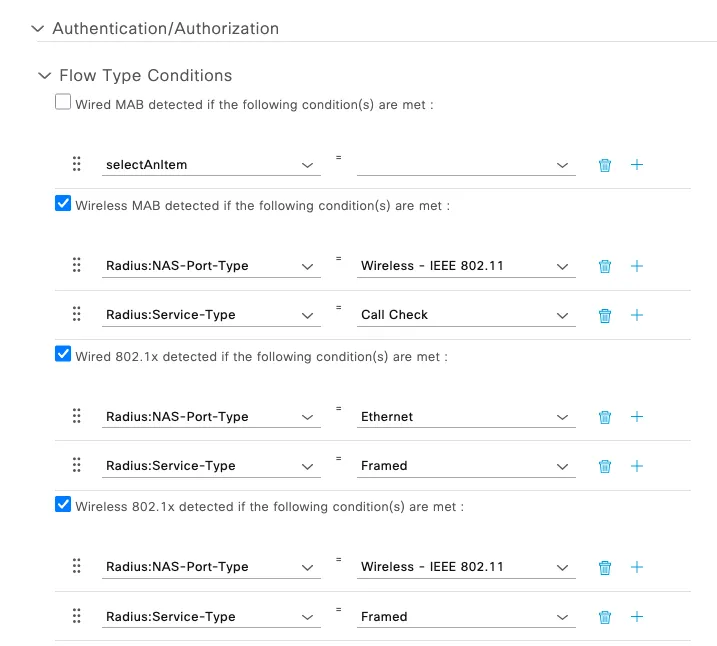
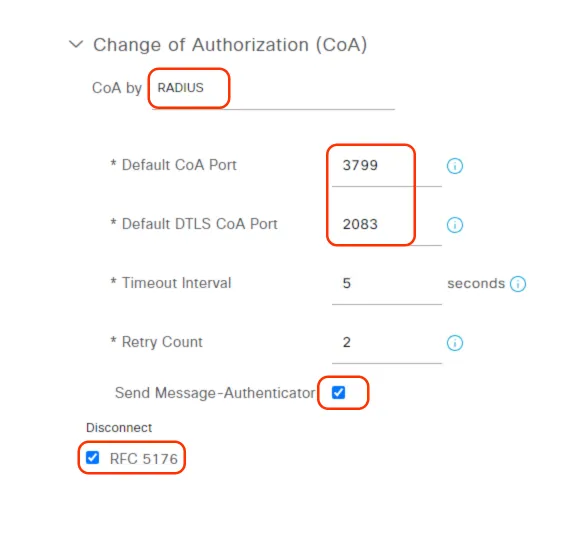
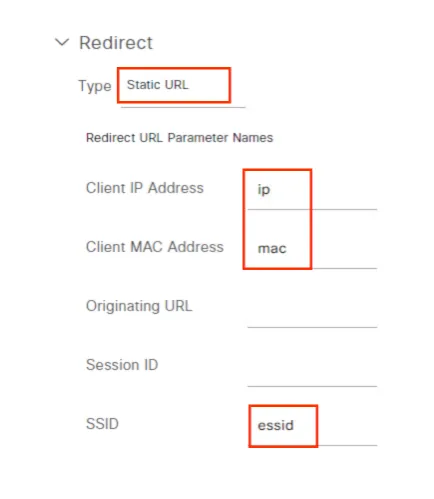
- Verify that the summary matches the below screenshot, then click Save to store the profile.
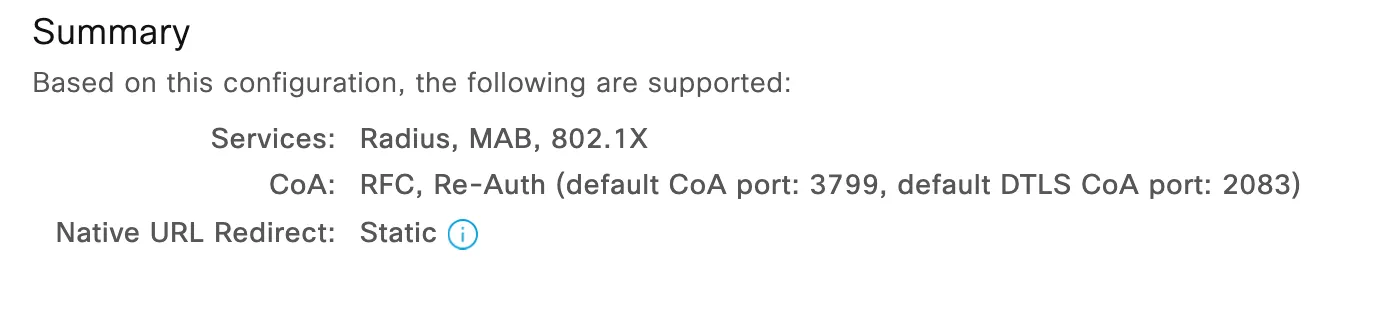
c) Enable MS-CHAPv2 as an allowed protocol on ISE
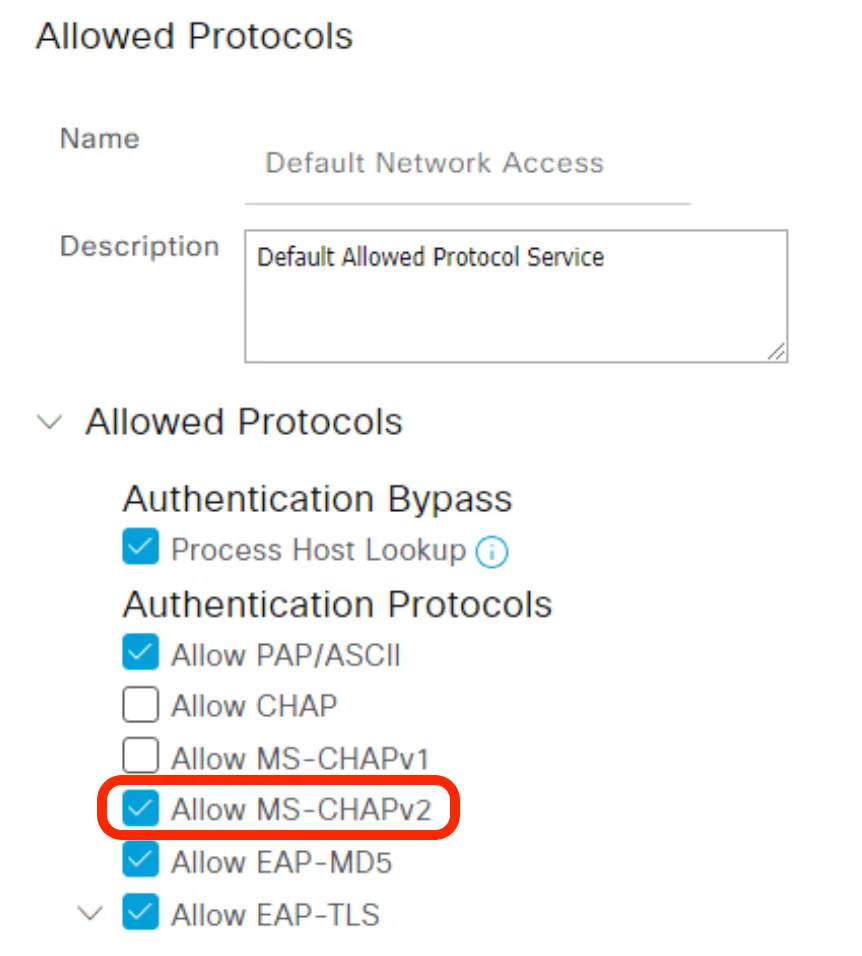
MS-CHAPv2 is required for the Nile portal to monitor a configured ISE server.
- From ISE GUI, Naviate to Policy > Policy Elements > Results > Authentication > Allowed Protocols > Default Network Access > Make sure that MS-CHAPv2 is allowed.
2) ISE Integration
a) Add Nile gateway to ISE
To proceed with this step, you will need the Nile HE IP address.
- The IP address for the Nile HE, required for ISE configuration, can be found in the Authentication settings when adding a new RADIUS server in the Nile portal. Click the "Display NAS IP's" button to view it.
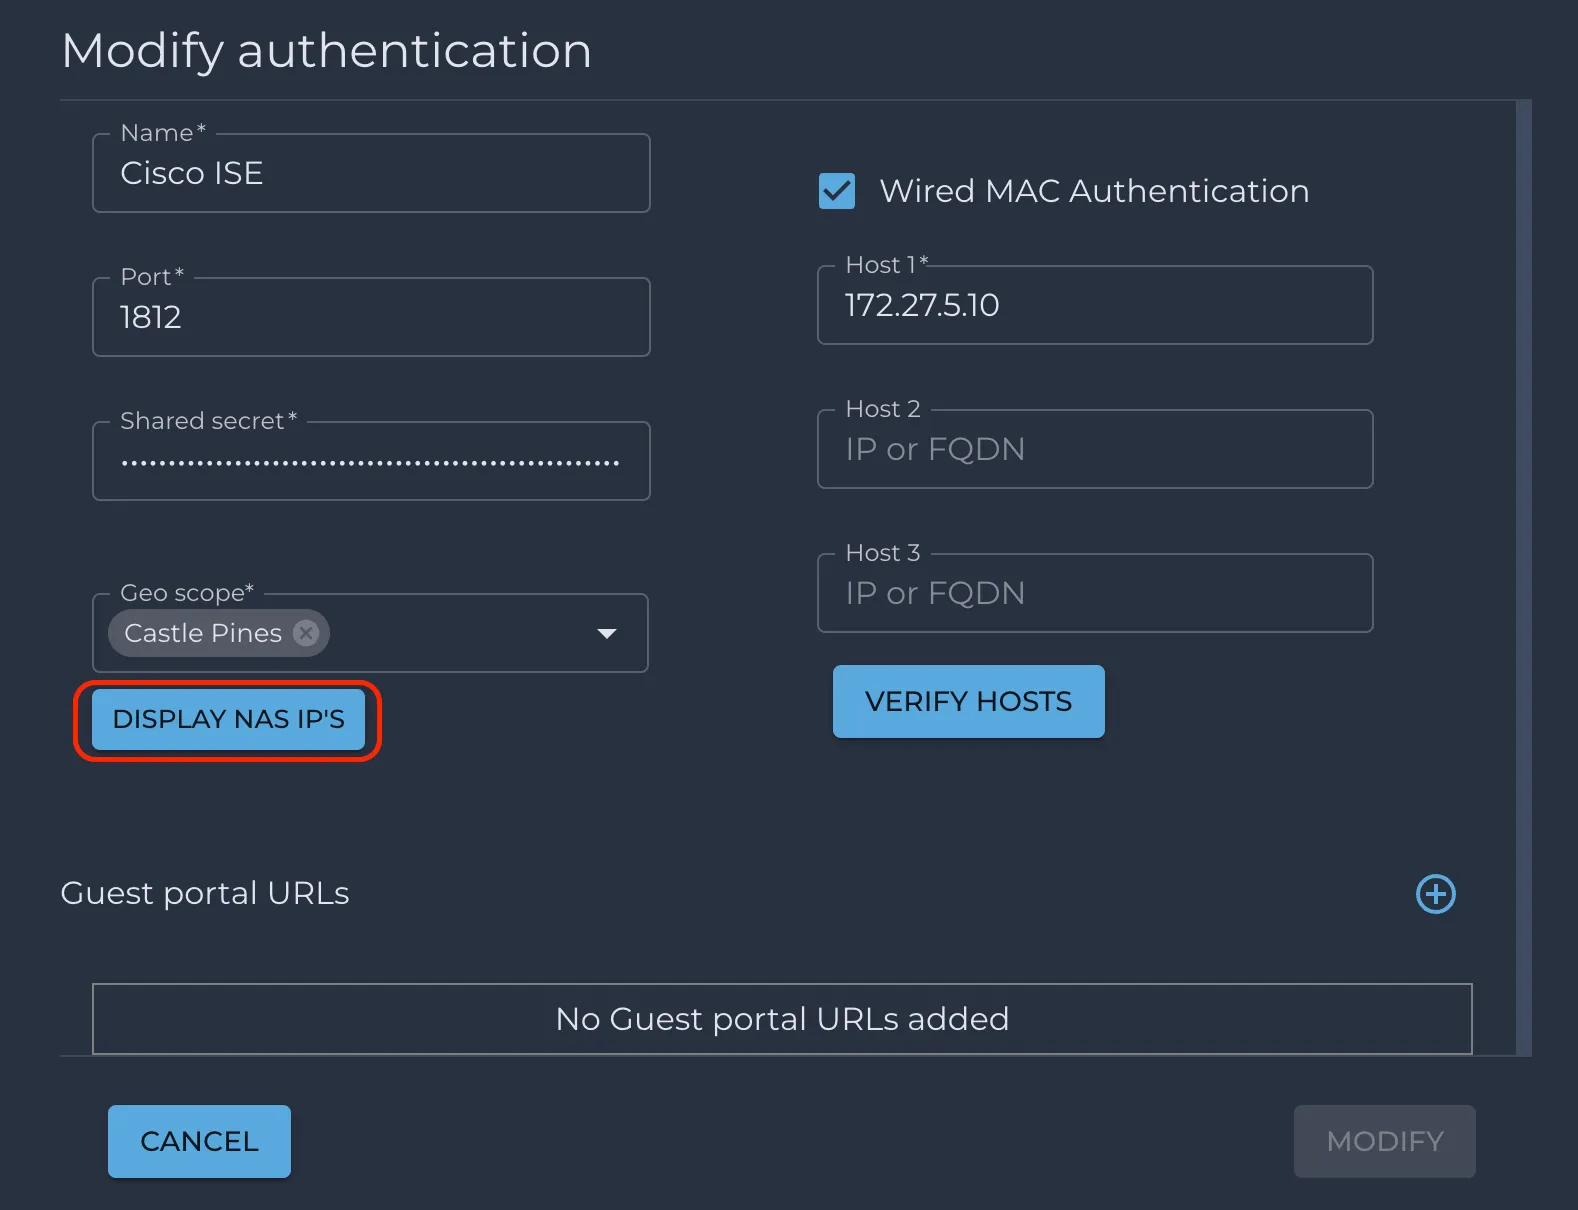
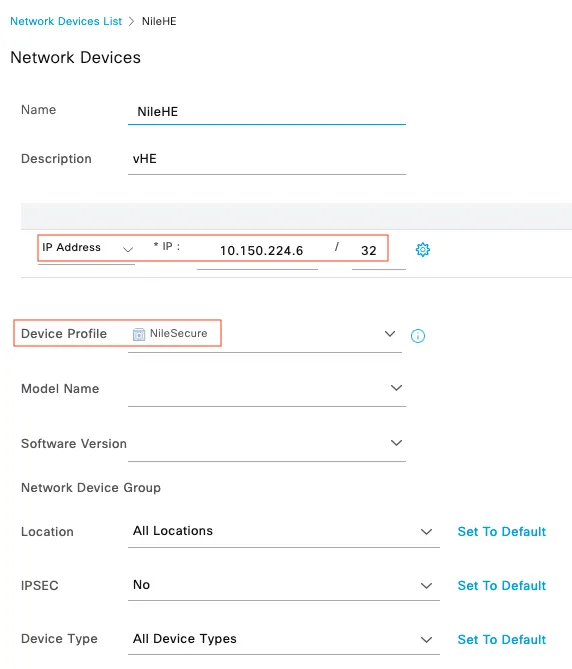
- From within ISE GUI, Navigate to Administration > Network Resources > Network Devices and Click on 'Add'.
- Configure the Nile Gateway as the network device, using the network device profile Nile created in the previous step. Refer to following screen for other parameters.
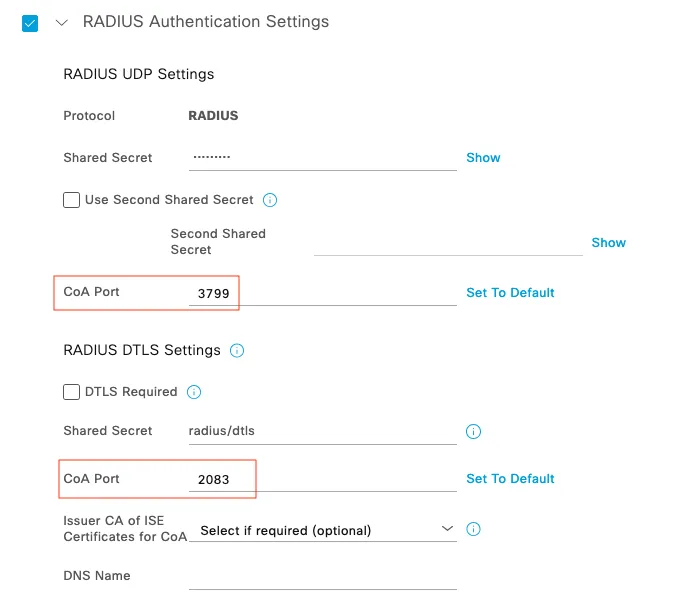
b) Add RADIUS (ISE) to Nile portal
This section describes the Nile Portal's configuration to add RADIUS.
Create a radius configuration on the Nile Portal as following:
- Login to the Nile Portal > Click on the Settings icon > Navigate to the Authentication tab.
- Click on the ‘+’ sign to create a radius entry for the ISE server.
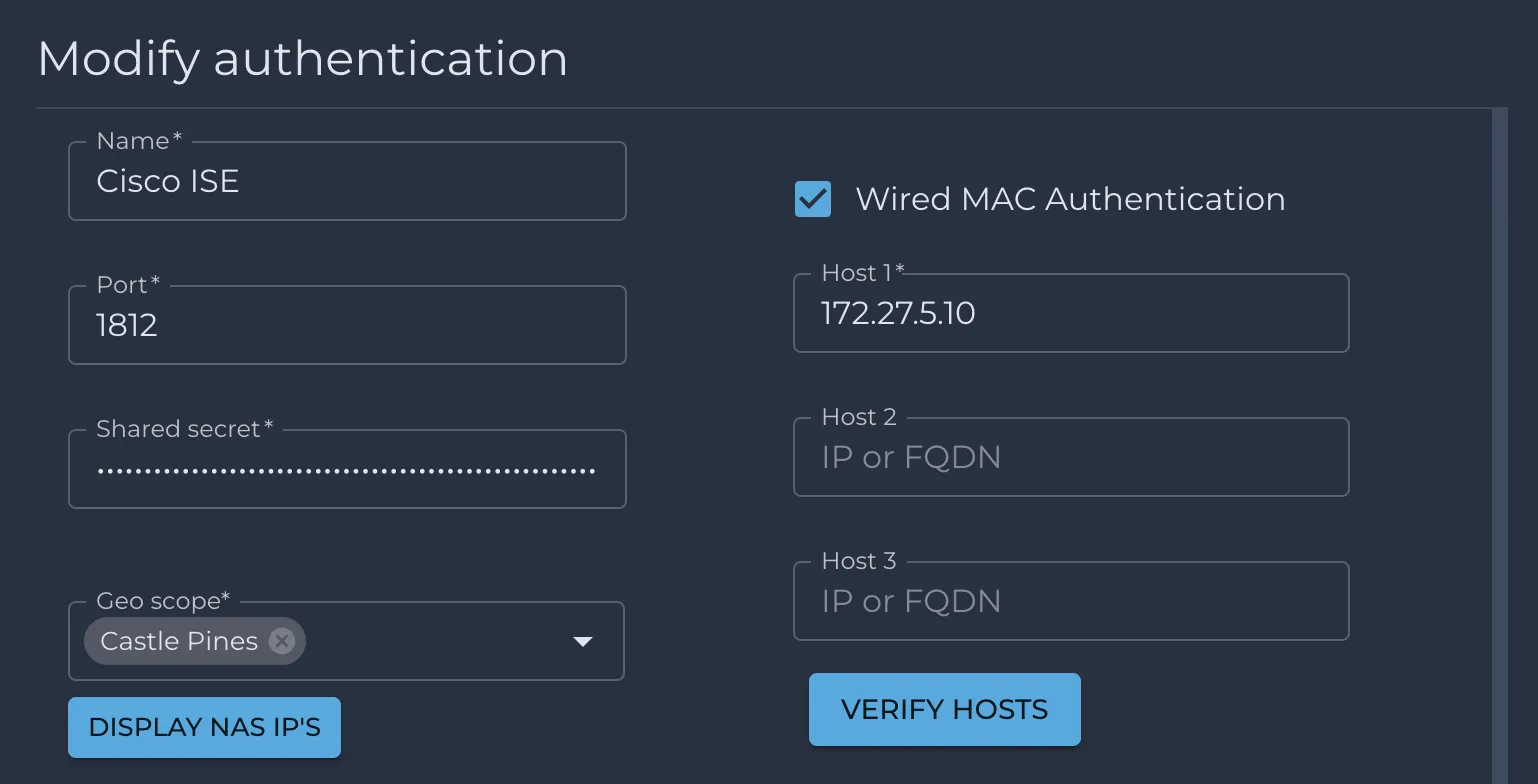
Note: The user shown here, “nilestatus” is used by the Nile Portal to poll ISE availability and latency every one-minute interval. This user must exist in an identity store supported by ISE. The typical approach for a demo is to use the local ISE user identity store and create this user within it.
3) Use case - Wireless/Wired 802.1X Authentication
a) Create ISE Authentication/Authorization policy
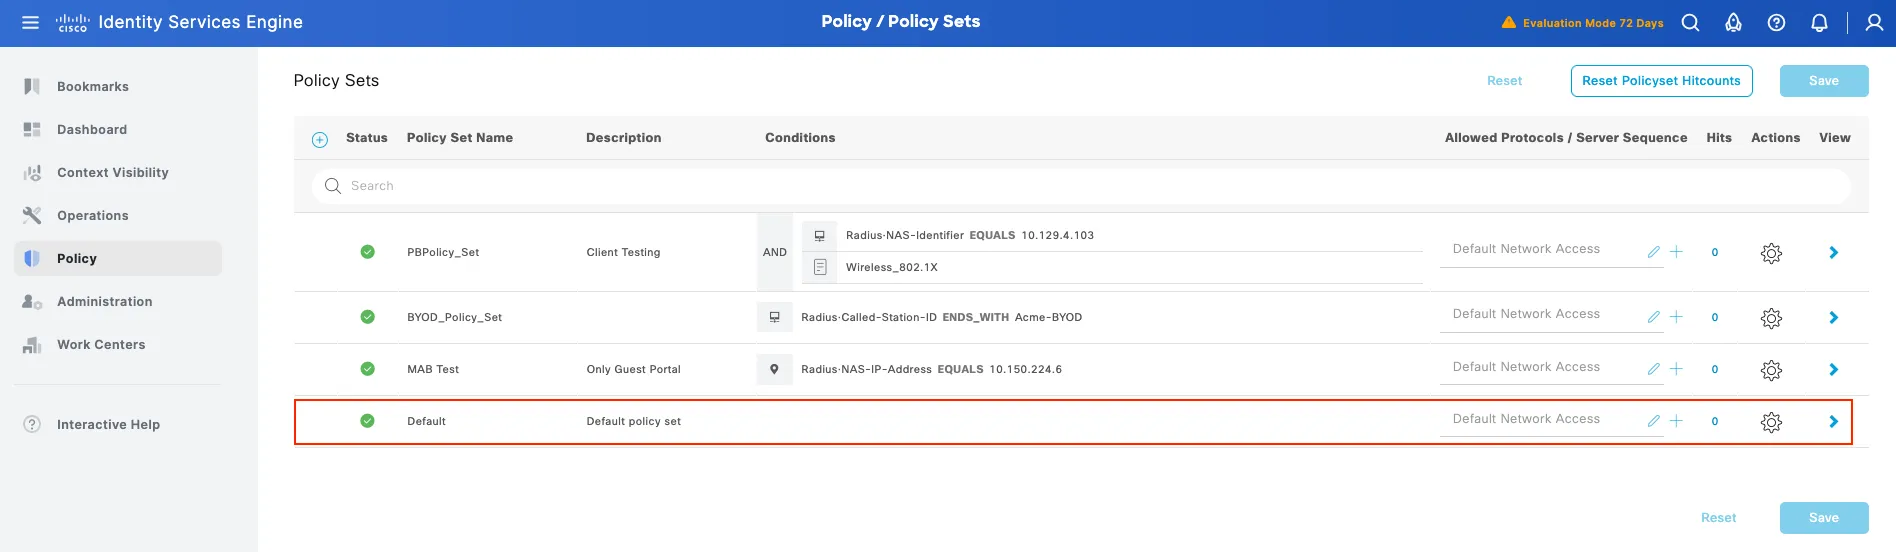
- From ISE GUI, Navigate to Policy > Policy Sets > select Default, Click on the right side ‘>’ to expand the default policy set.
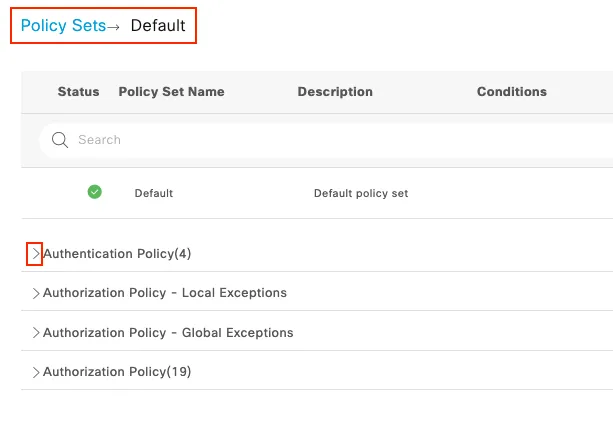
- Click on left side ‘>’ to expand the Authentication Policy.
- Click on the ‘+’ sign to create a new authentication policy rule as mentioned below.
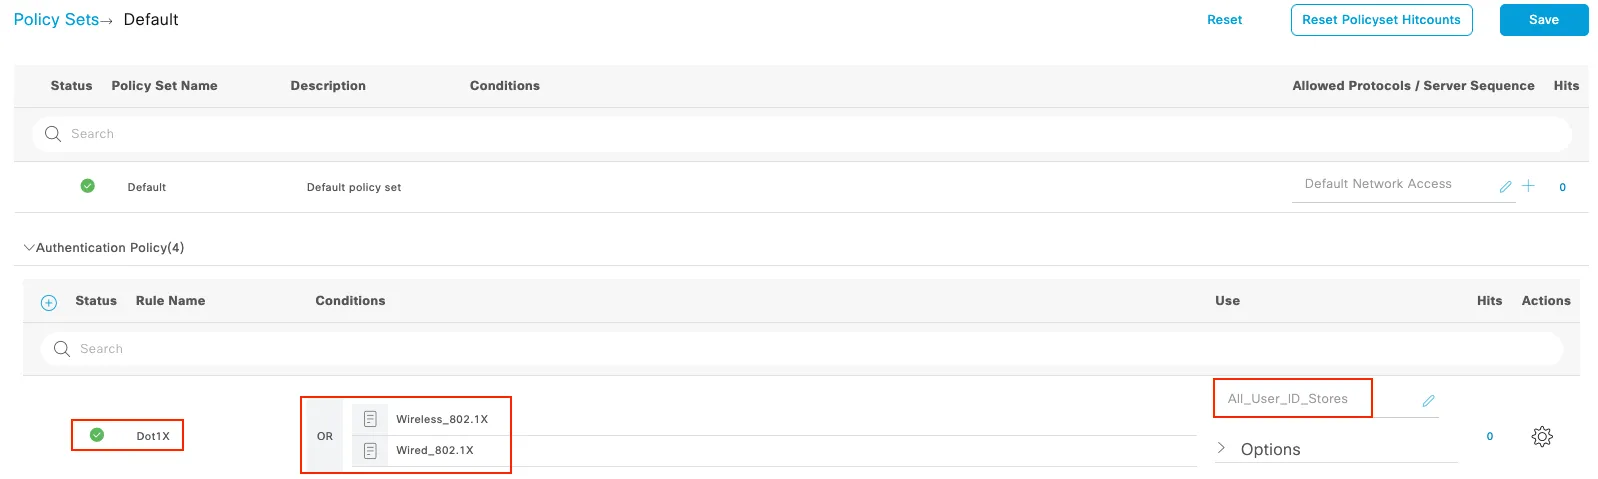
- Rename the ‘Authentication Rule 1’ to ‘Dot1X.
- Add the Conditions: Wireless_802.1X OR Wired_802.1X
- Select All_User_ID_Store.
- Set the ‘Option’ rule by as follows:
- If Auth fail: REJECT
- If User not found: REJECT
- If Process fail: DROP

- Click on left side ‘>’ to expand the Authorization Policy.
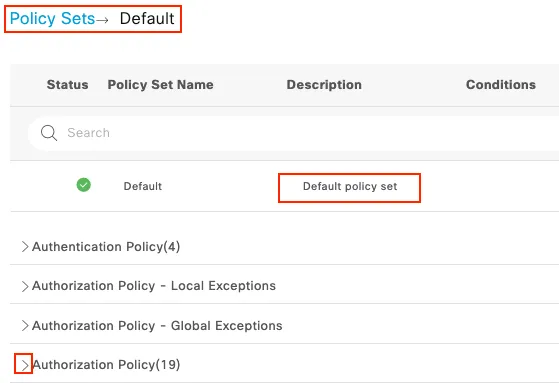
- Click on the ‘+’ sign to create a new Authorization Rule policy.

- Rename the ‘Authorization Rule 1’ to Dot1X.
- Add the Conditions: Wireless_802.1X AND EAP-MSCHAPv2.
- Select “PermitAccess” as Results Profile.
- Click on Save to save the configs.
b) Nile Dynamic Segments using RADIUS (ISE) attribute – netseg (Optional)
This section is applicable only if you have multiple segments associated with a single dot1x SSID and you prefer to push segments dynamically.
Nile supports dynamic segment allocation that can be assigned by RADIUS (ISE) depending on the user account (e.g., employee or contractor).
To setup the Nile Dynamic Segments, please follow the below steps.
- From ISE GUI, Navigate to Policy > select Policy Elements > Results > expand Authorization and select Authorization Profiled, click on “+” to create a profile that matches Nile segment name.
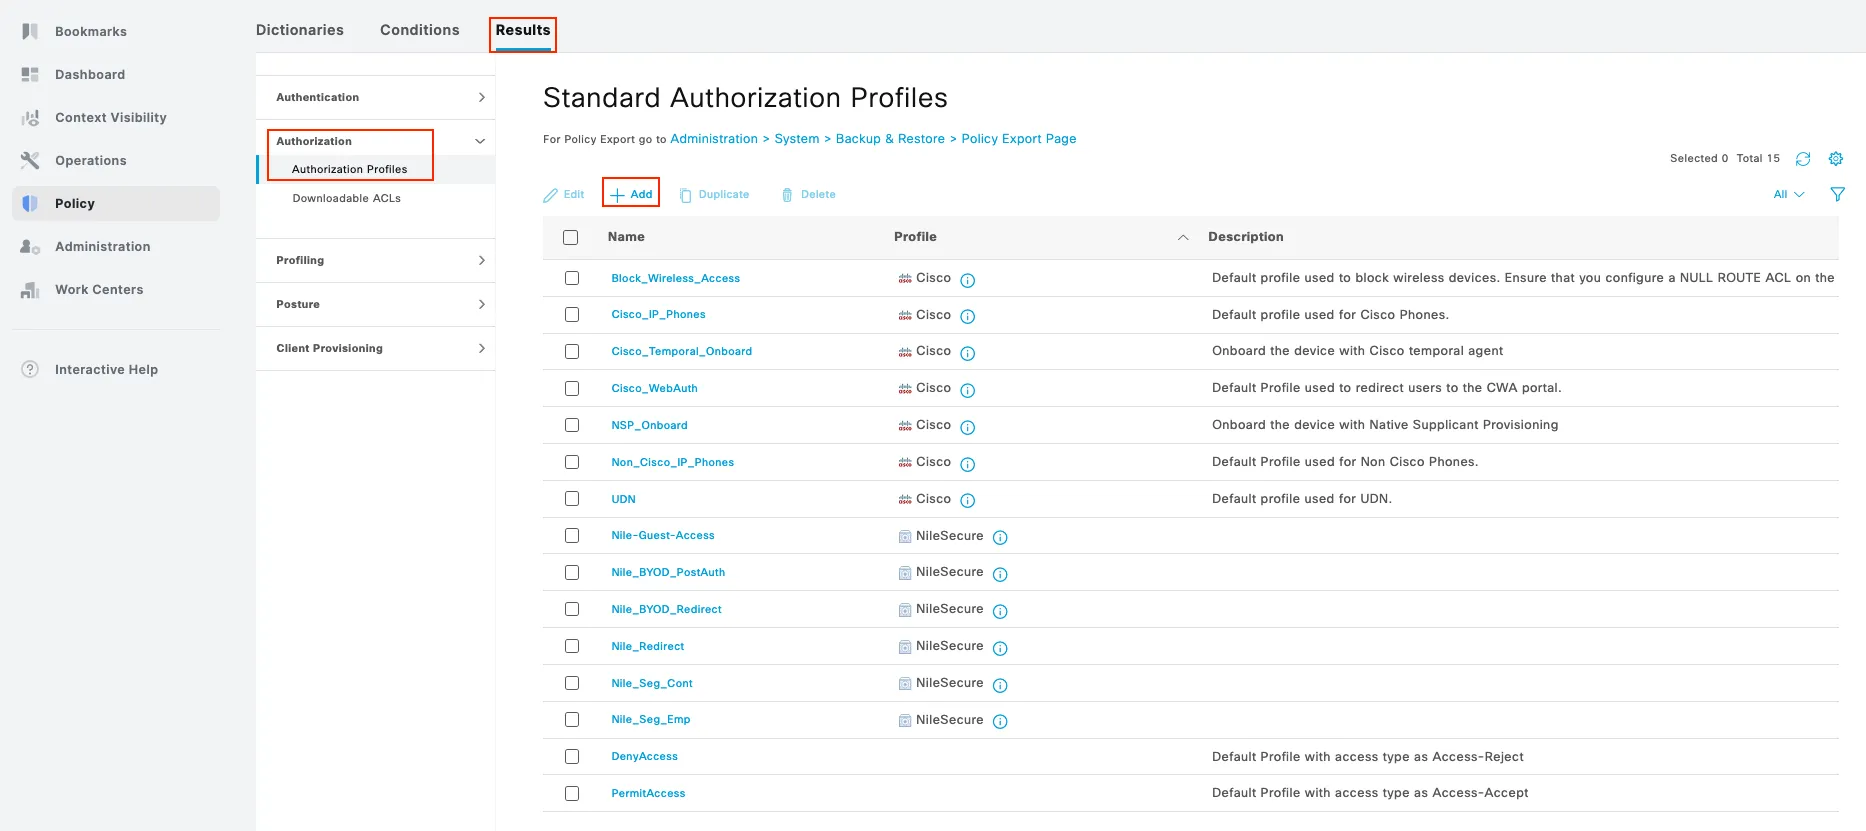
- Enter the name for the new Authorization profile,
- Select access type as “ACCESS_ACCEPT”
- Network Device Profile as NileSecure
- Under Advanced Attributes, select Nile:netsg and enter Nile segment name as a value (Name is case sensitive)
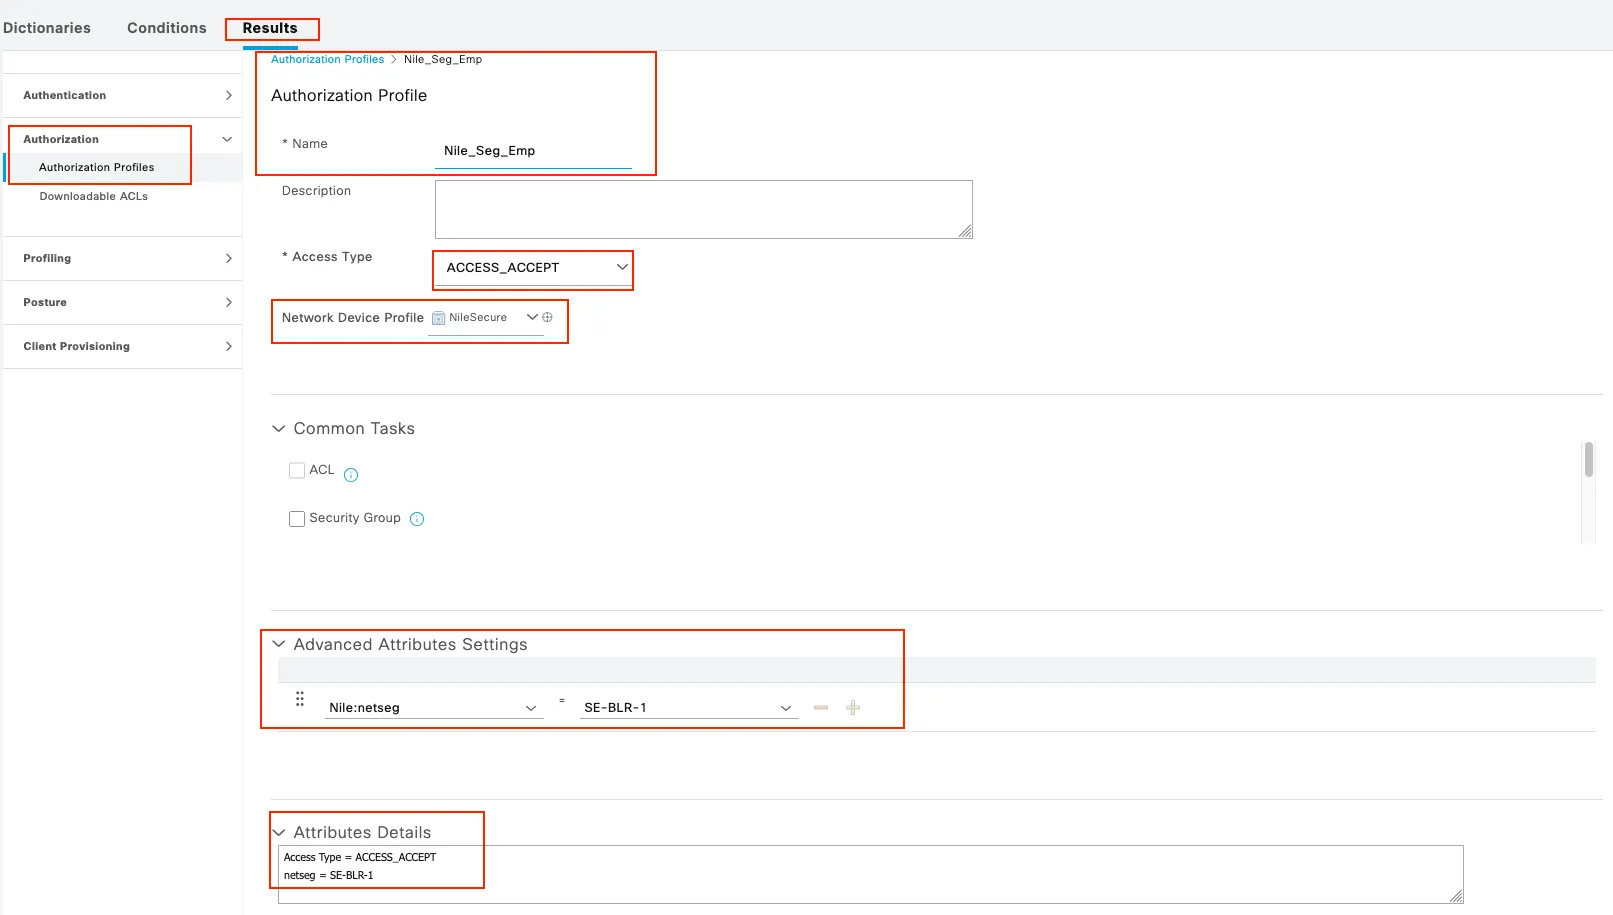
- Click on Submit to save the config and repeat the same steps to create a new Authorization profile for the other segment.
- From ISE GUI, Naviate to Policy > Policy Sets > select Default, Click on the right side ‘>’ to expand the default policy set.
- Click on left side ‘>’ to expand the Authorization Policy.
- Click on the ‘+’ sign to create a new rule.
- Rename the ‘Authorization Rule 1’ to Dot1X-Segment-Name.
- Add the Conditions: Wireless_802.1X AND IdentityGroup equal to user group (e.g., employee or contractor).
- Select the respective setment's Authorization profile as Results Profile.

- Repeat the same steps to create an Authorization policy for the second user groups that will be mapped to the second segment.

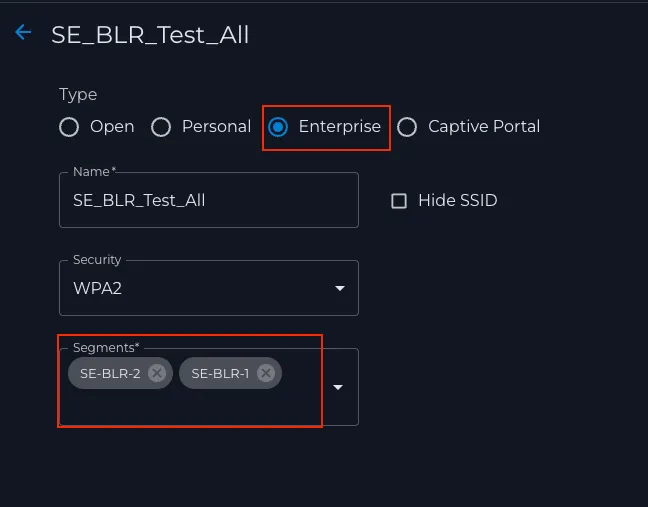
- Modify the Nile Wireless SSID to include the multi segments.
4) Use case - Wired MAB Authentication
By default, the standard Cisco MAB AuthC policy does not recognize the attributes sent by Nile. If these attributes are not adjusted, the ISE RADIUS live logs will show that the AuthC policy is not being matched by the data received from Nile.
ISE Auth policy for MAB with Nile requires that we call out:
a) ISE Authentication/Authorization policy
- From ISE GUI, Naviate to Policy > Policy Sets > Default > Authentication Policy and configure a MAB policy, or reconfigure the existing MAB AuthC policy, to match on these conditions:
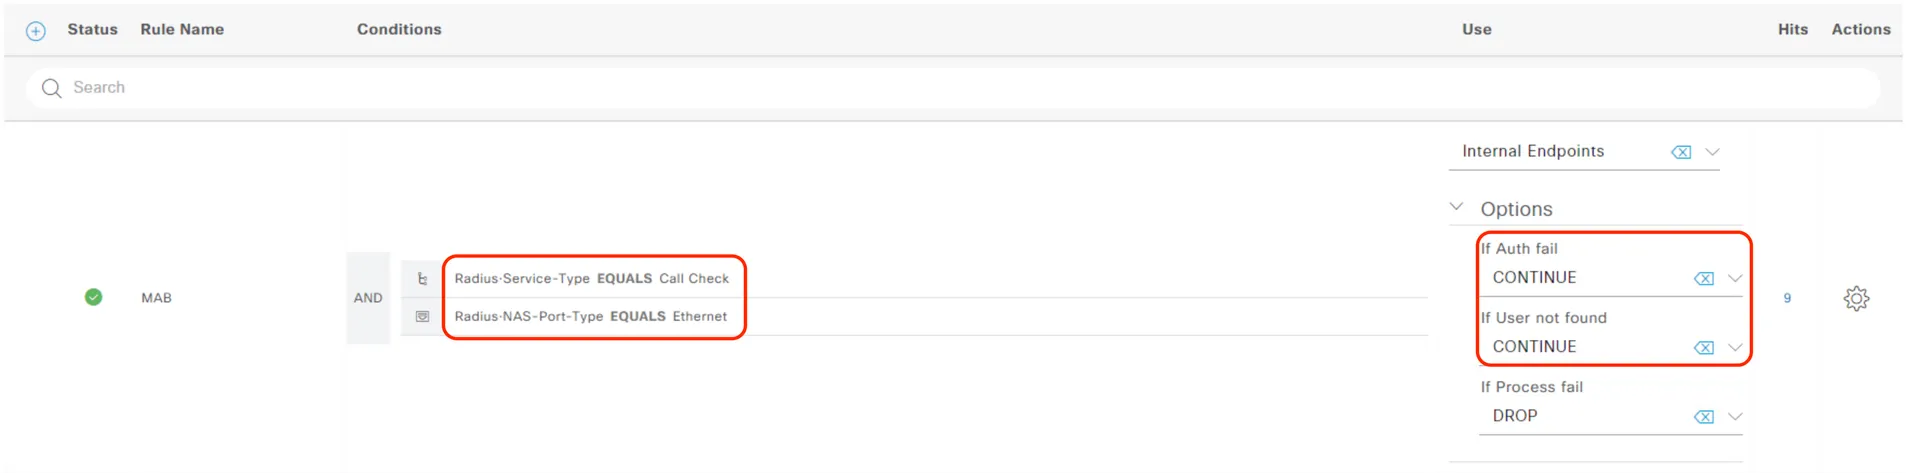
- Configure the Options to:
- If Auth fail = CONTINUE
- If User not found = CONTINUE
This tells ISE that if the wired MAC address is currently unknown or never seen before by ISE, to go ahead and let it proceed for AuthZ policies.
Once an endpoint has passed an Authentication (AuthC) policy, ISE still needs further context for what to do with the endpoint. That is where the Authorization (AuthZ) policy comes into play.
- From ISE GUI, Naviate to Policy > Policy Sets> Default> Authorization Policy. Click the + sign to create a new policy
- You can match the conditions of Authorization Policy to same as that of AuthC policy above. And then place all endpoints into segment “Internal-Net3”.

- Save policy set and verify results within ISE. You can review all of the specifics regarding user authentication and authorization from within the ISE live logs. This is the best resource to figure out if your policy is working or not for any use case. The live logs will show exactly what ISE is doing and why it is doing it.

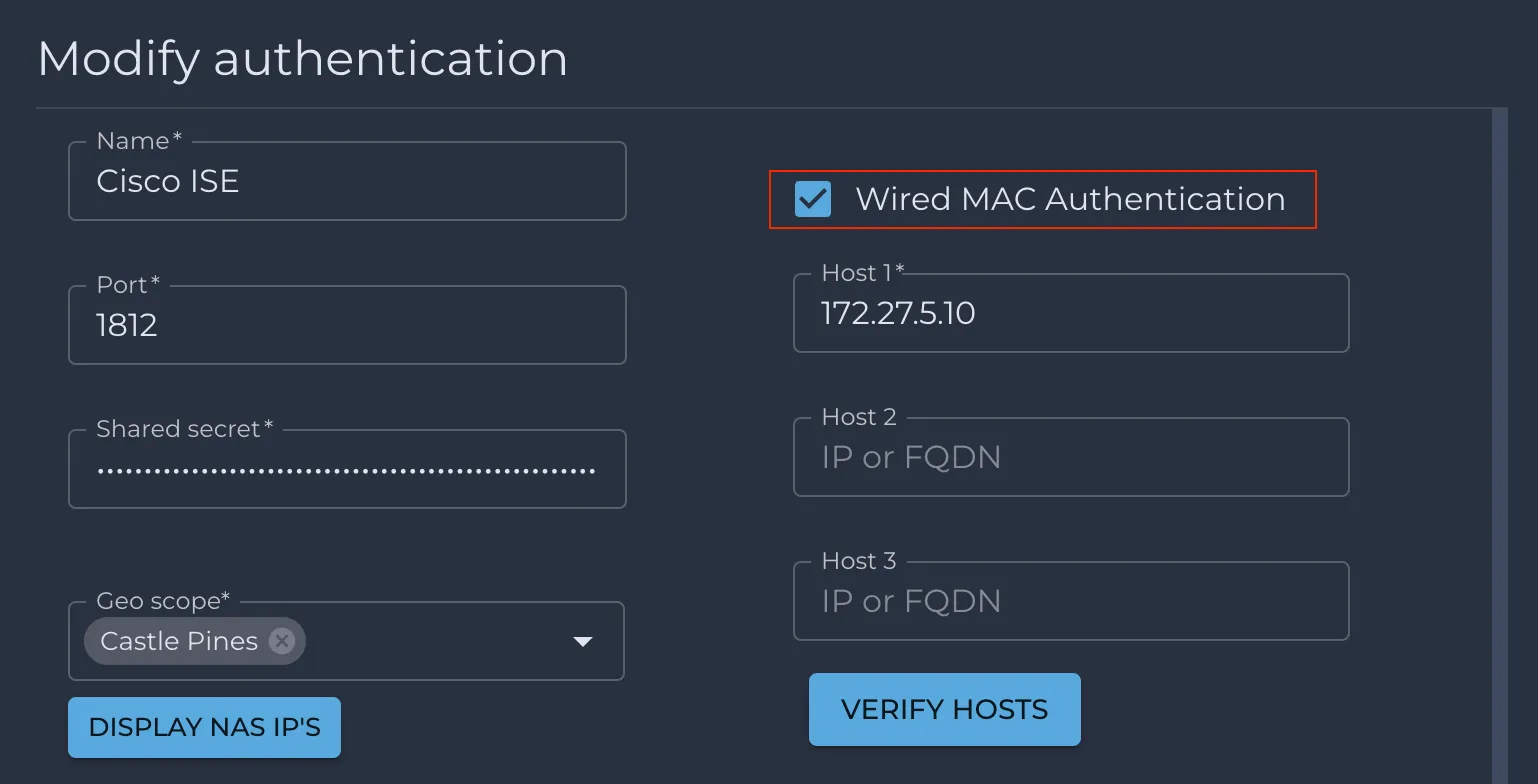
Note: Make sure the ISE server is checkbox is configured to support Wired MAC Authentication from within the Nile portal. If you don’t see this checkbox available, then you will need to get a feature flag enabled on the tenant you are configuring this on.
5) Use case - Wireless Guest Sponsored Portal Authentication
A Guest Access Captive Portal authentication approach has three kinds of portal configurations:
- Hotspot Guest Portal (Terms & Conditions)
- Self-Registered Guest Portal
- Sponsored Guest Portal.
In this use case, we will describe the Sponsored Guest portal options that ISE can present to wireless clients for guest authentication.
a) Create an Authorization profile for Terms & Conditions Guest Redirect .
- From ISE GUI, Naviate to Policy > Policy Elements > Results > Authorization Profiles
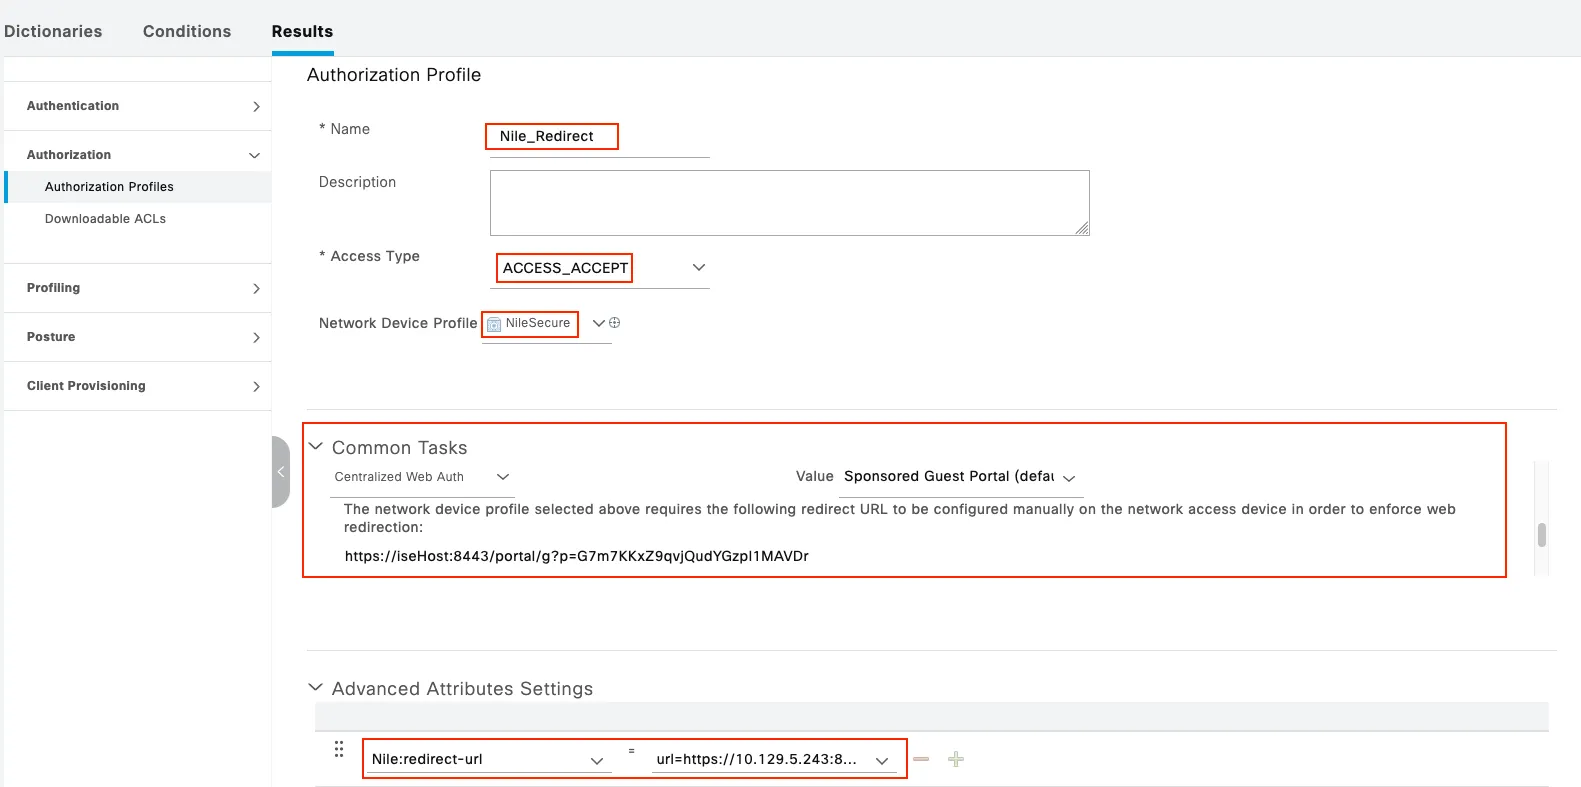
- Click on: Add and enter/select the following:
- Name: Nile_Redirect
- Access Type: ACCESS_ACCEPT
- Network Device Profile: NileSecure
- In ‘Advanced Attributes Settings:
- Select the attribute ‘Nile:redirect-url’
- Copy and paste the above URL while replacing ‘iseHost’ with the IP or FQDN of the ISE server.
- Note: Ensure that you add a prefix 'url=' before the URL
- Verify Attributes Details and Click on Submit to save the new profile.
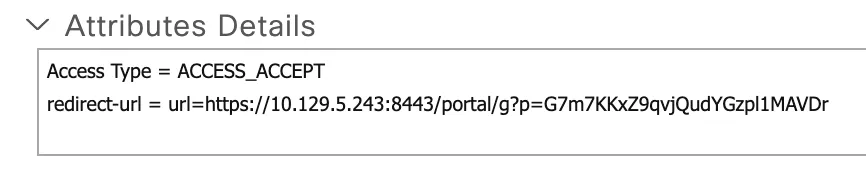
b) Create an Authorization profile for Guest post-redirection
- From ISE GUI, Navigate to Policy > Policy Elements > Results > Authorization Profiles.
- Click on: Add and enter/select the following:
- Name: Nile-Guest-Access
- Access Type: ACCESS_ACCEPT
- Network Device Profile: NileSecure
- Configure Advanced Attributes Settings as per the following screenshot and Save the profile.
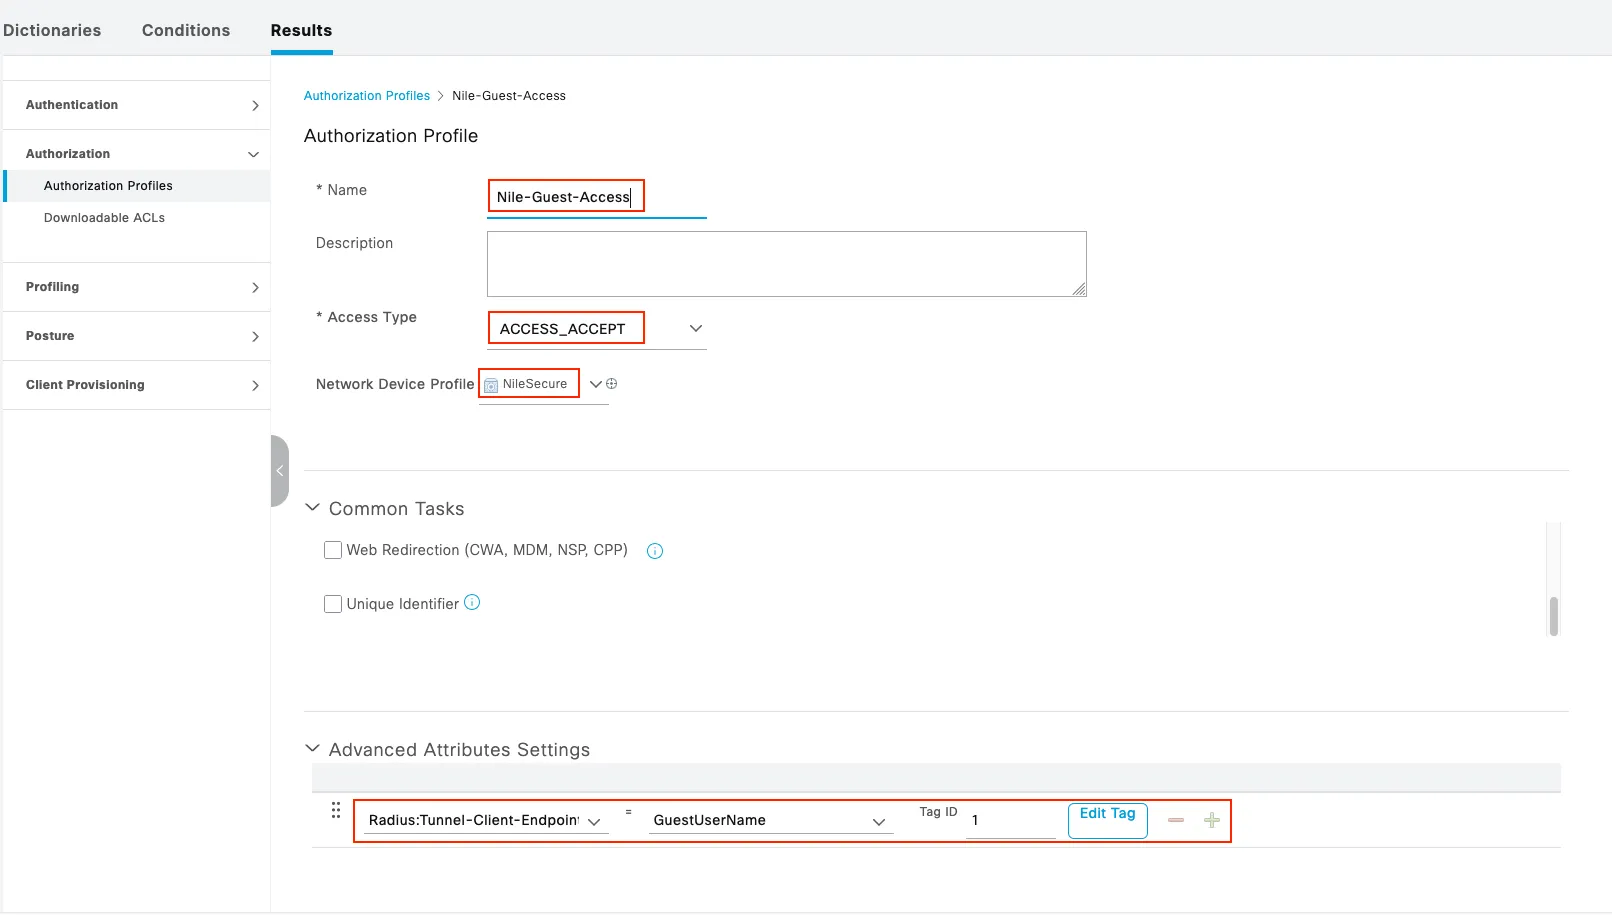
c) Create new Authentication and Authorization Policies
- From GUI Navigate to Policy > Policy Sets > select Default, Click on the right side ‘>’ to expand the default policy set.
- Click on left side ‘>’ to expand the Authentication Policy.
- Click on the ‘+’ sign to create a new rule and rename the ‘Authentication Rule 1’ to ‘MAB’.
- Add the Conditions: Wireless_MAB OR Wired_MAB.
- Select Internal Endpoints.
- Set the ‘Option’ rule by as follows:
- If Auth fail: REJECT
- If User not found: CONTINUE
- If Process fail: DROP
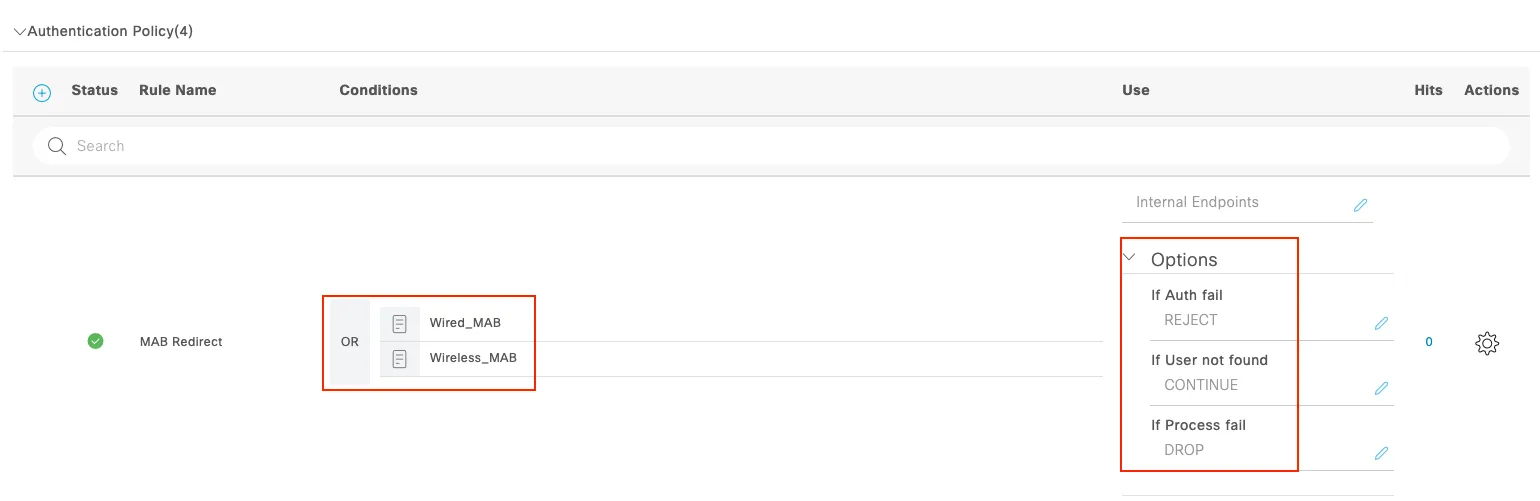
- Click on left side ‘>’ to expand the Authorization Policy.
- Click on the ‘+’ sign to create a new rule and rename the ‘Authorization Rule 1’ to “Nile_Guest_Access”.
- Add the Conditions as “Wireless_MAB” AND “Guest_Flow”.
- Select Results Profile “Nile-Guest-Access”.
- Click on the ‘+’ sign to create a second rule and rename the ‘Authorization Rule 1’ to “Nile_Redirect”.
- Add the Conditions: “Wireless_MAB” only.
- Select Results Profile “Nile_Redirect” and Save.

d) Create Guest SSID
- Navigate to the WIRELESS tab and Click on the ‘+’ sign to add an SSID.
- Select ‘Captive Portal’ for Security, choose the Guest Segment with the ISE server mapped, and click Save.
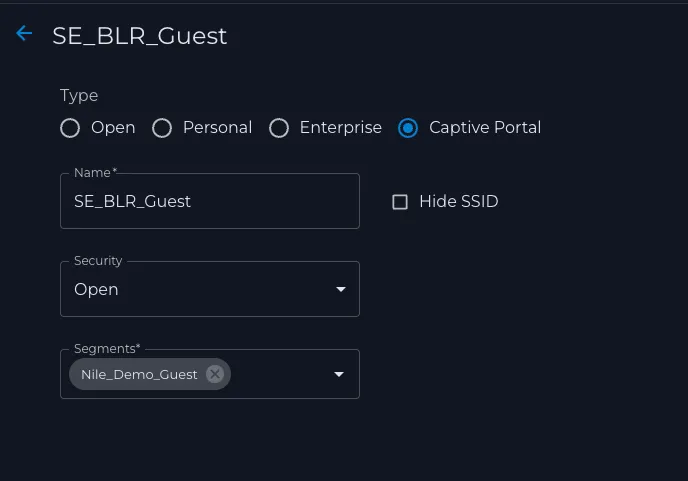
6) Use case - BYOD SSID Integration with Cisco ISE
In a single SSID BYOD deployment, only one SSID is used for both onboarding devices and providing afterwards full access to those registered devices.
The flow to connect a client to a BYOD SSID is as follows:
- User connects to the BYOD SSID with EAP-PEAP credentials.
- Redirection to the BYOD portal with limited access.
- Device registration.
- Native Supplicant Assistant (NSA) download from ISE.
- Profile and client certificate download.
- EAP-TLS authentication for full access.
Please refer to below step-by-step configuration of a single SSID wireless BYOD on Nile Service block (NSB) leveraging Cisco ISE radius services, BYOD portal and its private PKI infrastructure.
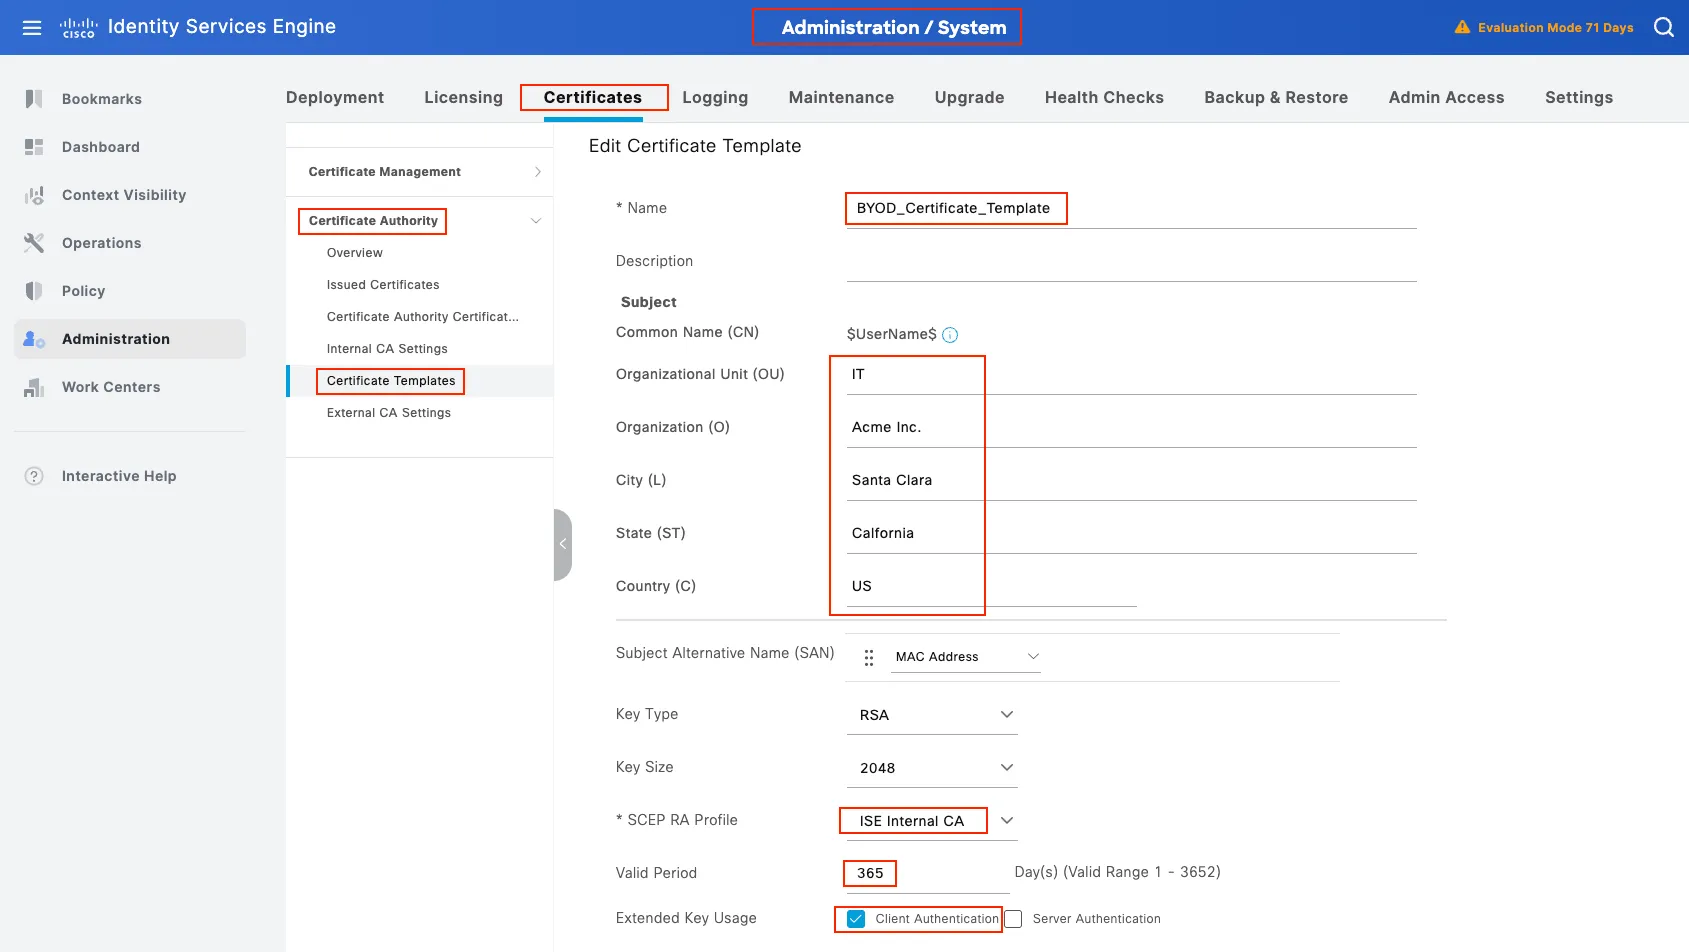
a) Create a certificate template for BYOD users
- From ISE GUI, Navigate to Administration > Certificates > Certificate Authority > Certificate Templates Click on 'Add' and configure following parameters
- Add a Native Supplicant Profile (NSP) - Navigate to > Work Centers > BYOD > Client Provisioning > Resources > Click on 'Add'.
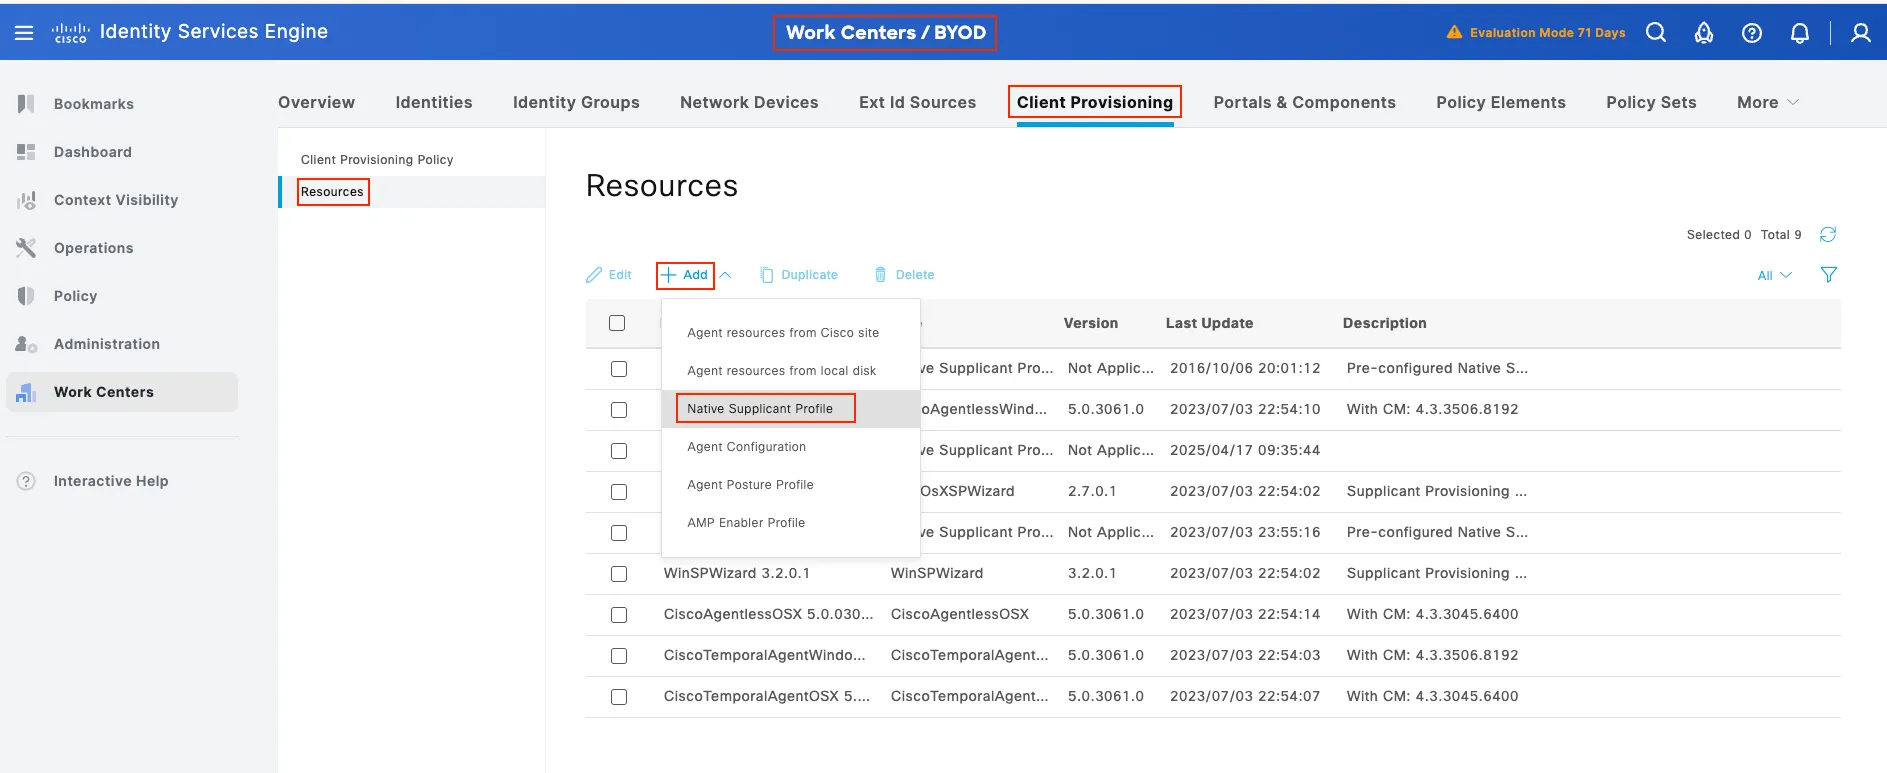
- Select Native Supplicant Profile and Click on 'Add'
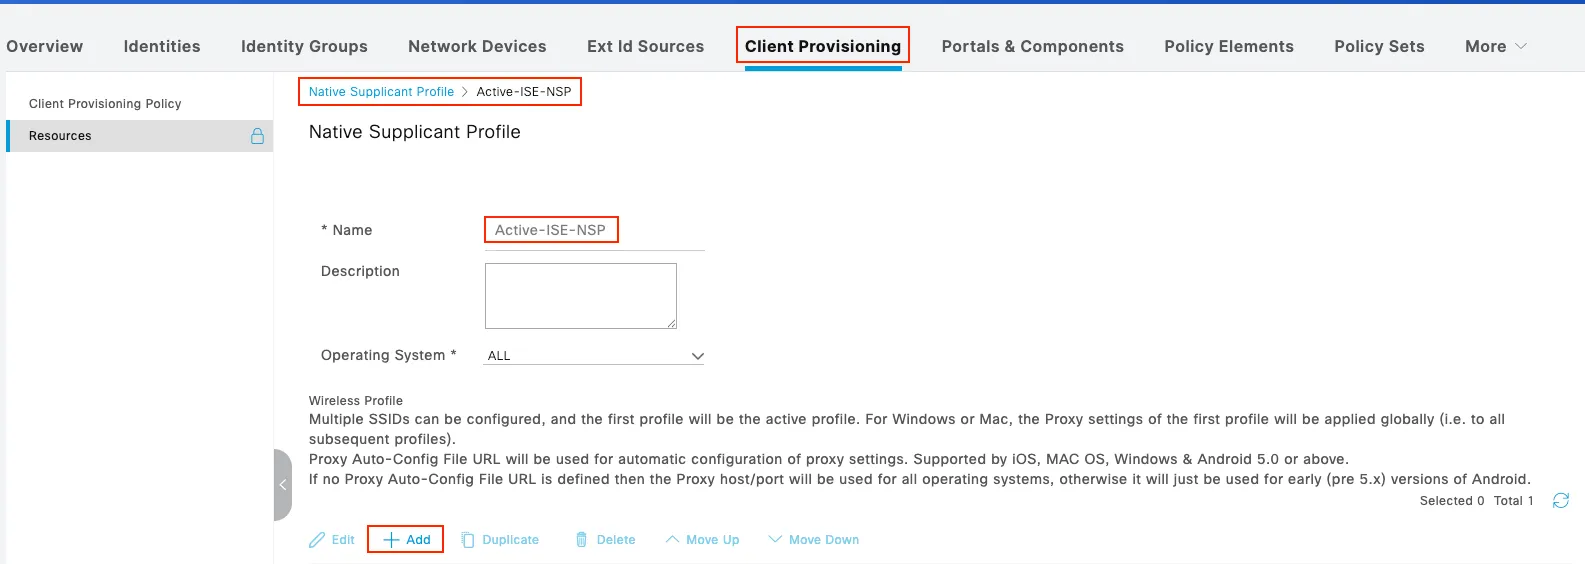
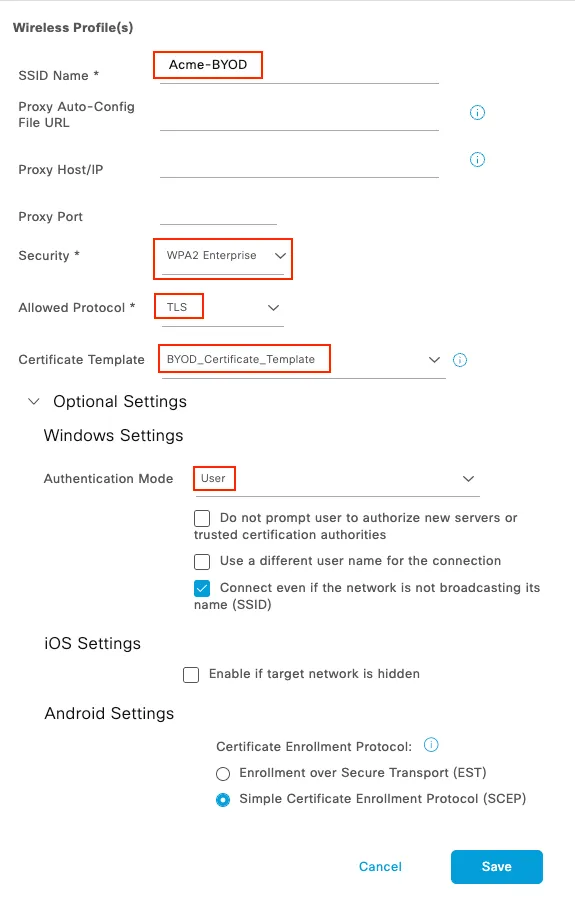
- Click the Submit at the bottom of the page to save the new NSP
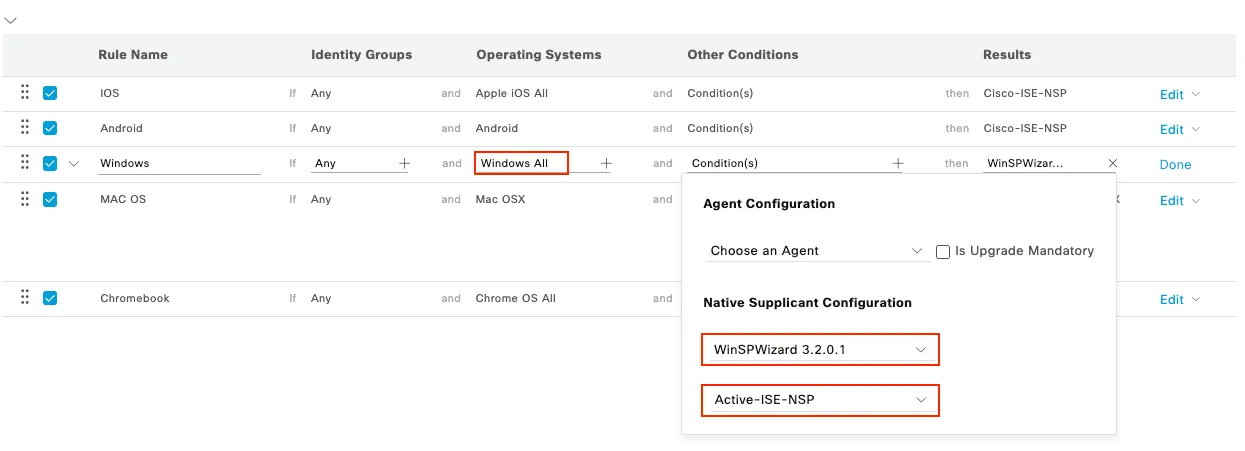
- Modify the client provisioning policy - Navigate to Work Centers > BYOD > Client Provisioning > Client Provisioning Policy and Click on 'Edit' for the Windows rule
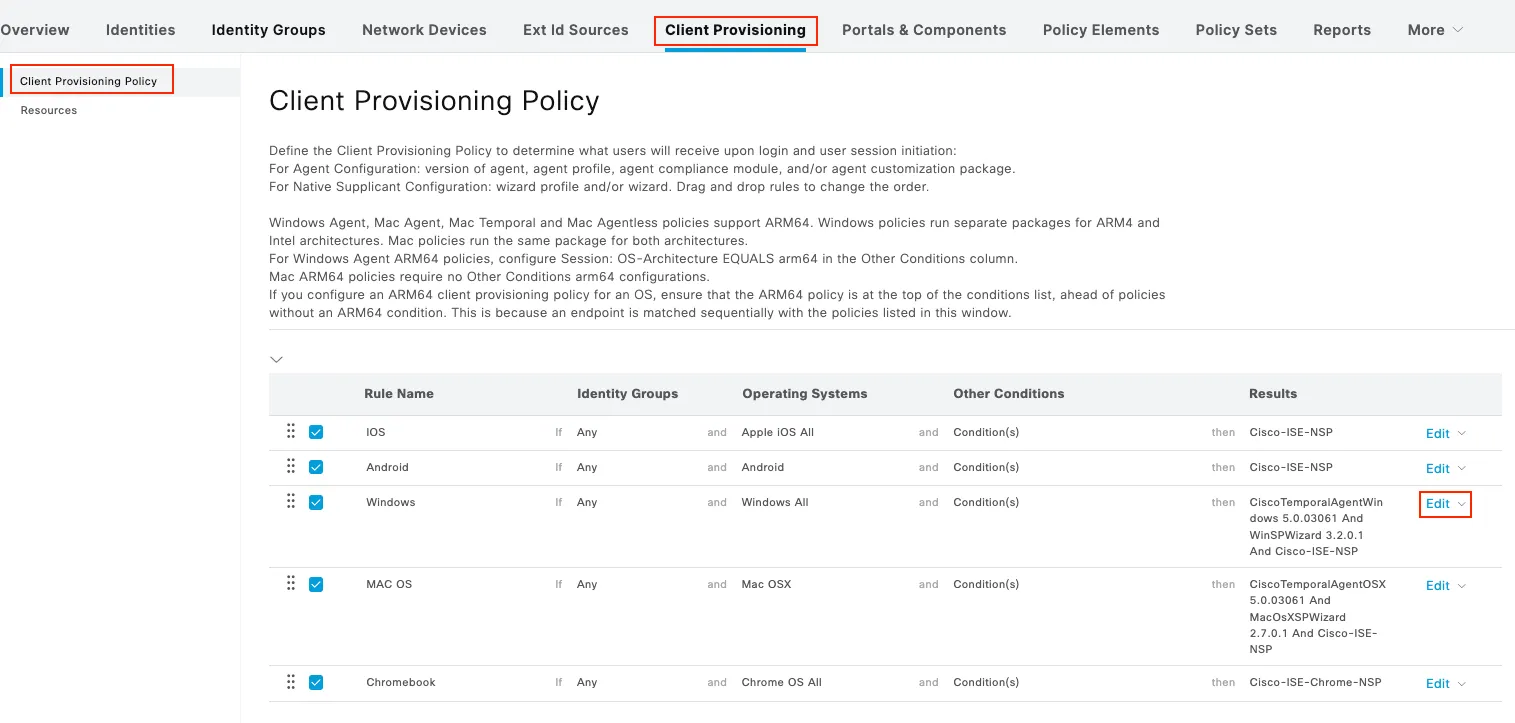
- Select Windows All and WinSPWizard 3.x.x.x and Acme-ISE-NSP then Click Done followed by Save.
b) Create an Authorization profile for non-registered BYOD devices
- From ISE GUI, Navigate to Policy > Policy Elements > Results > Authorization Profiles Click 'Add' and Enter/select the following:
- Name: Nile_BYOD_Redirect
- Access Type: ACCESS_ACCEPT
- Network Device Profile: NileSecure
- Web Redirection: Native Supplicant Provisioning value BYOD Portal.
- Click Submit to save the new profile.
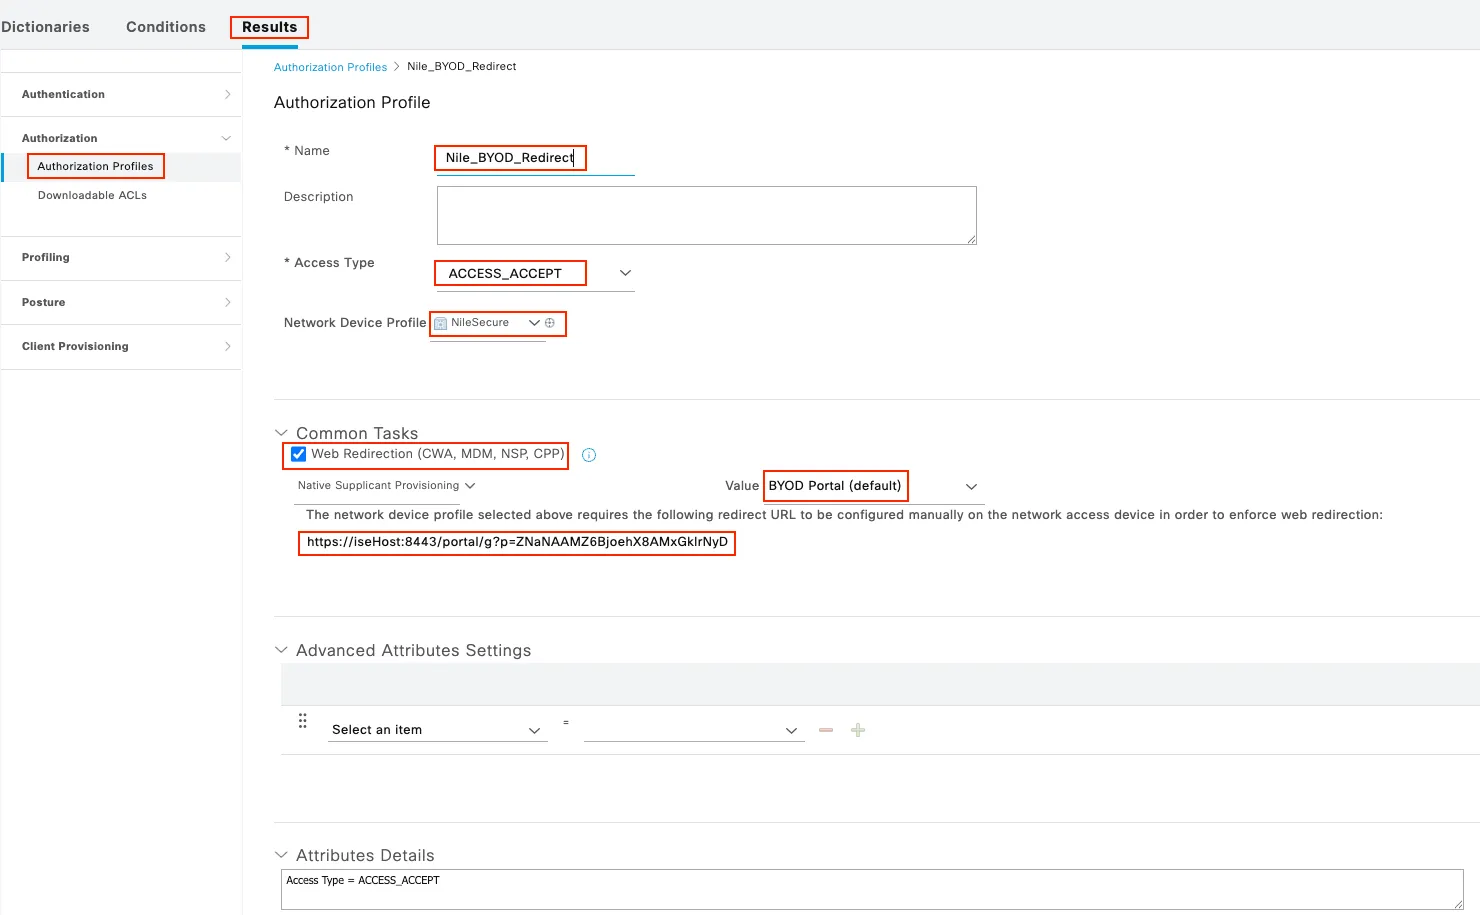
- Collect the static URL as it needs to be entered in the Nile Portal at a later stage.

c) Create an Authorization profile post-authentication for BYOD devices
- From ISE GUI, Navigate to > Policy > Policy Elements > Results > Authorization Profiles then Click: Add Enter/select the following:
- Name: Nile_BYOD_postauth
- Access Type: ACCESS_ACCEPT
- Network Device Profile: NileSecure
- Advanced Attributes Settings: Nile:netseg = postauth
- Then Click Submit to save the new profile
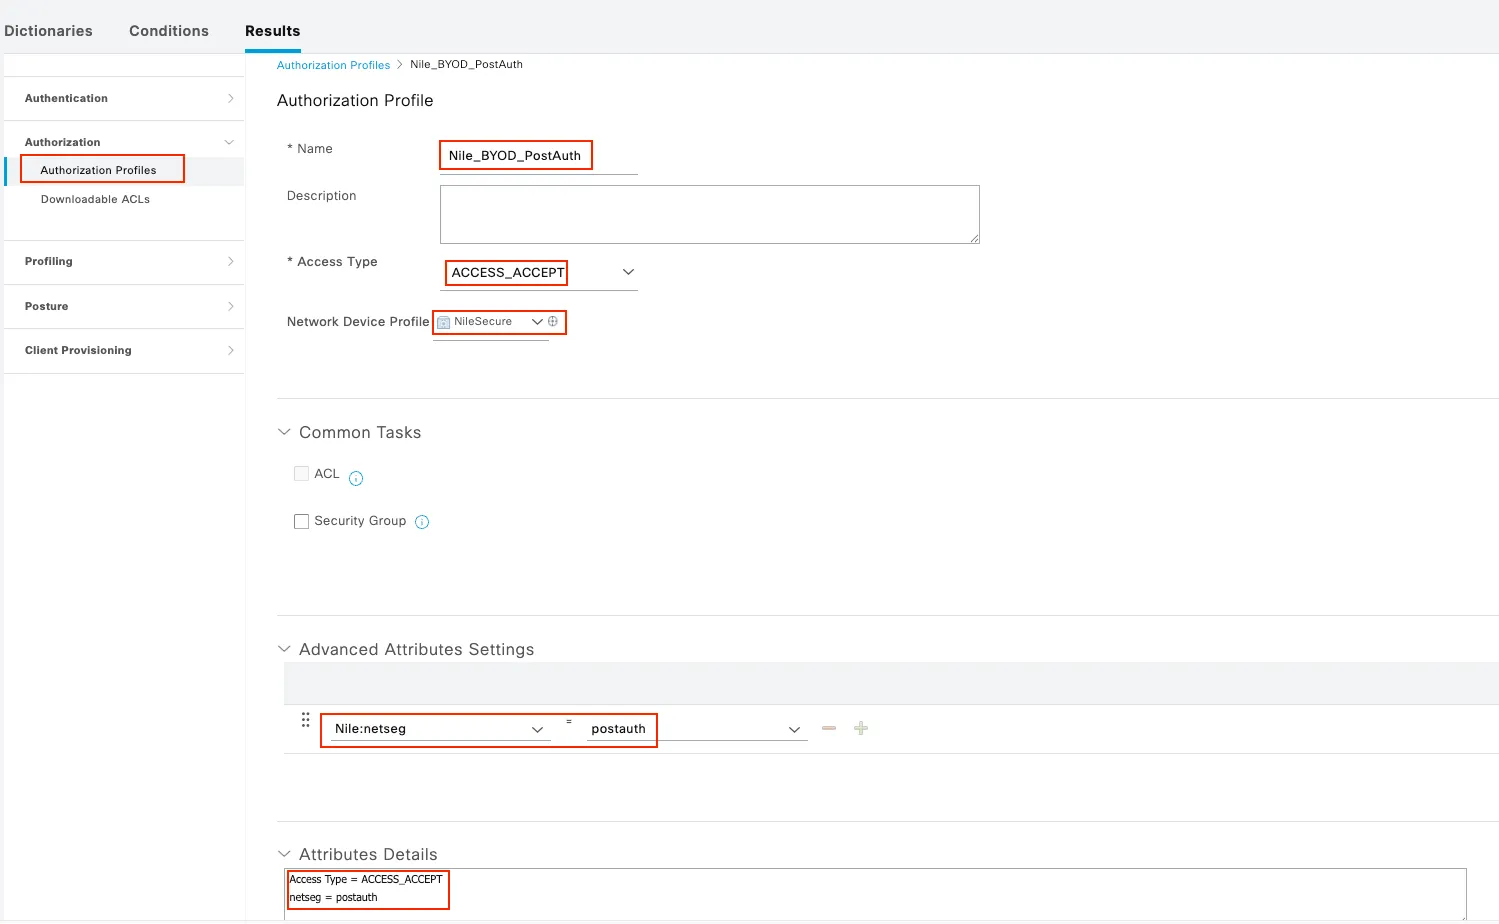
Note: In the case of two Nile segments: one for PEAP and one for EAP-TLS, replace ‘postauth’ with the EAP-TLS segment name.
d) Create a Policy set, Authentication, and Authorization profiles
- From ISE GUI, Navigate to Policy> Policy Sets Click on ‘+’ sign to add a policy
- Rename the ‘New Policy Set 1’ to: BYOD-Policy-Set
- Set the conditions to: Radius-Called-Station-ID ENDS_WITH Acme-BYO
- Set Allowed Protocols to: Default Network Access
- Click on Save.

Note: The above policy condition references the Nile BYOD SSID: Acme-BYOD used in this document. Change it to match the BYOD SSID configured on the Nile Portal.
- Create two Authentication profiles as follows:
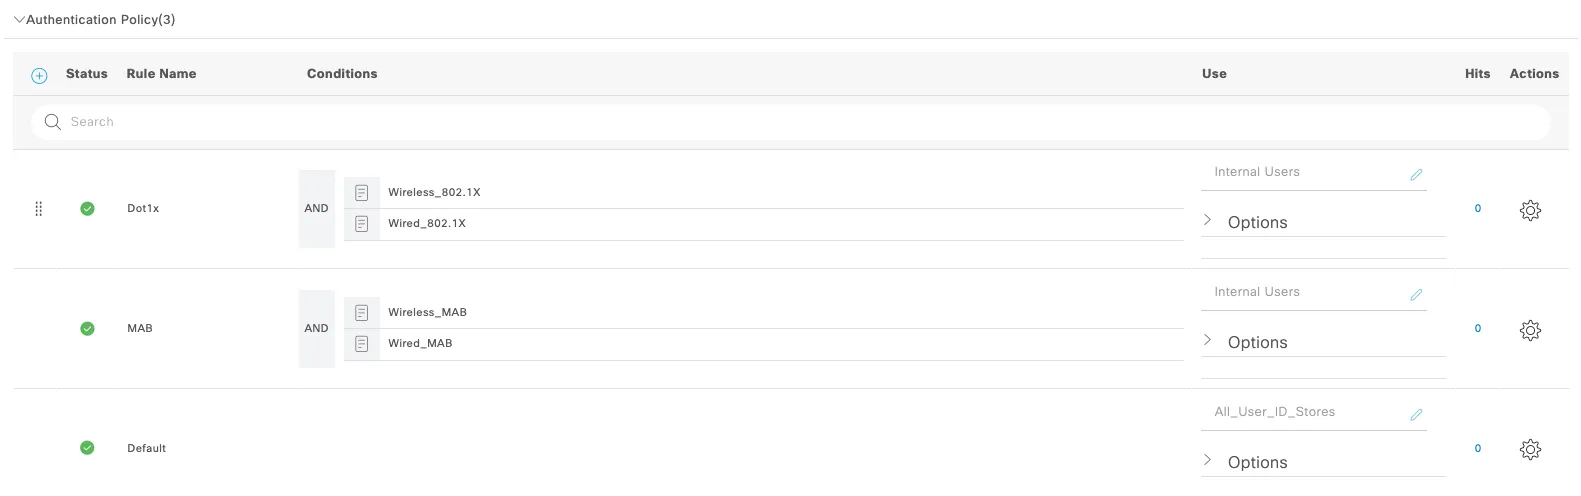
- Click on the right-side arrow ‘>’ to expand the policy and Create two Authorization profiles as follows and click on Save when done.
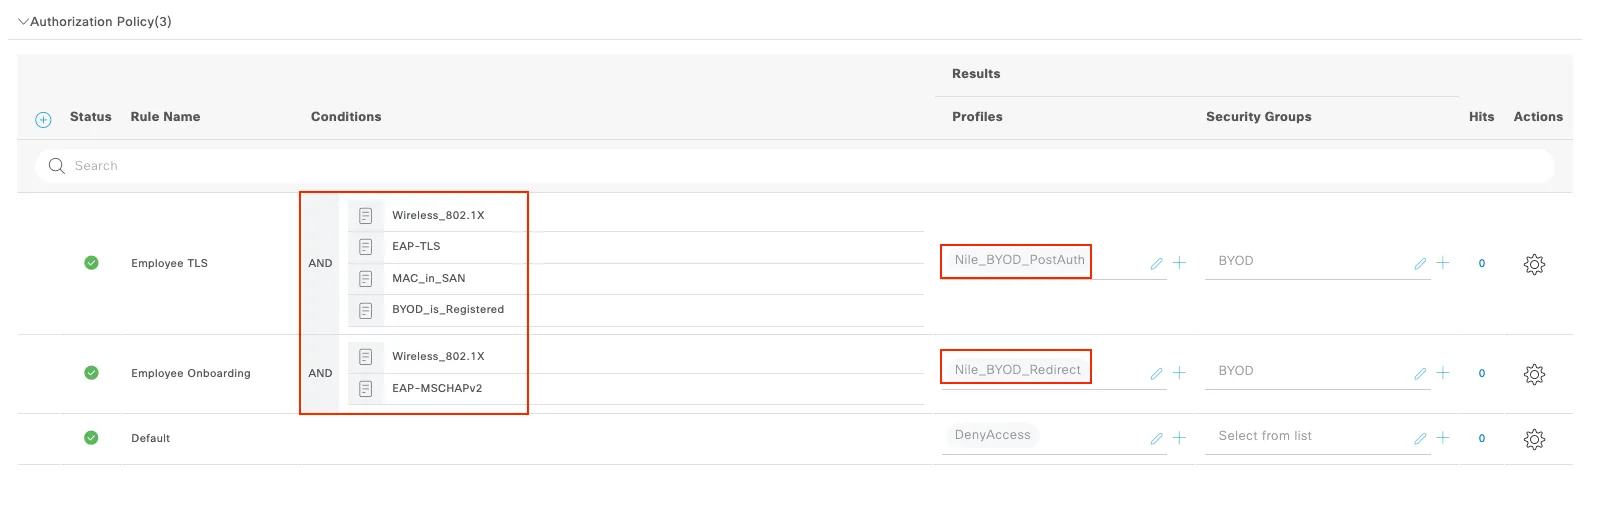
e) BYOD Nile Portal configuration
This section touches on the Nile Portal pertinent configuration to get a BYOD SSID up and running.
- Create/modify the radius configuration on the Nile Portal.
- Connect to the Nile Portal
- Navigate to the Authentication page
- Add the static redirect URL generated in the step 6b (Create an Authorization profile for non-registered BYOD devices), when creating the redirect authorization profile and replace the ‘isehost’ string by the ISE server FQDN or IP address.
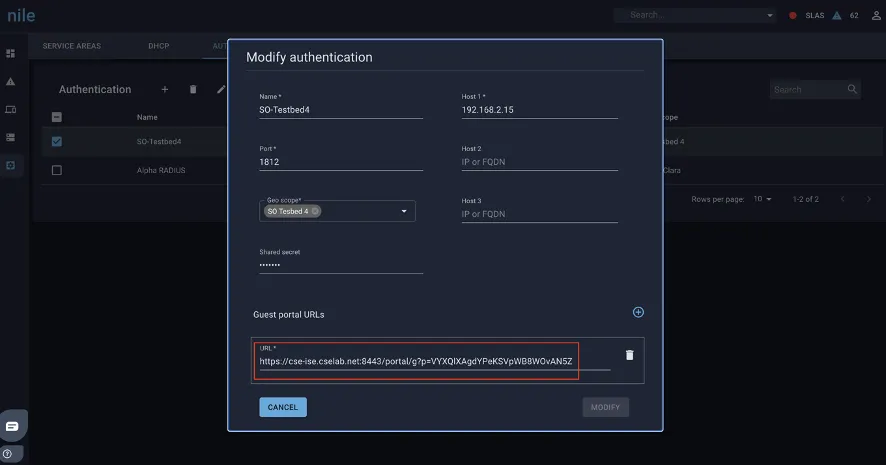
- Configure the BYOD segment to use the appropriate radius and static URL.
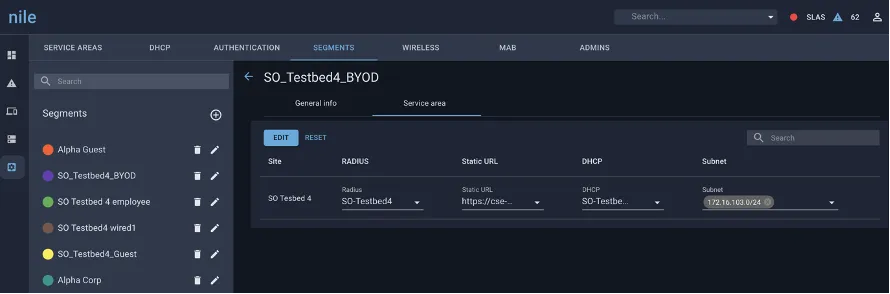
- Validate the SSID string is matching the SSID used by ISE.