Nile Integration with Google Workspace for SSO Setup
9 min
This document covers the setup of SAML federation between Nile (Okta) as a Service Provider (SP) and Google Workspace as an Identity Provider (IdP).
Requirements
Administrator rights to the Nile Portal.
Administrator rights to Google Workspace.
The same Nile Portal administrator needs to be a Google Workspace user.
Create a Google group and map users to the group for Nile App (Optional)
Note: This is required if Admin user(s) use SSO to authenticate to Nile Portal.
- Sign in to the Google Workspace portal: (https://admin.google.com/ in this example). HC Consulting is the sample organization used in this document for demonstration purposes only.
- Go to Directory > Groups.
- Click Create group to create a NileAdmin group and enter a group e-mail address. Assign a Group owner. Click NEXT.
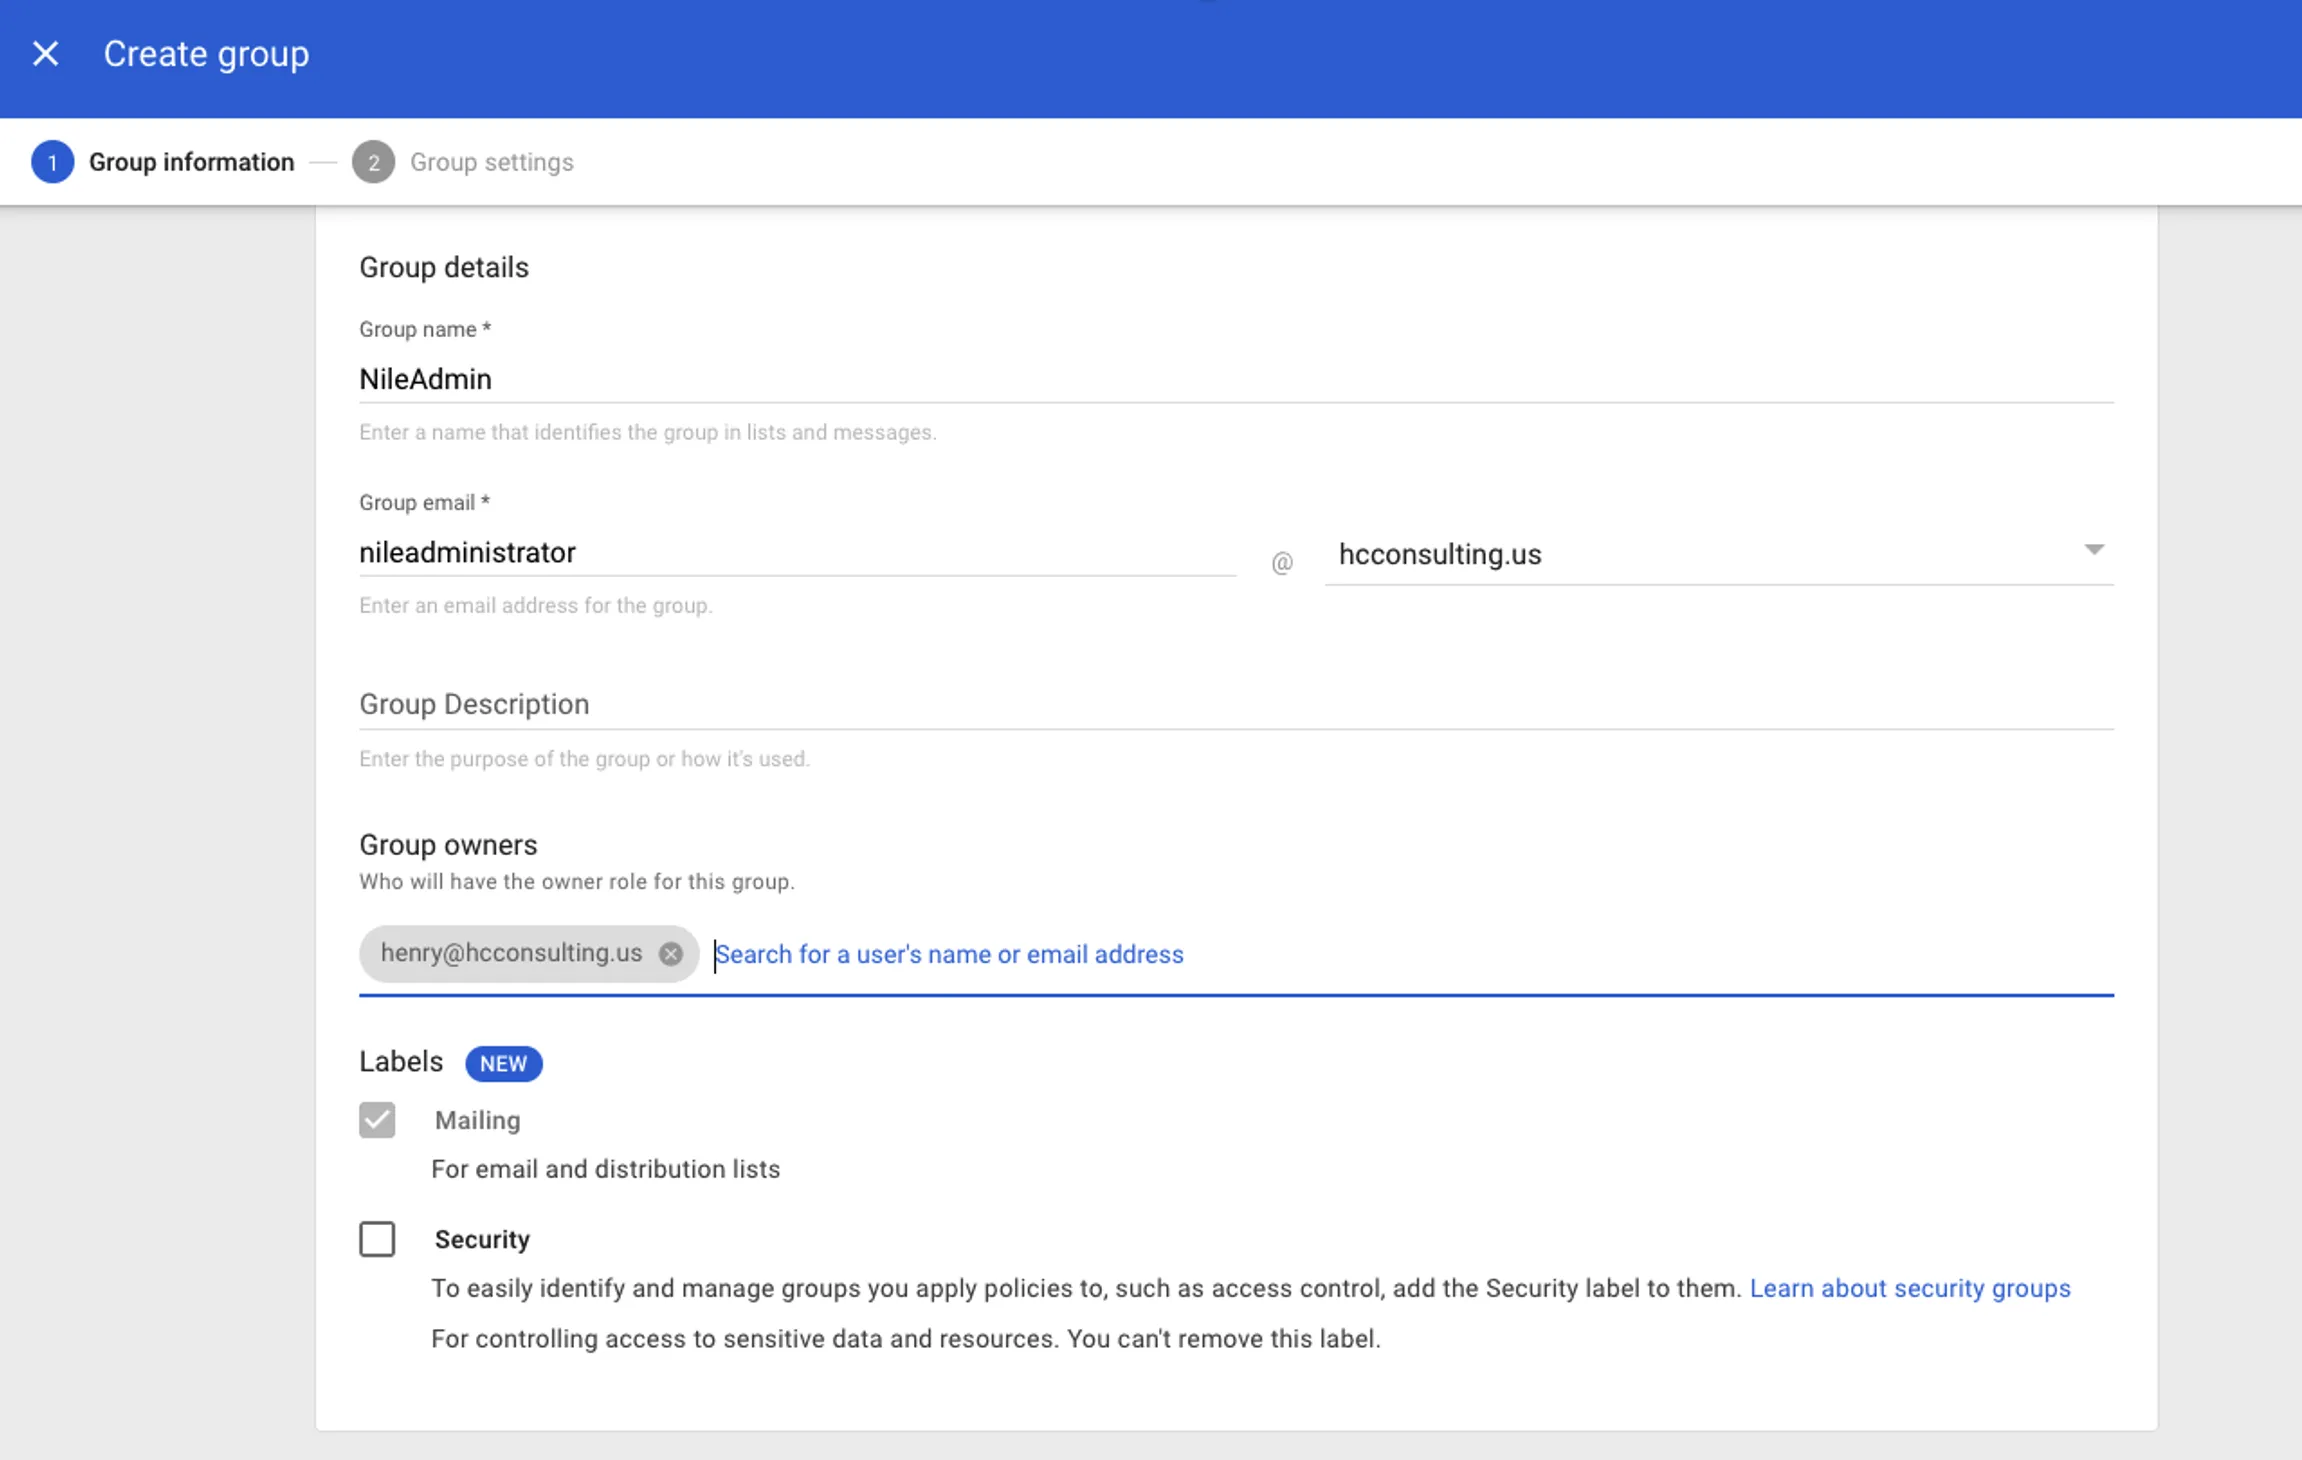
- Select Access Type and click CREATE GROUP
- Click Directory > Users:
- Click on a User in the list to open it for editing
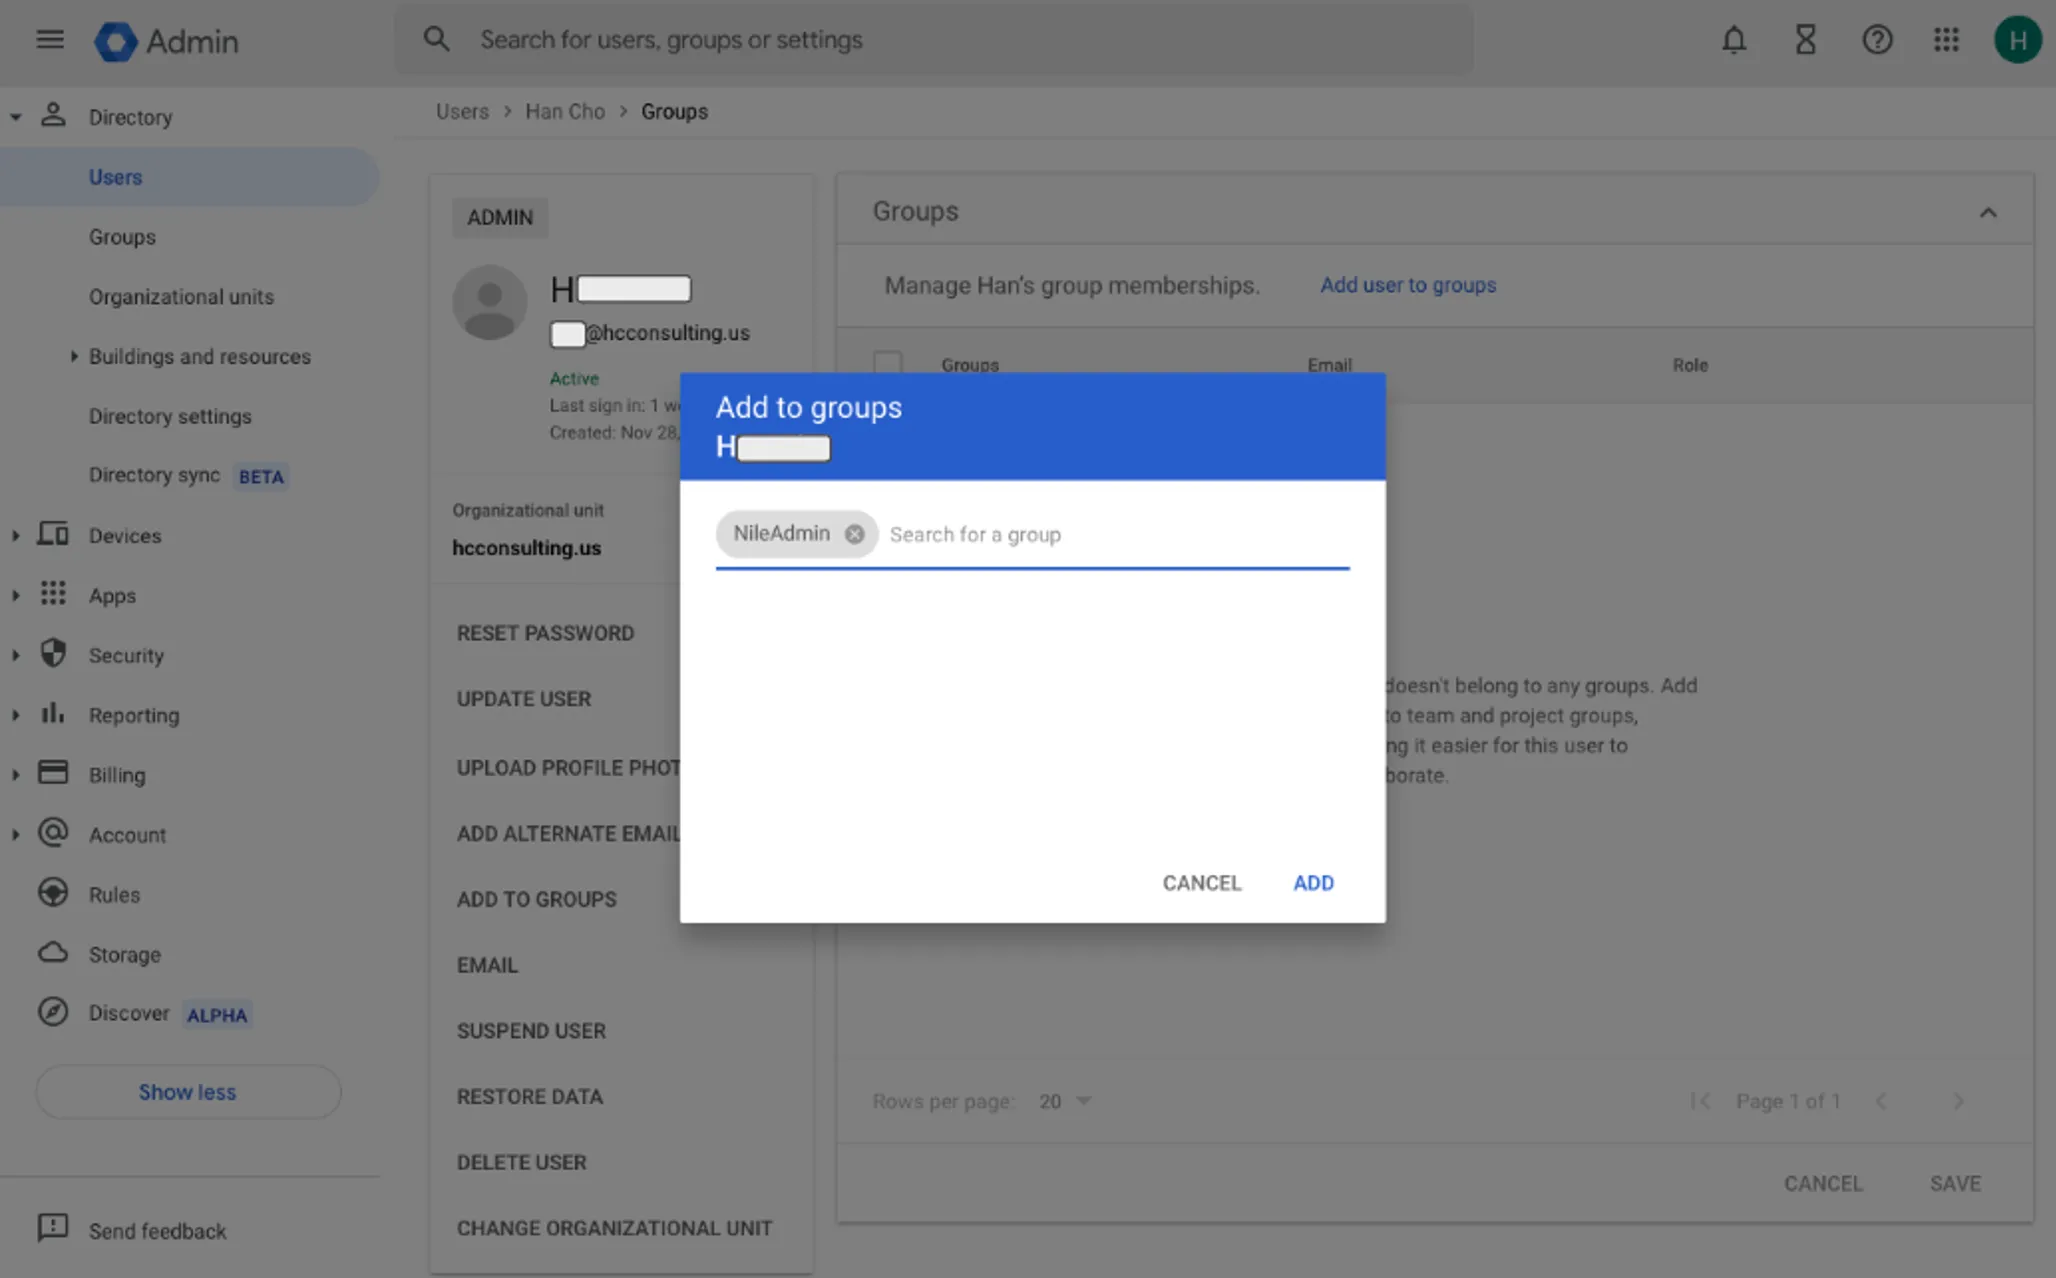
- Select Groups and click Add user to groups
- Select the NileAdmin group
- Click ADD
- Sign-in to Google Workspace portal: (https://admin.google.com/ in this example).
Google Workspace SAML app Configuration
- Sign in to the Google Workspace portal: (https://admin.google.com/ in this example).
- In the Admin console, go to Menu > Apps > Web and mobile apps.
- Click Add app > Add custom SAML app.
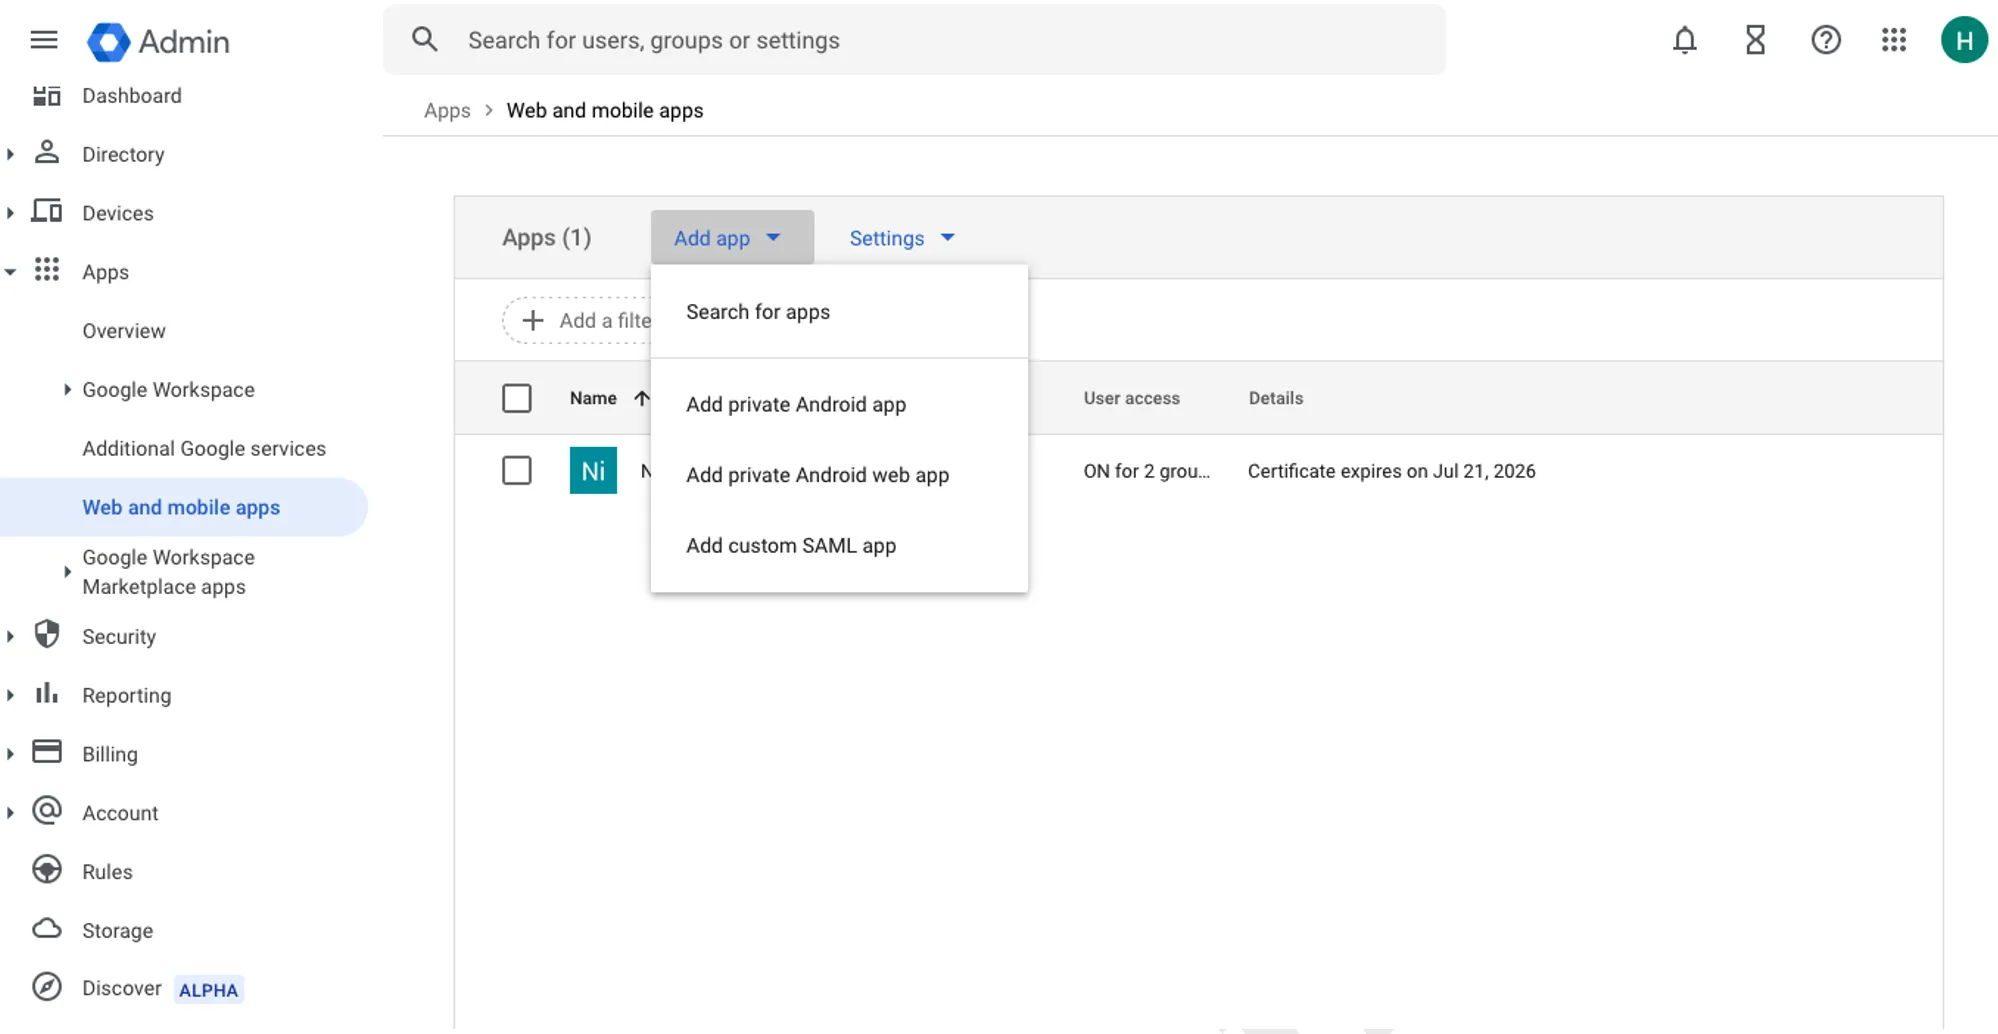
- A new window will appear. Enter a name for the App, for example, Nile SSO or Nile Global. Then click CONTINUE.
- Two options are available to obtain Google Identity Provider details:
- Option 1: You may download the Metadata file and search for the entity ID and Location URL from the Metadata file. Copy and paste into a clipboard or text editor for later use on the Provider page of the Nile Portal. The Location URL is also referred to as the SSO URL.
- Option 2: Copy the SSO URL and entity ID to a clipboard or text editor for use later on the Provider page of the Nile Portal.
- Download the certificate. Then click CONTINUE
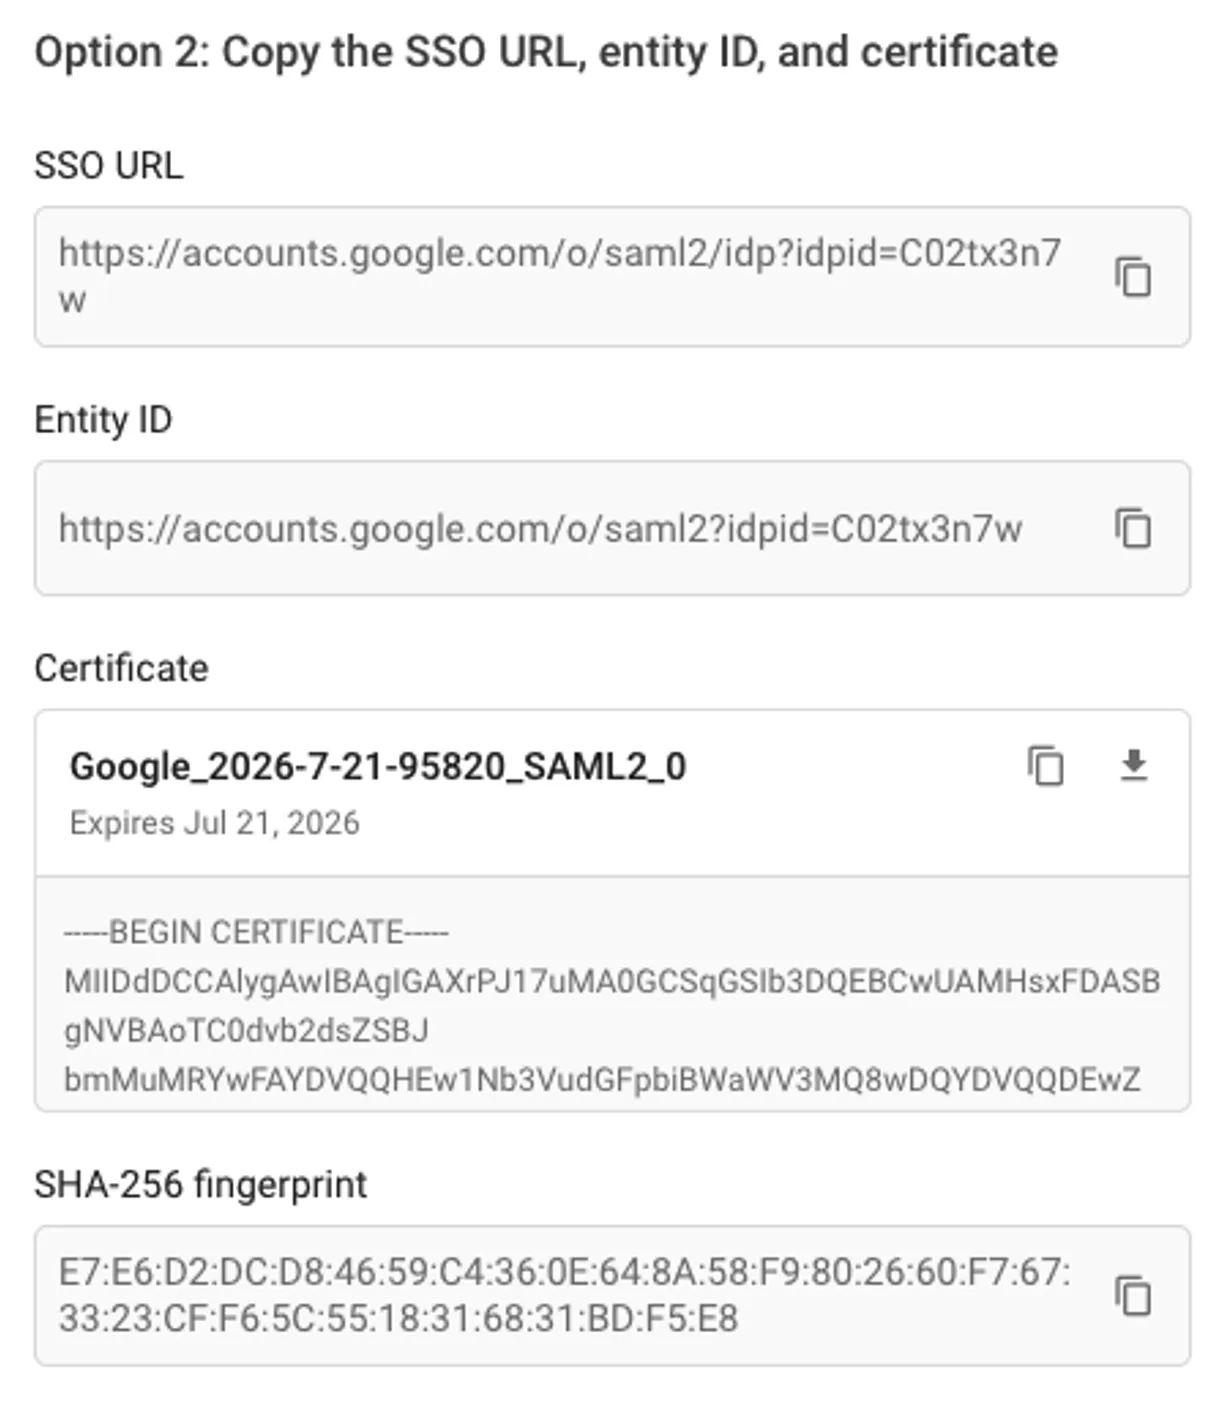
- The certificate may present a .pem file extension. Change the file extension from .pem to .cert
- Do not close this browser window. We will complete this process after configuring the Nile Portal.
Nile Portal Identity Provider Configuration
- Now, open a new browser window and log in to Nile Portal with the same Google Workspace administrator at https://www.nile-global.cloud, and navigate to Settings -> Global Settings -> Identity page.
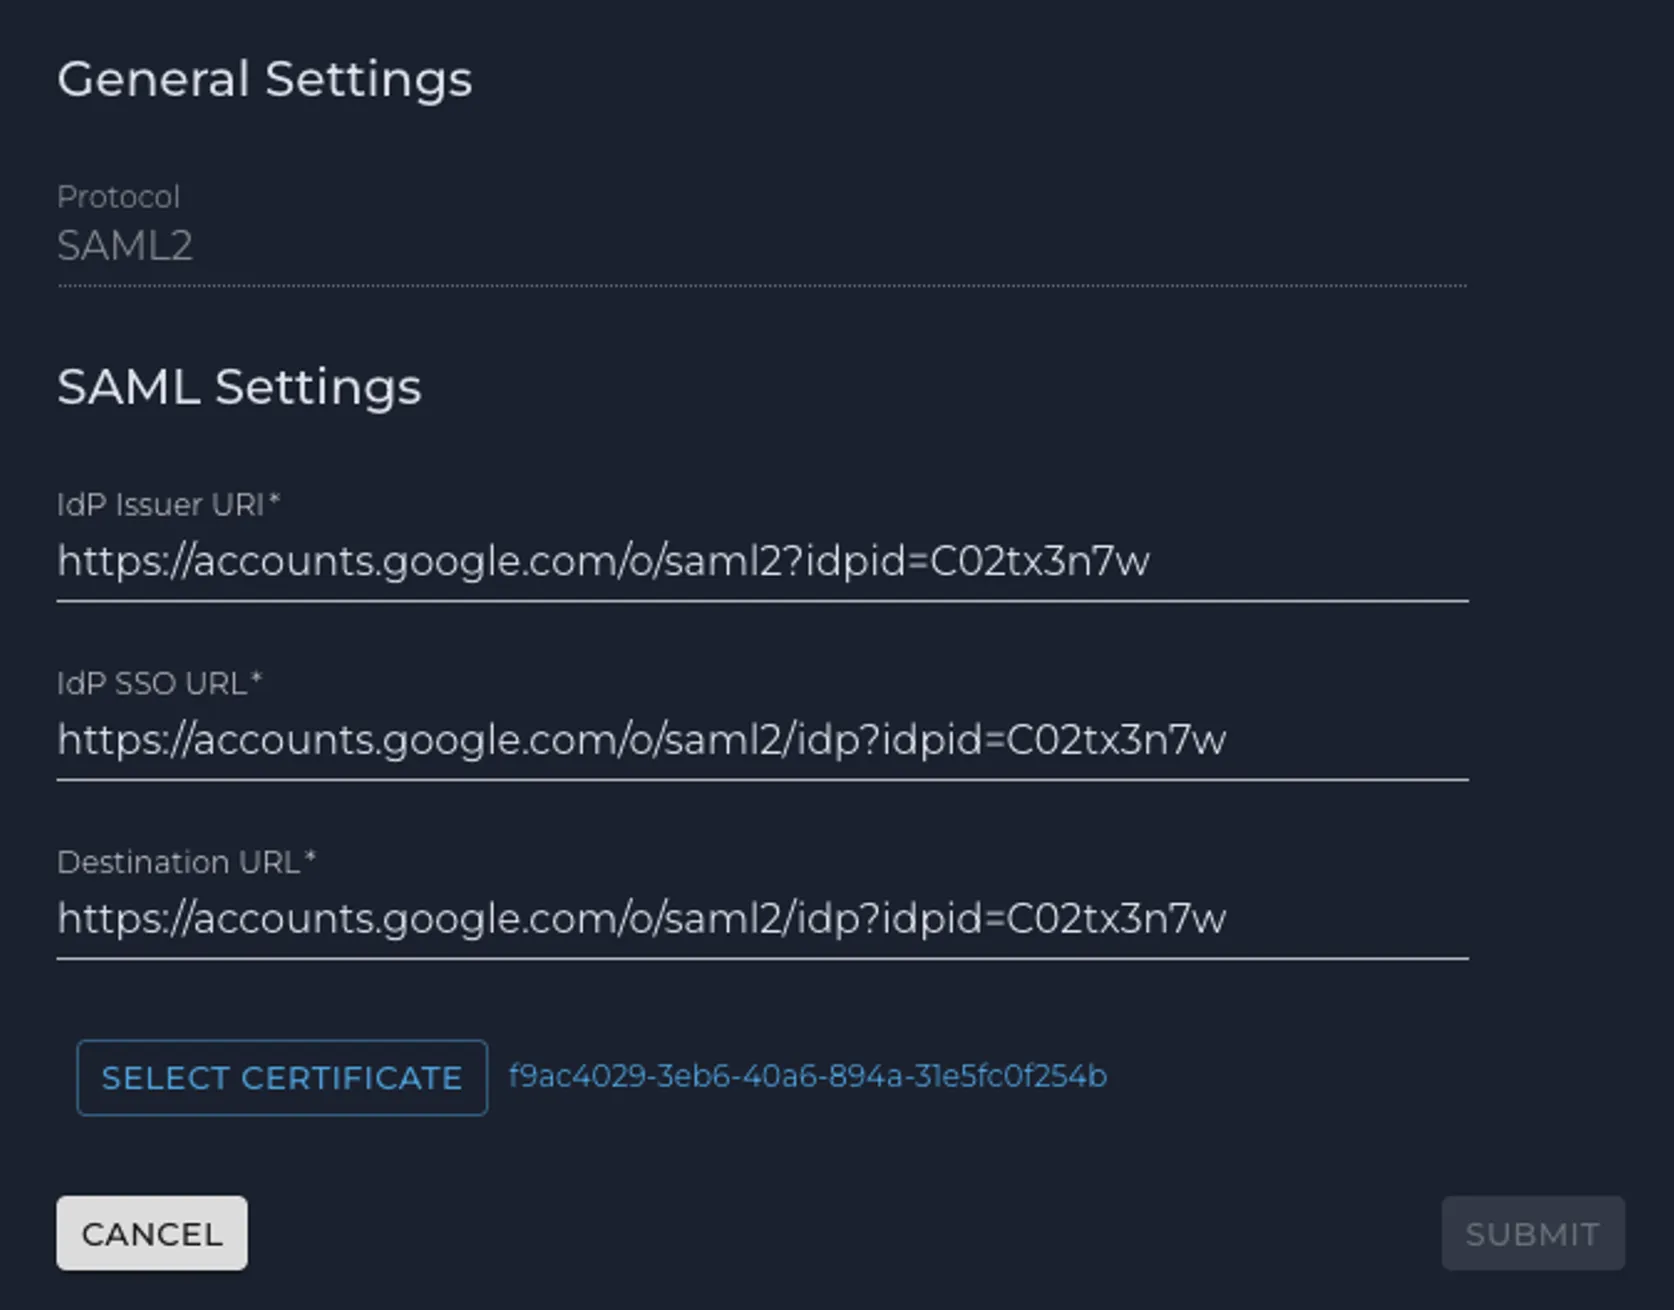
- Click on ADD A NEW PROVIDER and fill out the form as follows:
- IdP Issuer URI: <Entity ID (http)>
- IdP SSO URL: <SSO URL (http)>
- Destination URL: <SSO URL (http)>
- Click SELECT CERTIFICATE and upload the Google Workspace certificate downloaded earlier, and click on SUBMIT when done:
Note: If the certificate file cannot be selected, either change the file type to “all files” and/or go to the file’s ‘get info’ and unlock it.
- Before closing the Provider settings, click on the METADATA link to download the XML file, where the Nile Okta entityID and location could be extracted (to be entered to continue the Google Workspace SAML app setup).
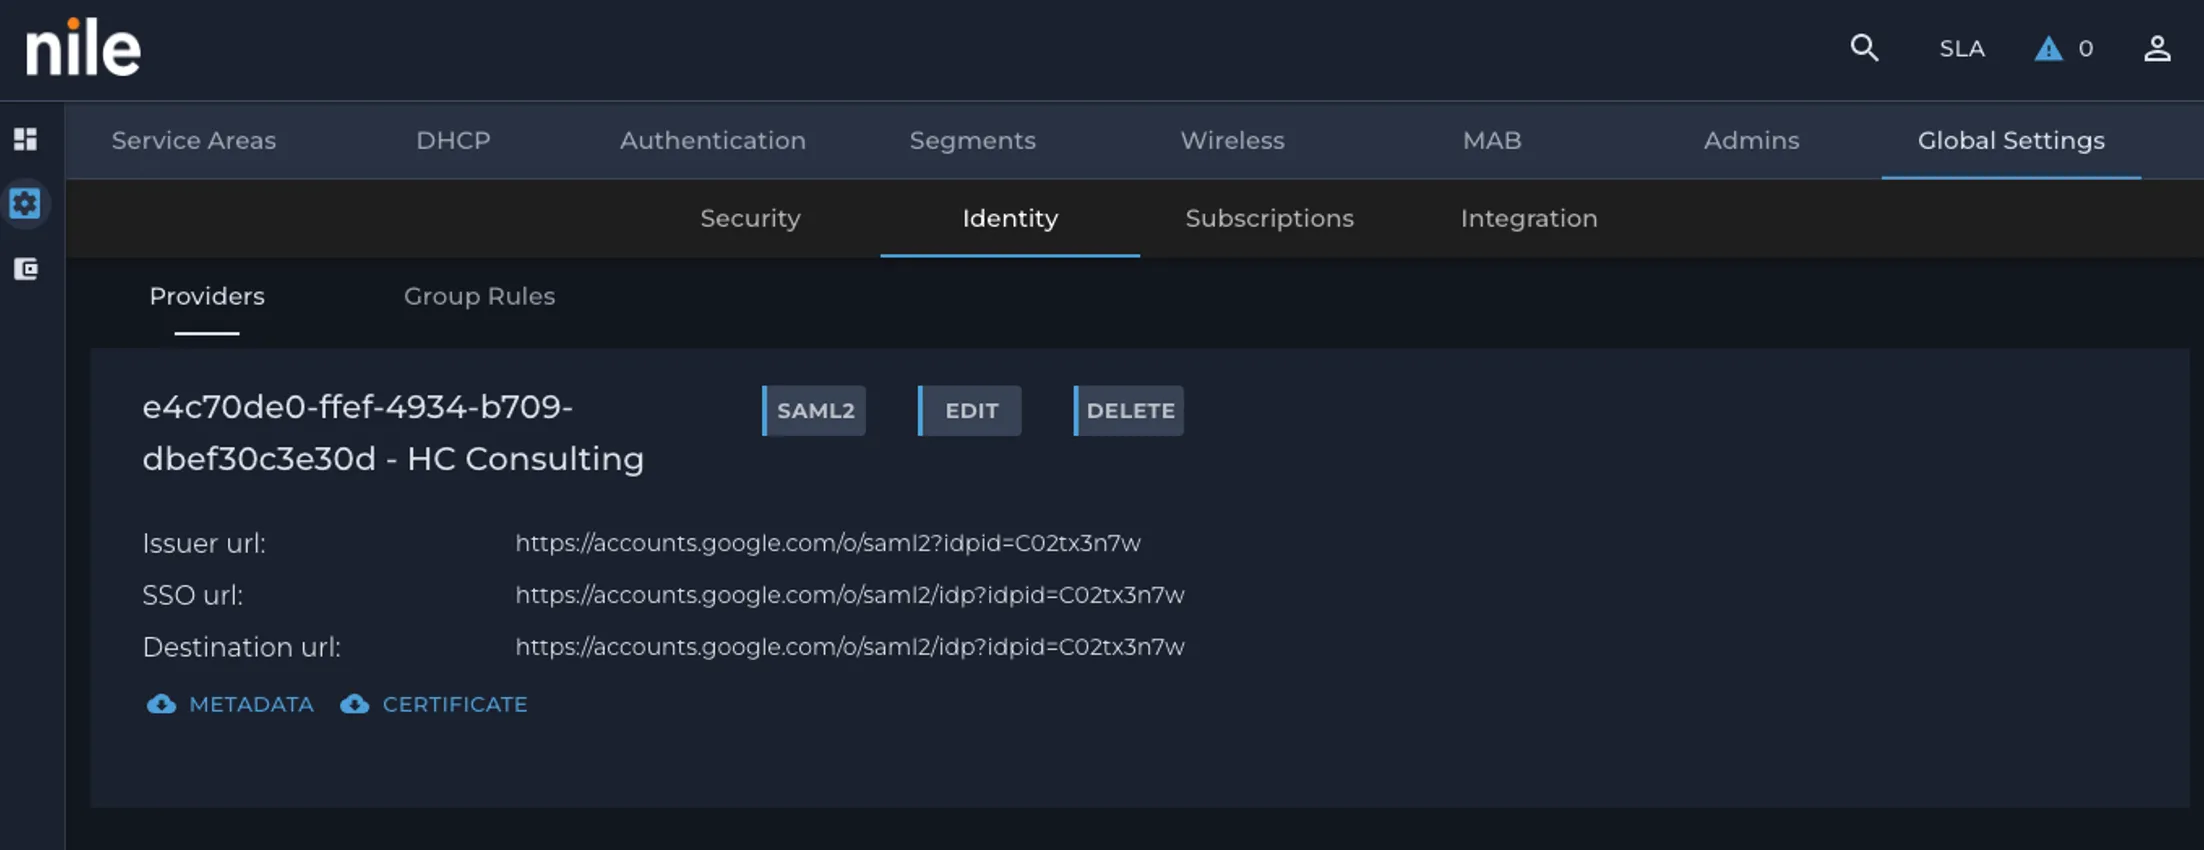
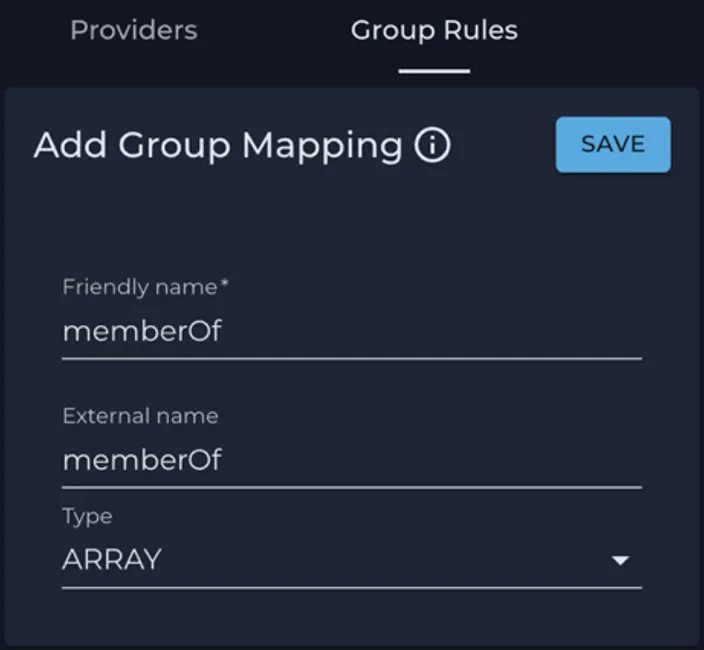
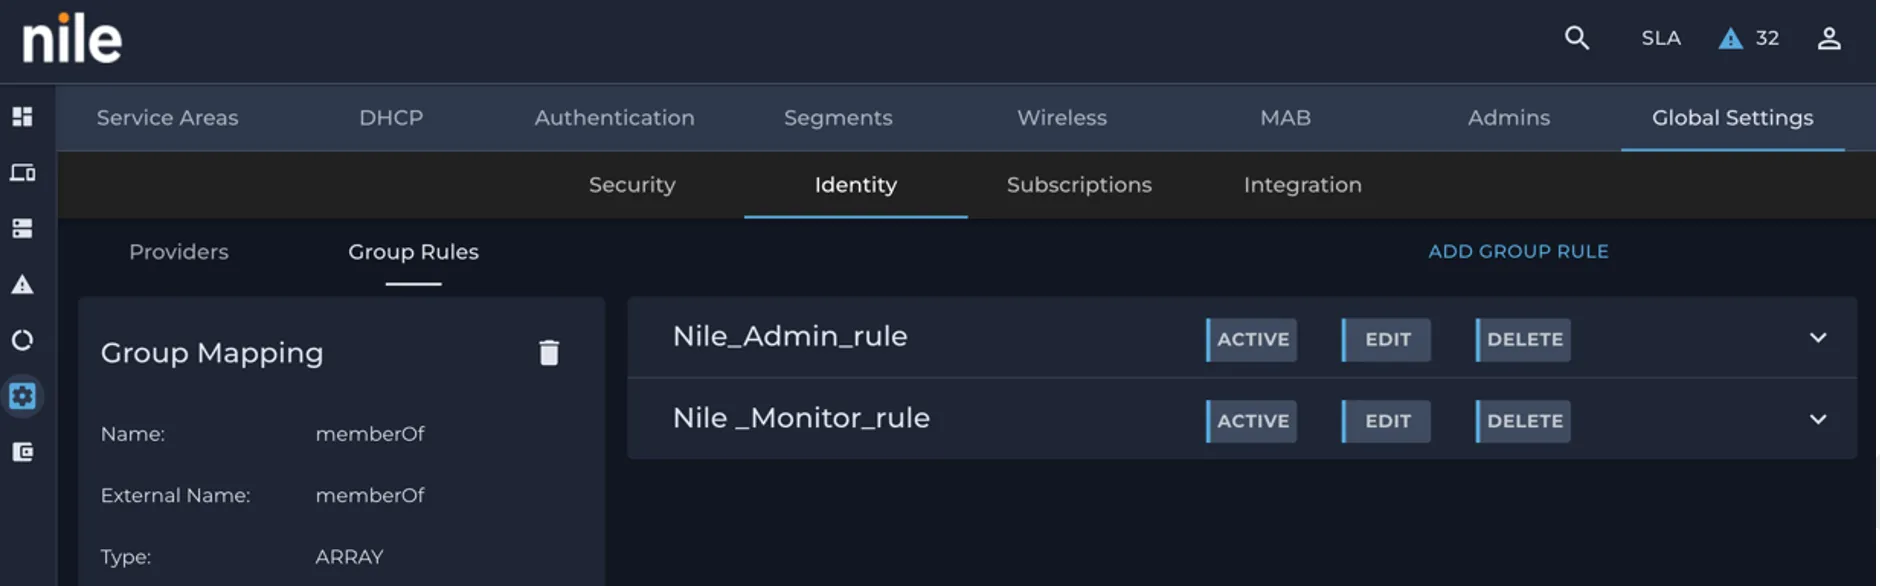
- Click on Group Rules, then on ADD GROUP MAPPING to create a ‘memberOf’ Group Mapping rule, and then click SAVE when done:

- Click on ADD GROUP RULE to create one rule for the Nile Administrator:
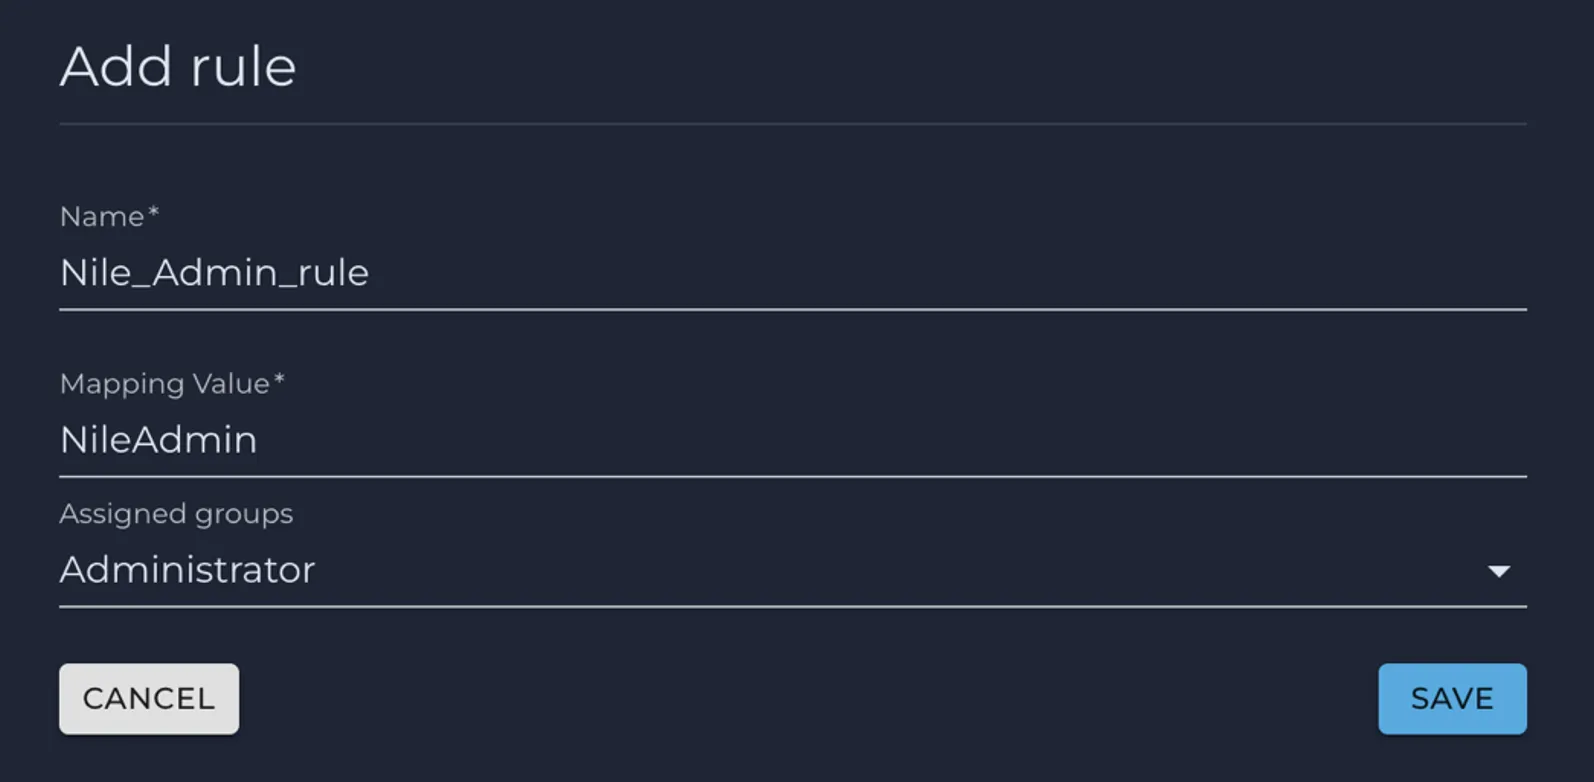
- Once the rule is saved, it can be activated by clicking the INACTIVE button.
Second pass at the Google Workspace Custom SAML app Configuration
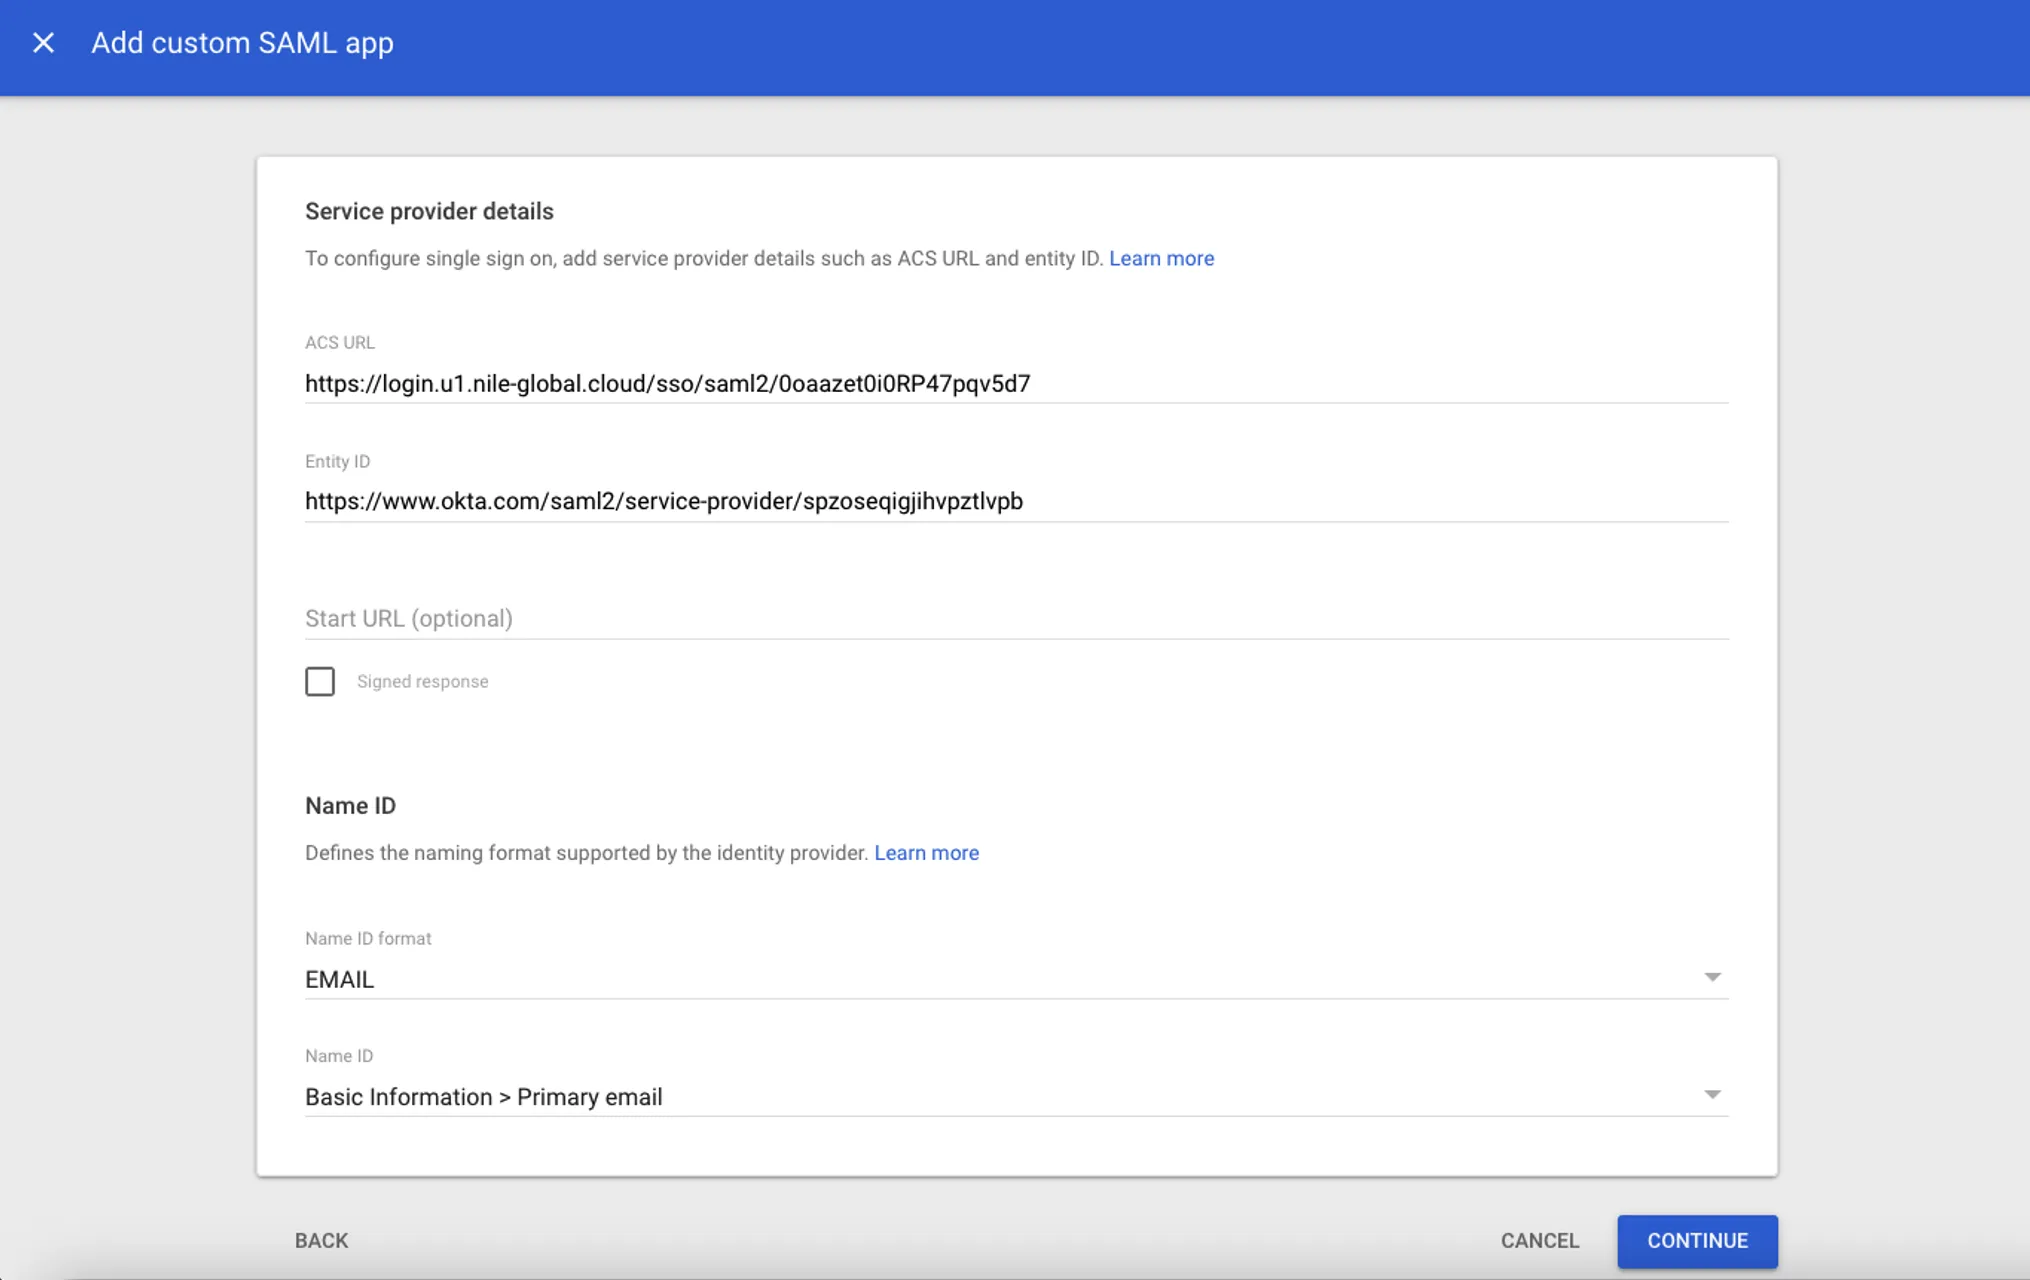
- Parse the Nile Portal provider METADATA XML file to extract the entityID and location URLs. Here is an example for illustration only: entityID: https://www.okta.com/saml2/service-provider/sppdejeumsqtplsczcjs location: https://login.u1.nile-global.cloud/sso/saml2/0oa5prpwodXxgB6mI5d7
- Go back to the Google Workspace custom SAML app configuration window. Copy and paste the location in the ACS URL field and the entity ID in the Entity ID field. Change Name ID format to EMAIL. Click CONTINUE.
- Attribute mapping: the following Google Directory attributes are required to be mapped and sent to Nile:
- Primary email: email
- First name: firstName
- Last name: lastName
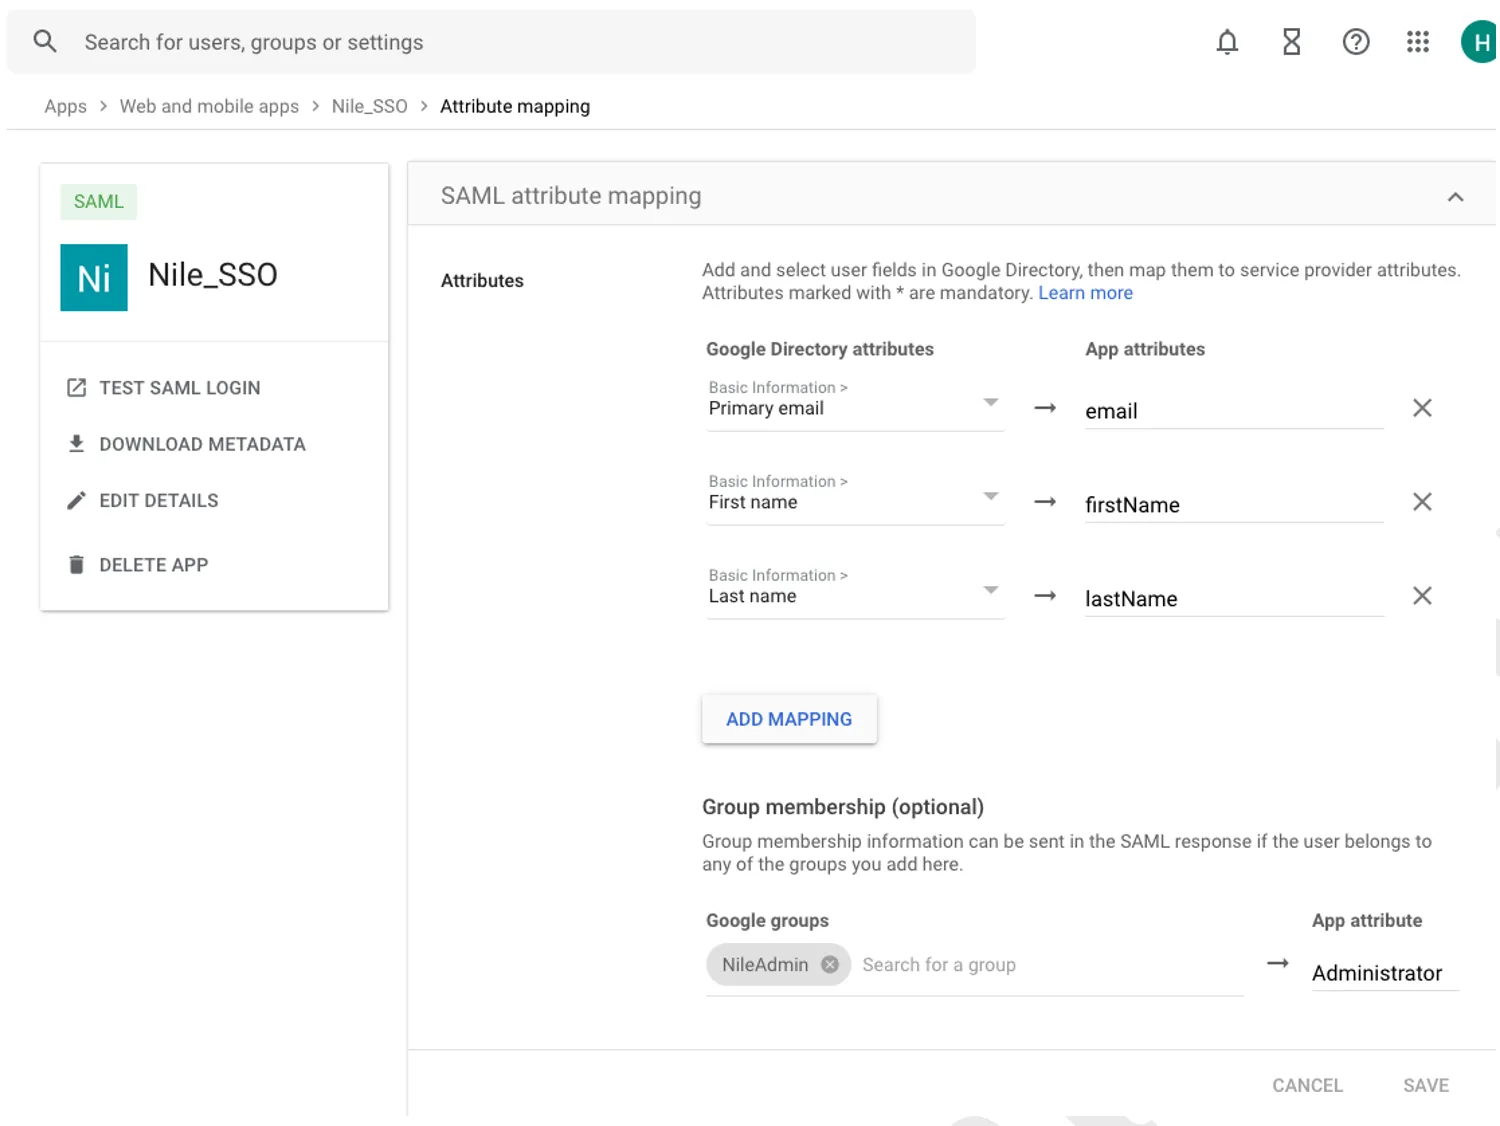
- Click FINISH. You may view the mapped Google Directory attribute as shown below:
- Group mapping (Optional): If an admin user uses SSO to authenticate to Nile Portal, map the NileAdmin group from Google groups to the Administrator App attribute. Click FINISH
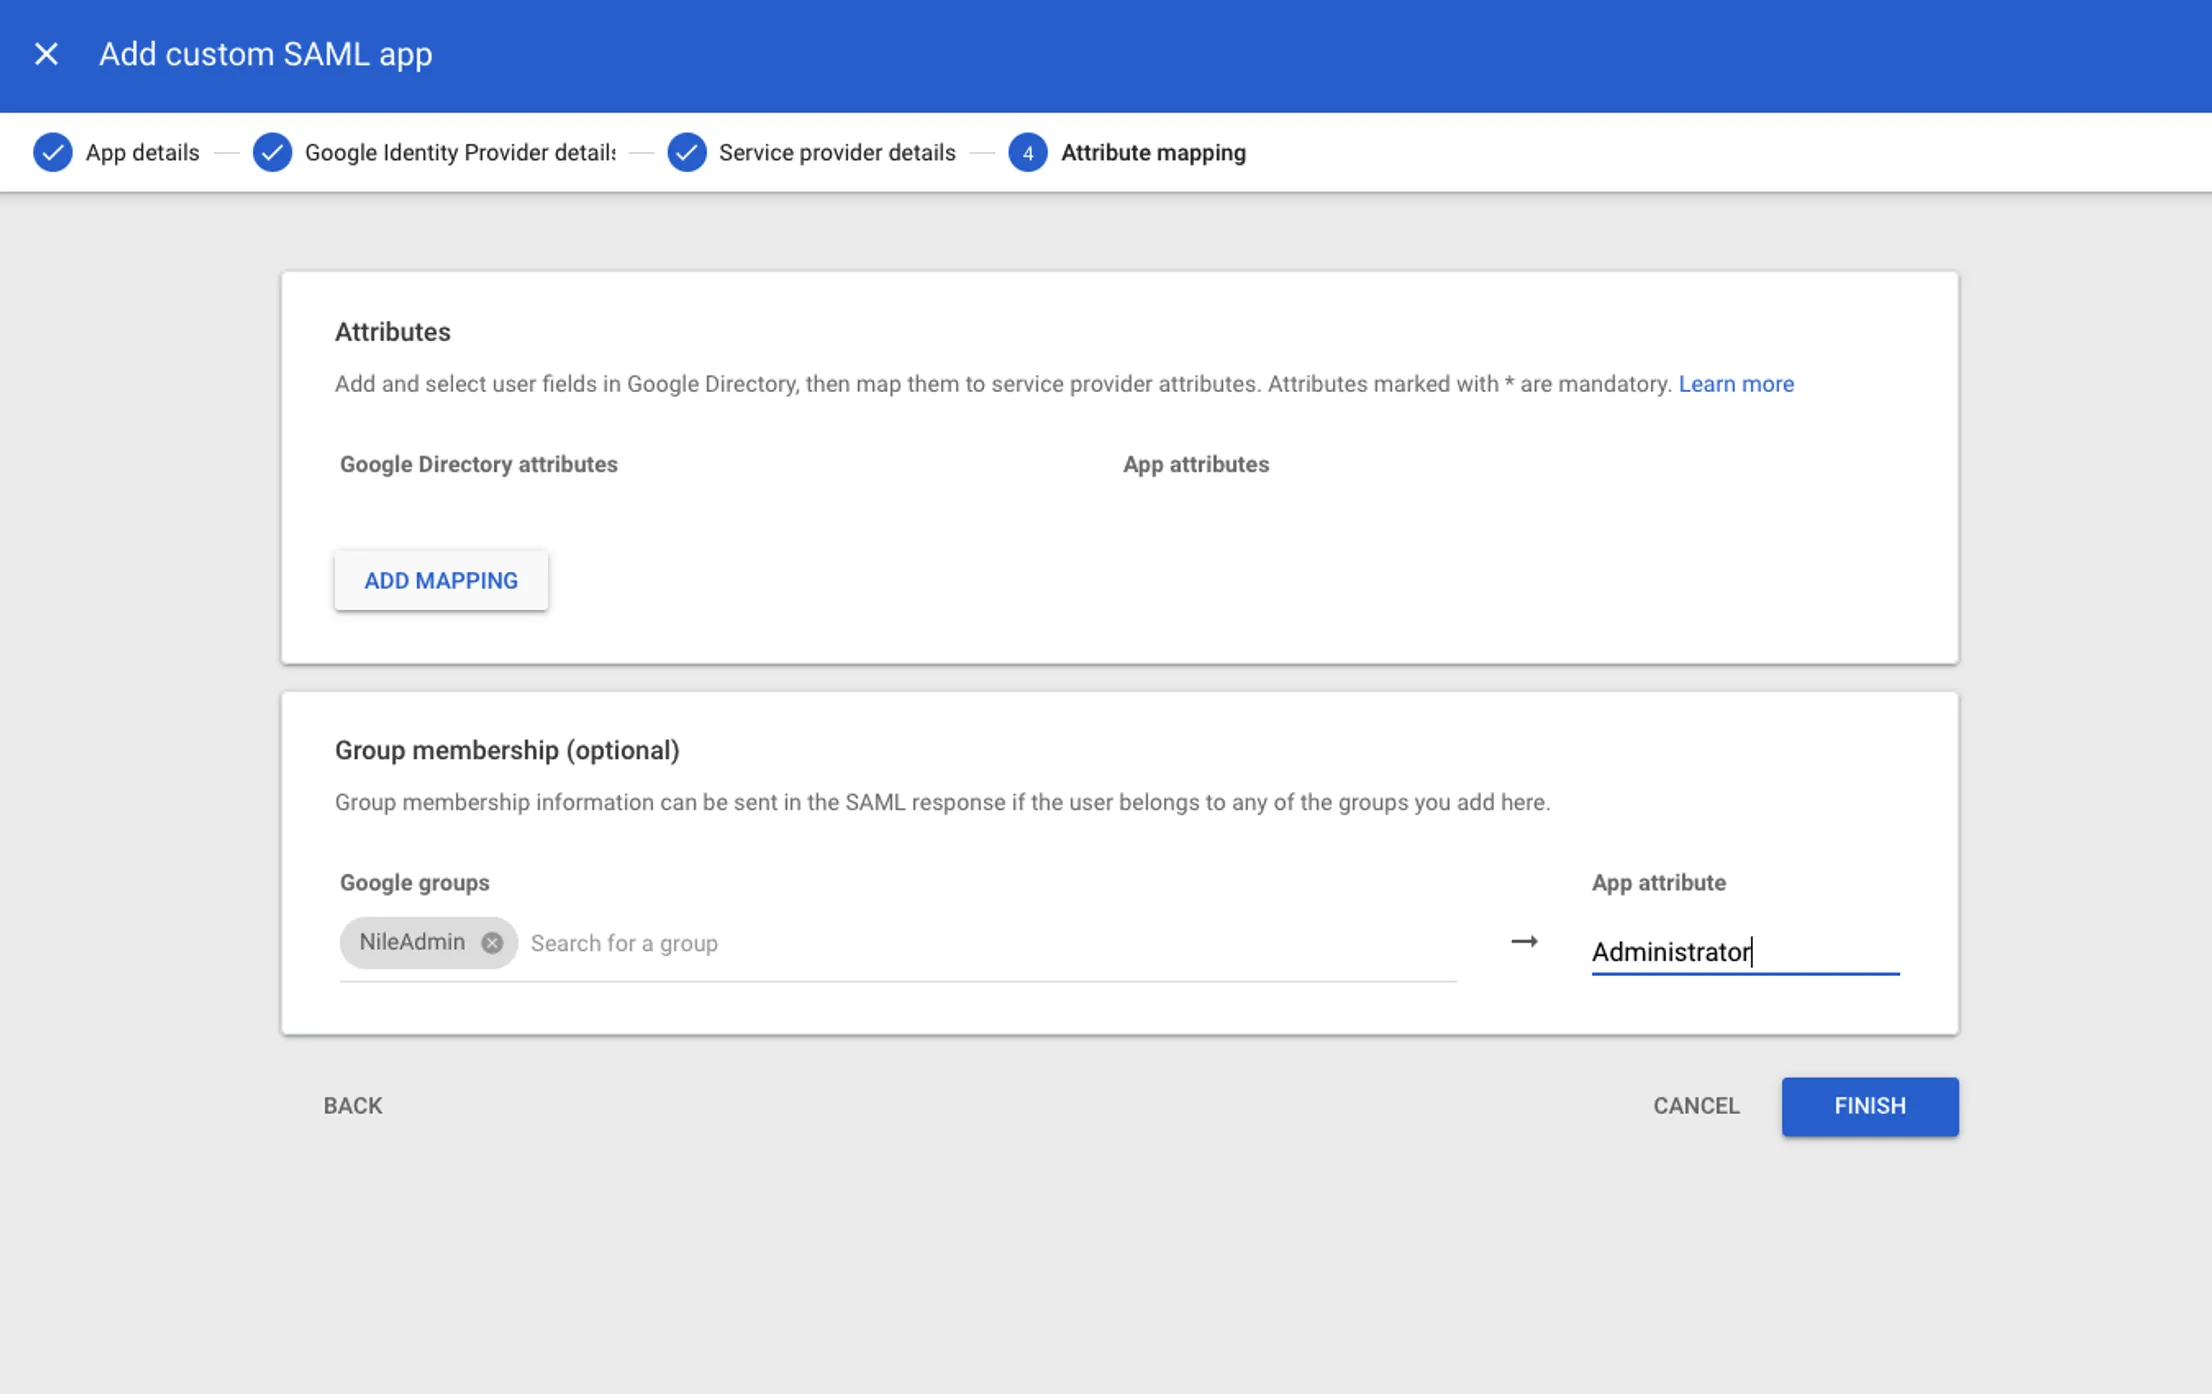
- If Group mapping is not required, just click FINISH
You can now log in to the Nile Portal using your SSO credentials to validate your privileges. Please note that once SSO is activated, all local (non-SSO) accounts will be disabled, except for the root administrator.
Additionally, you can set up SSO on a PSK SSID. For step-by-step instructions, please refer to the setup guide for the same.