Setup Guide for Nile Trust Service
Overview
This guide explains how to set up Nile Trust Service, Nile’s micro-segmentation capability for controlling both east–west and north–south traffic.
Key Terminology
- Uni (Unidirectional): Traffic flows in one direction only
- Bi (Bidirectional): Traffic flows in both directions
- Segments: Layer 3 construct that maps to a subnet (replaces VLANs in traditional networks)
Policy Types
Nile Trust Service supports three approaches to creating trust policies:
- Identity-based policies (Nile recommends using Identity-based policies when doing a greenfield deployment)
- Subnet/Segment-based policies (Traditional approach)
- Hybrid policies (Mix of identity and subnet)
Prerequisites
Before beginning any migration, complete the following:
- Review Technical Documentation: Read the Nile Trust Service Documentation to understand key concepts and constructs
- Contact Nile Support: Confirm your system release version
- Enable Feature Flags: Request Nile Support to enable the micro-segmentation 1.6 feature flag
- Check site readiness: Confirm that the target site is already onboarded to Nile Access Service.
- Ensure that segments are created and mapped to their respective DHCP pools. In the Nile ecosystem, there are no VLANs. Nile has a construct called Segments. A segment is an L3 construct that maps to a subnet. So, if your existing network has 10 VLANs, in Nile that would equate to 10 segments
Step 1 - Create Policy Group definitions
A Policy Group represents a collection of endpoints that share common access requirements. Each endpoint belongs to exactly one Policy Group, ensuring that its access policies are clear and deterministic. The Trust Engine automatically evaluates each user or device during onboarding and assigns it to the most appropriate group based on predefined classification rules for its identity.
Group Types
- User Groups – Endpoints tied to an authenticated user. Commonly used for employees, guests, contractors, students, and faculty.
- Device Groups – Endpoints such as printers, cameras, or IoT devices not associated with user identities.
- Application Groups – Destination endpoints that represent private or public applications.
Admin User Group
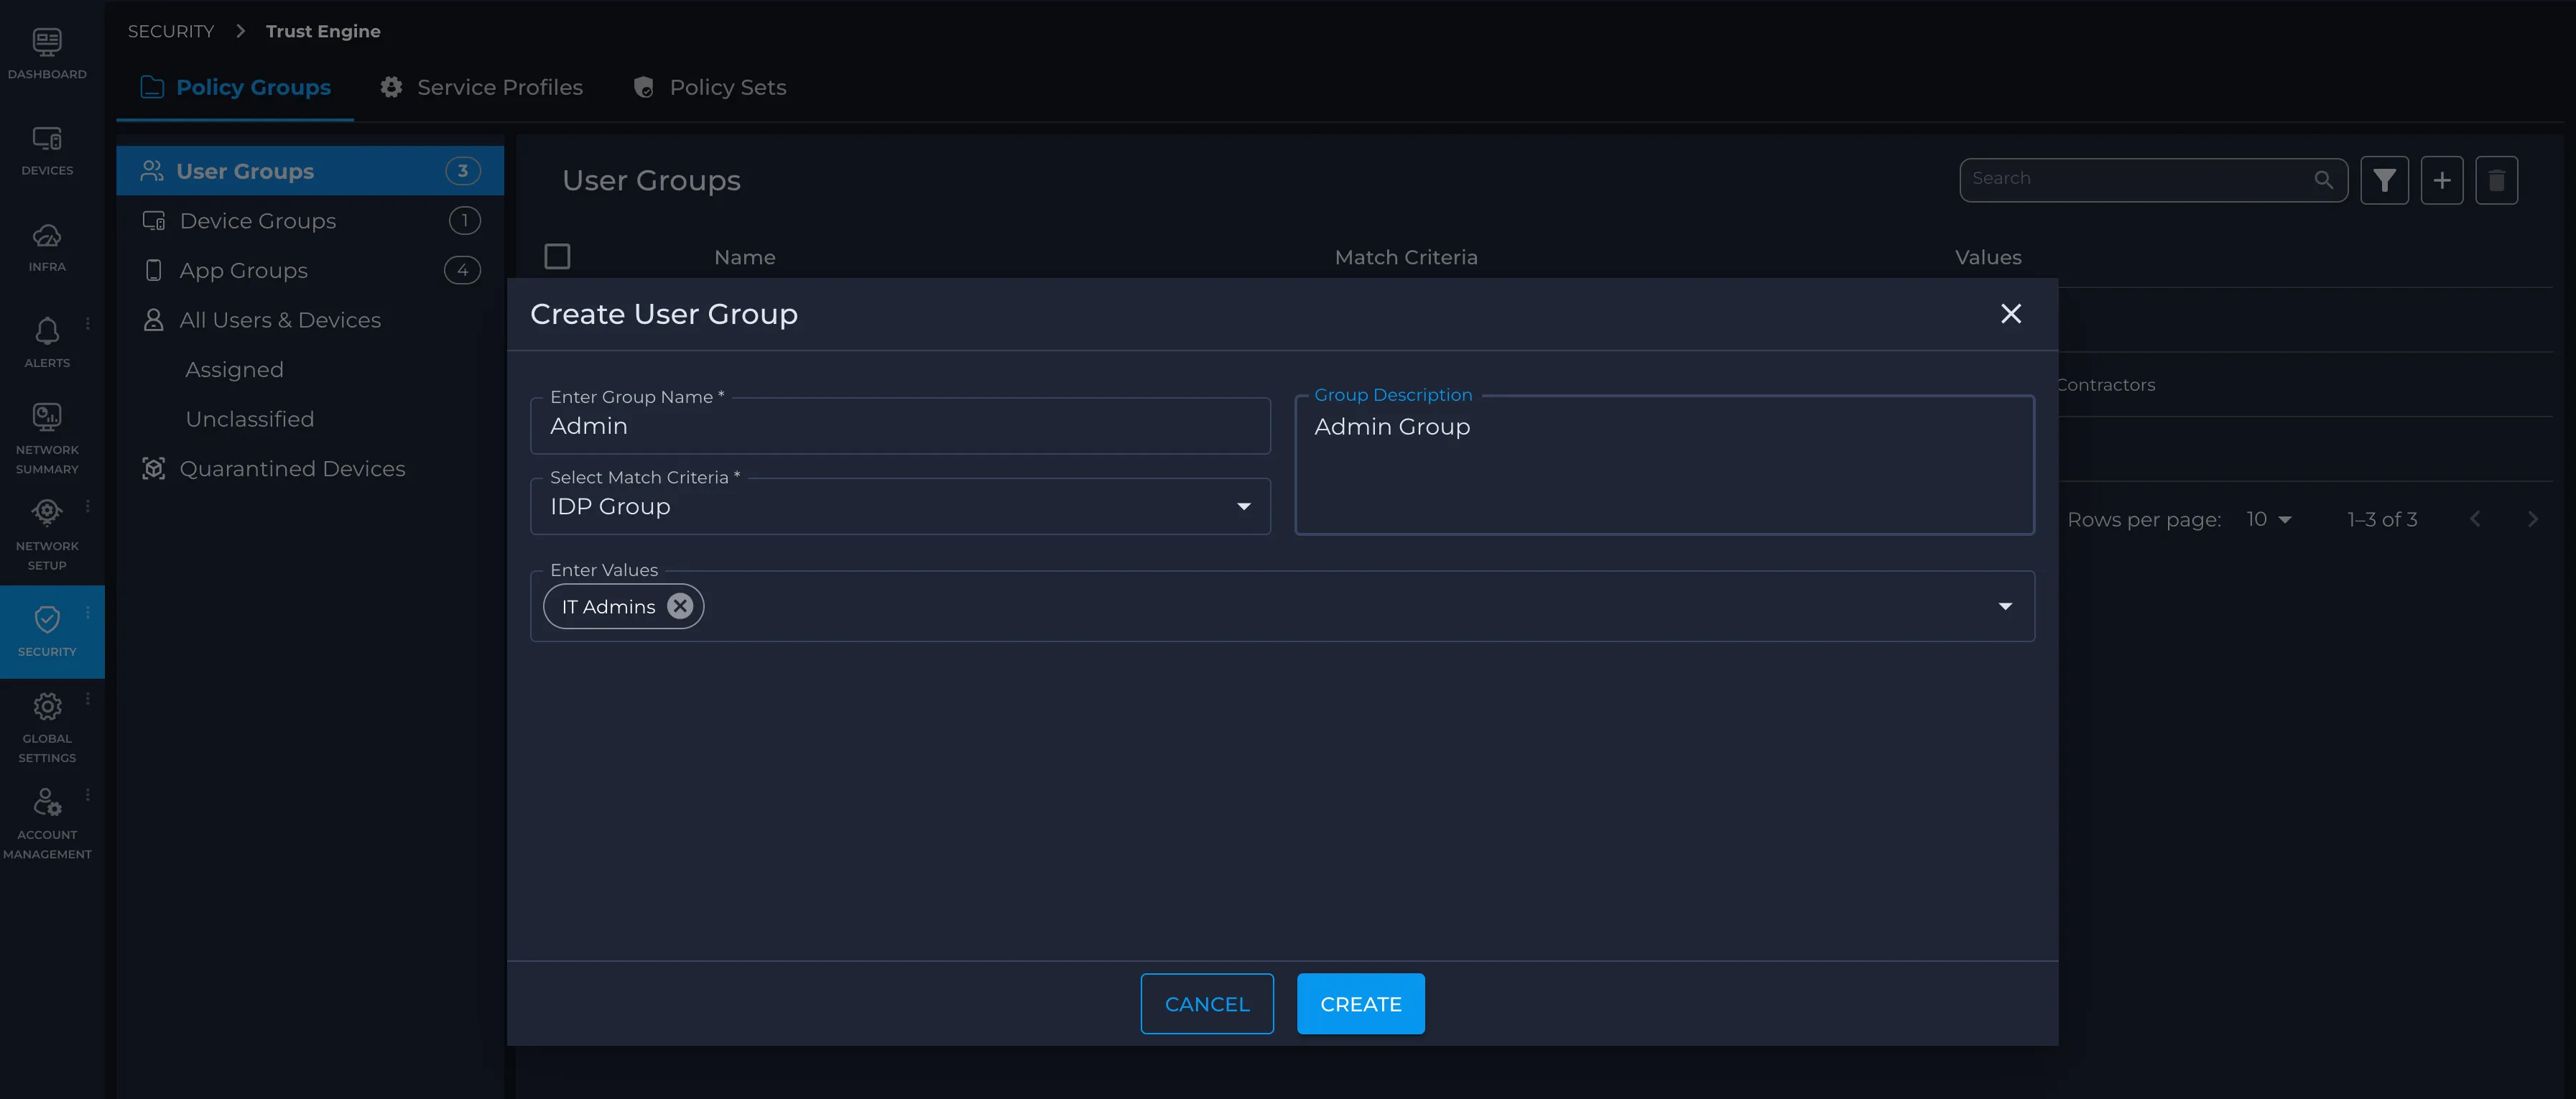
Create an Admin user group using the steps below and select IDP Group as the match criteria. This assumes that Admins use SSO SSID or wired SSO to access the network. (Note: RADIUS-based groups will be supported in the future.) SCIM will return the groups a user belongs to, which will be used to distinguish Admins from Employees. Ensure the Admin group is configured with the highest priority/order.
- Log in to the Nile portal.
- In the left navigation, select Security > Trust Engine > Policy Groups > User Groups.
- Click the + icon to create a new user group.
- In Enter Group Name, type a descriptive name for the group (for example, Admin).
- In Group Description, add an optional description (for example, Admin Group).
- From Select Match Criteria, choose how users are matched into this group (for example, IDP Group).
- In Enter Values, type or select the corresponding identity provider value(s) for this group (for example, IT Admins), then confirm the selection.
- Click Create to save the user group.
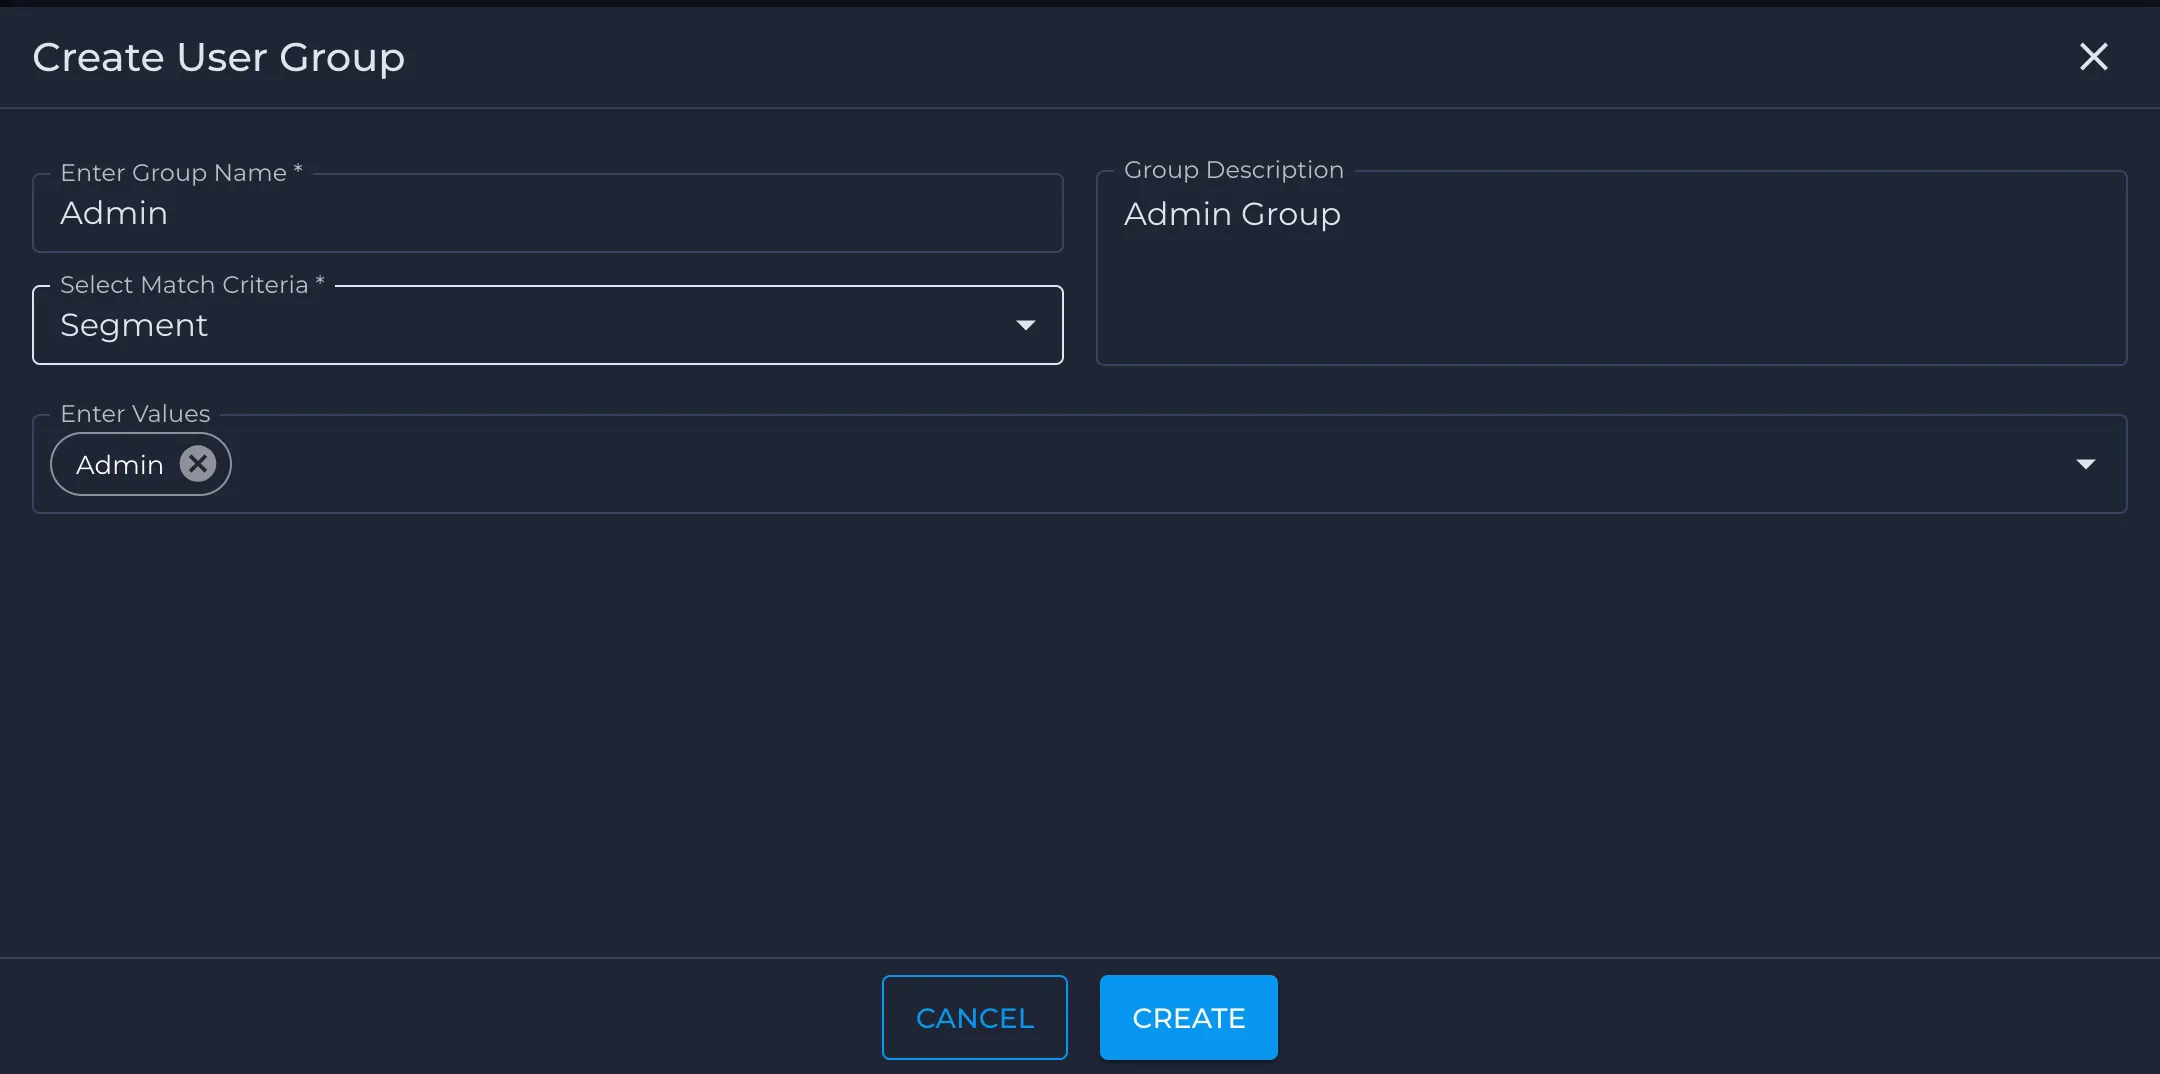
If no IdP is available for identity-based policy creation, you can instead create an Admin user group that matches on the Nile segment, as described in the steps below. Make sure this Admin group is configured with the highest priority/order.
- Log in to the Nile portal.
- In the left navigation, select Security > Policy Groups > User Groups.
- Click the + icon to create a new user group.
- In Enter Group Name, type a descriptive name for the group (for example, Admin).
- In Group Description, add an optional description (for example, Admin Group).
- From Select Match Criteria, choose Segment.
- In Enter Values, type or select the segment value that represents your admin users (for example, Admin), then confirm the selection.
- Click Create to save the user group.
Employee User Group
Similarly, create an employee user group and choose IDP Group as the criteria. This assumes Employees will be doing SSO to access the network. The SCIM protocol will return the groups the user belongs to, and that will be used to differentiate between Admin and Employee
Alternatively, if no IDP is available (for identity-based policy creation), create an employee user group and set the Nile Segment as the criteria.
Guest User Group
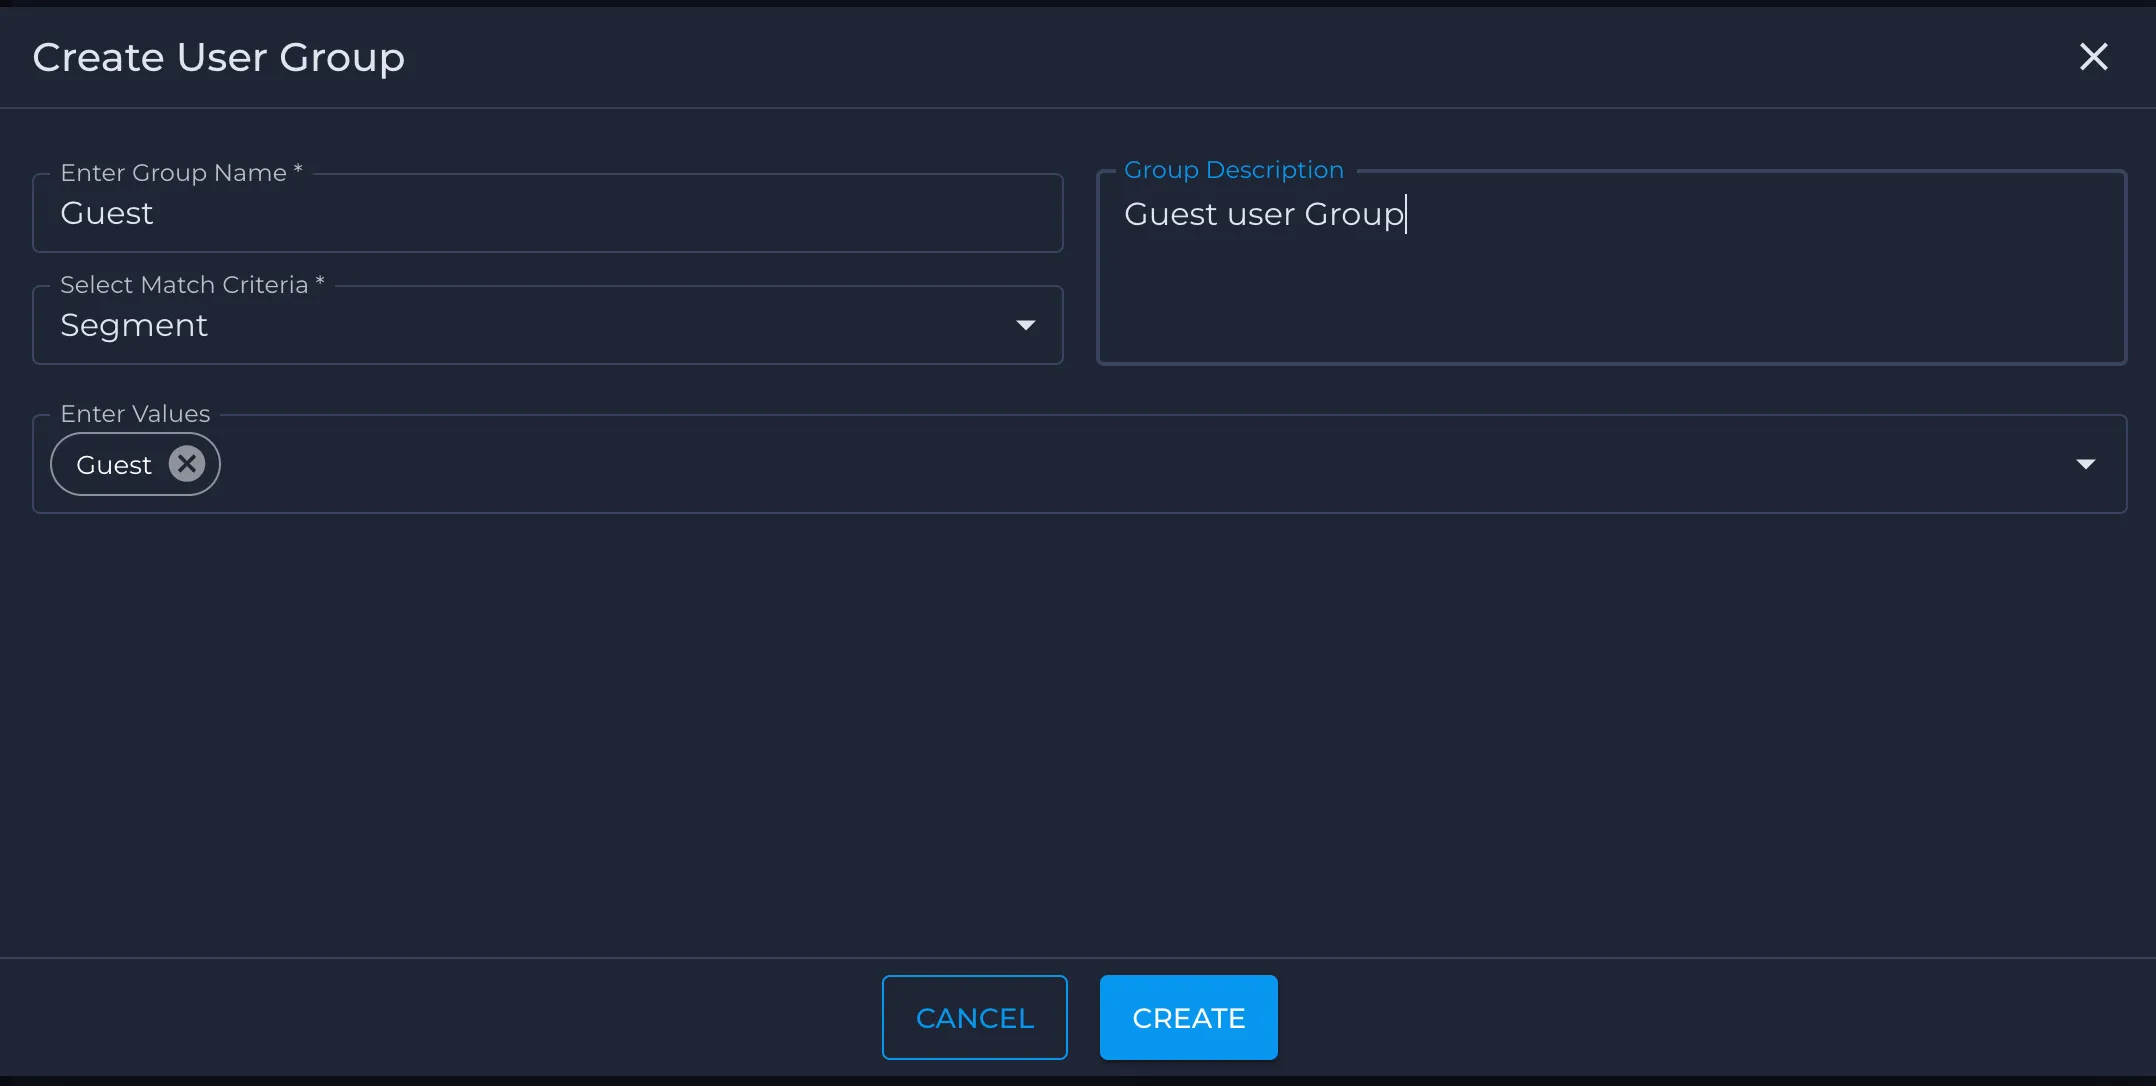
Create a Guest user group and choose the Nile Segment as the criterion.
Printer Device Groups
Create a Printer Group using the following steps and choose Fingerprint as the criteria. Ensure this has the highest priority
- Log in to the Nile portal.
- In the left navigation, select Security > Policy Groups > Device Groups.
- Click the + icon to create a new user group.
- In Enter Group Name, type a descriptive name for the group (for example, Admin).
- In Group Description, add an optional description (for example, Admin Group).
- From Select Match Criteria, choose Fingerprint.
- In Enter Values, type or select the type of printer that matches your physical one(for example, HP Printer), then confirm the selection.
- Click Create to save the Device group.
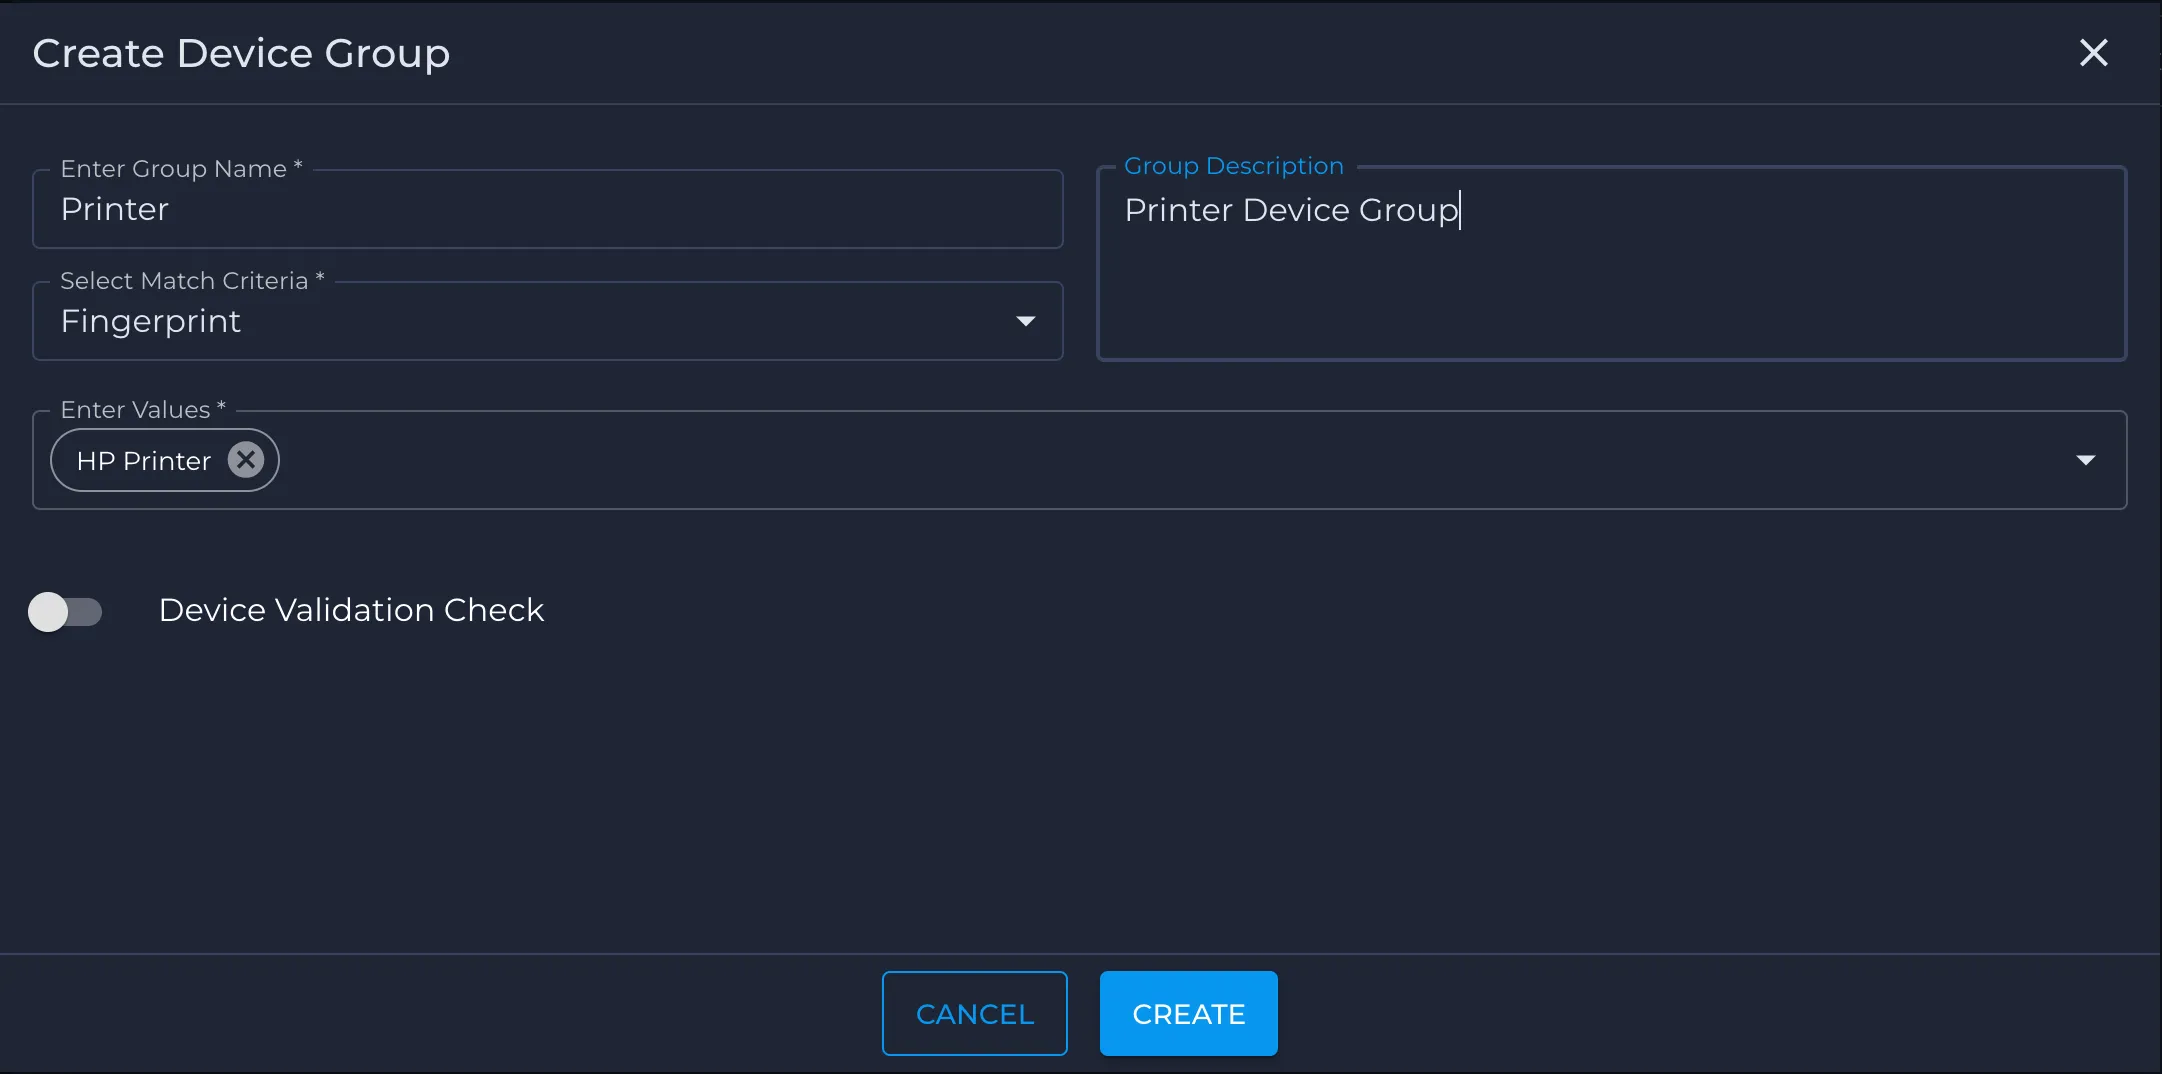
For device groups, Nile can continuously verify that devices are healthy and behave as expected by using Device Check.
The Device Check button enables protocol-based validation against devices in a device group (for example, HTTPS, SNMPv3, or SSH probes):
- If validation succeeds, the device remains in its intended device group (such as Printers, Cameras, or BMS).
- If validation fails consistently, the device can be automatically moved to the Quarantine group, where a more restrictive policy set applies.
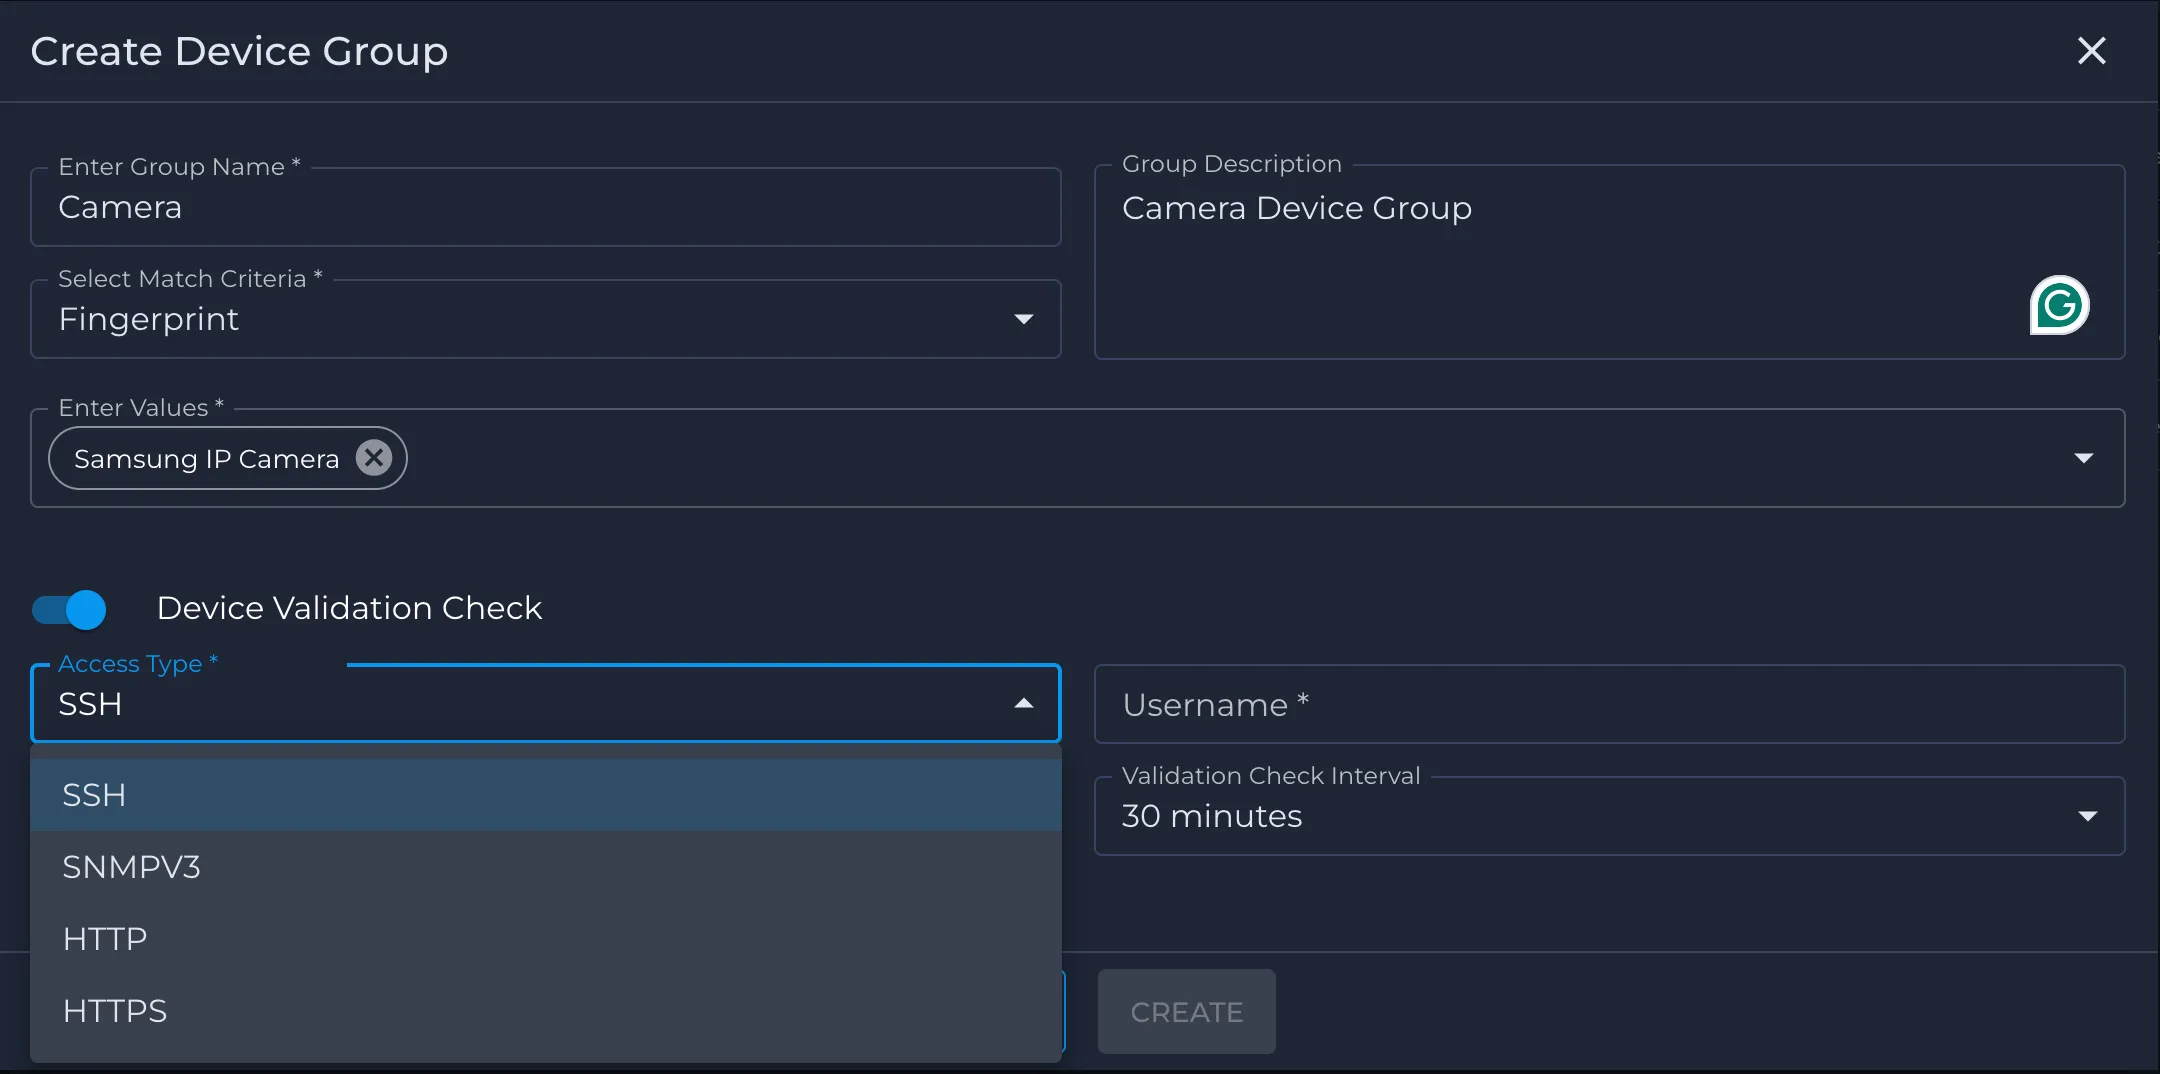
Nile recommends enabling Device Check for high-value or high-risk infrastructure devices (for example, printers, cameras, NVRs, building systems) to reduce the risk of spoofing, misconfiguration, or compromised firmware.
Camera Device Group
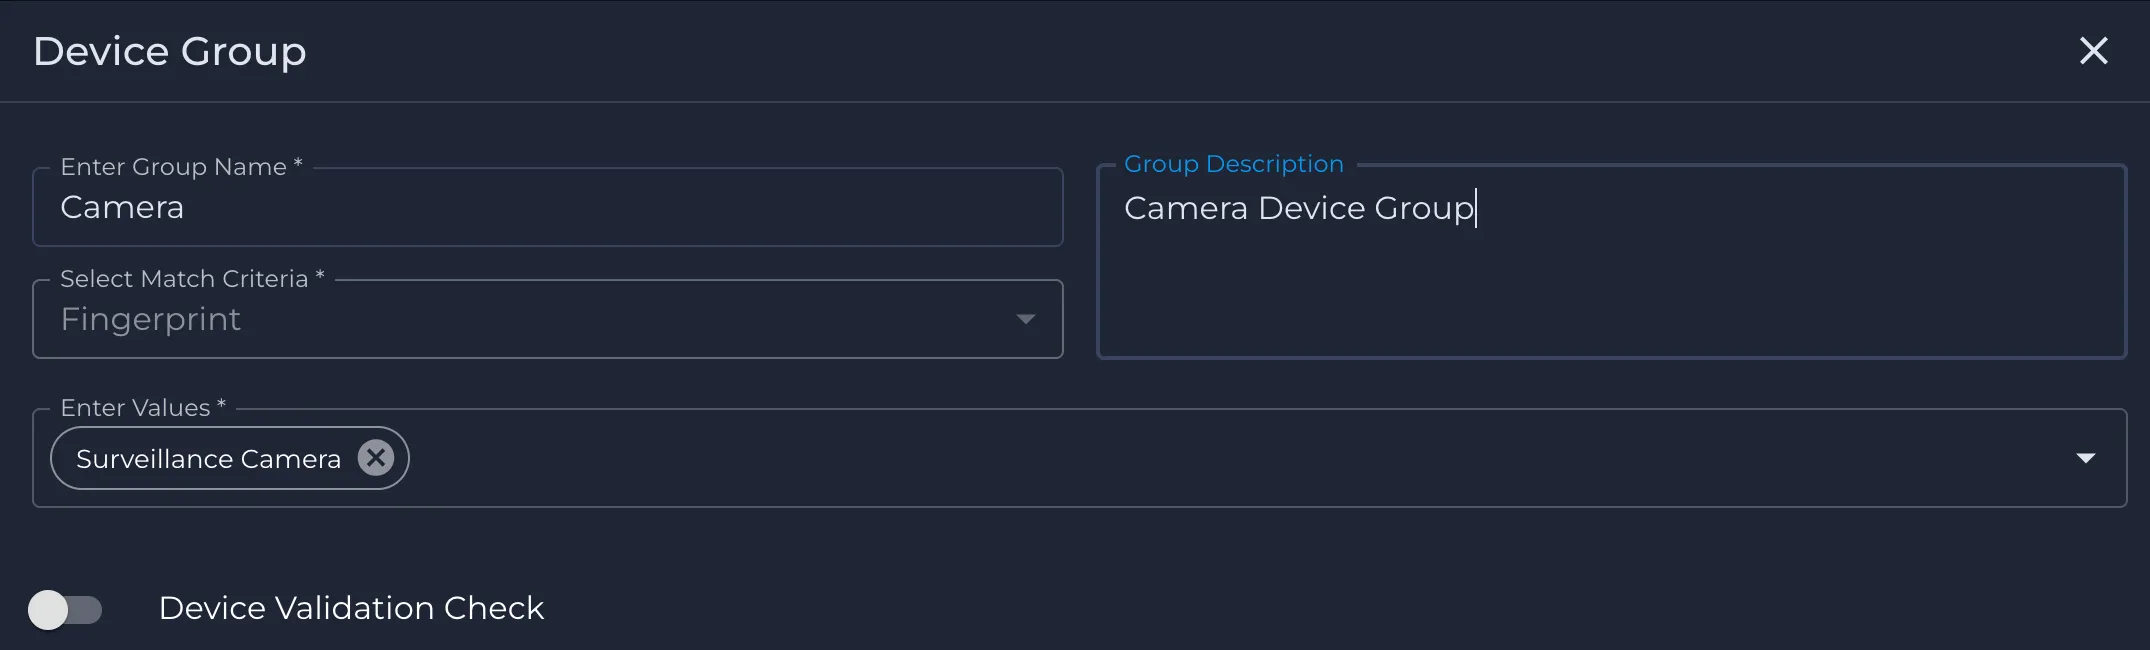
Create a Camera Group and choose Fingerprint as the criteria.
Zoom Rooms Device Group
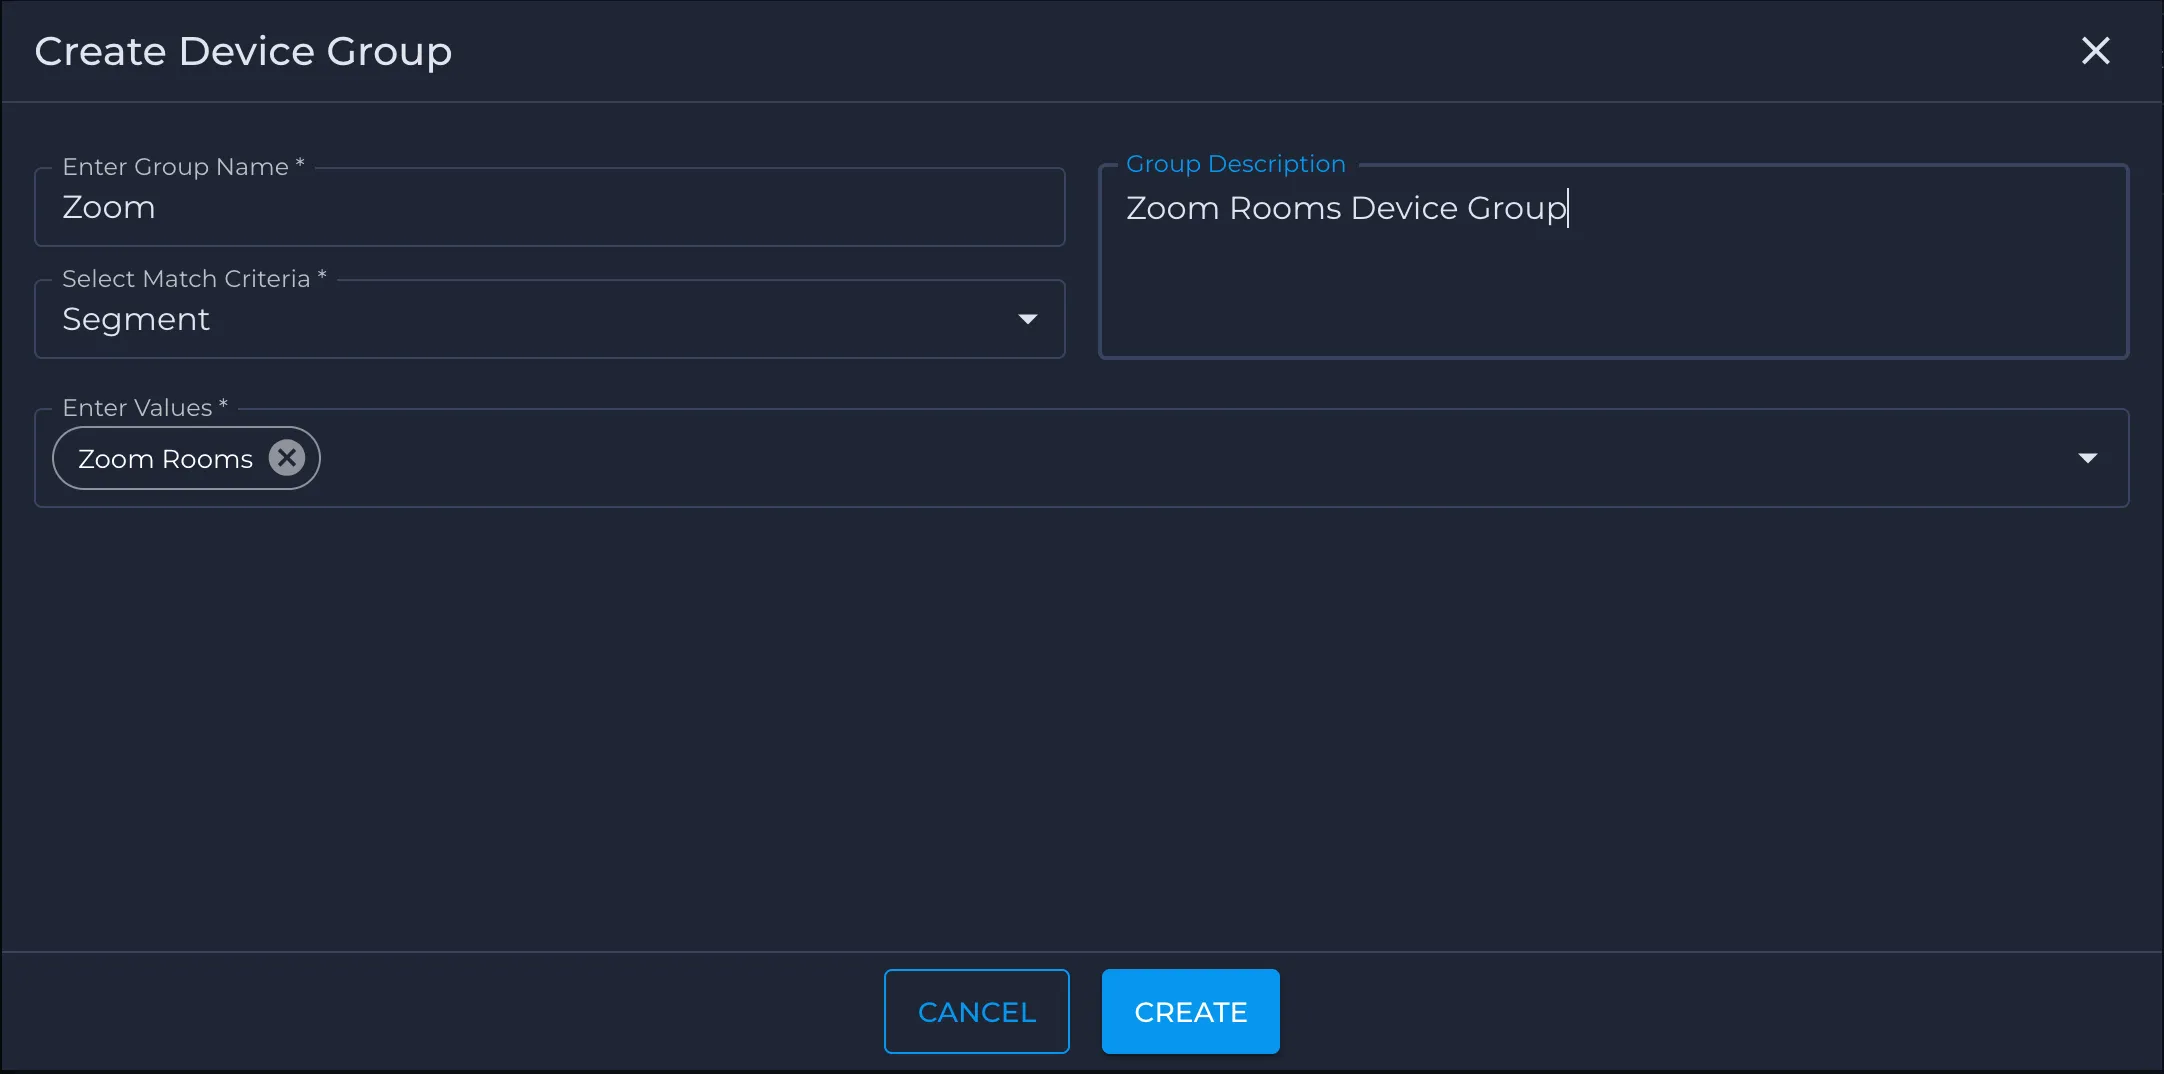
Create a Zoom Rooms Group based on segments. Usually, there are multiple types of devices, so a fingerprint may not be an optimal solution.
DVR App Groups
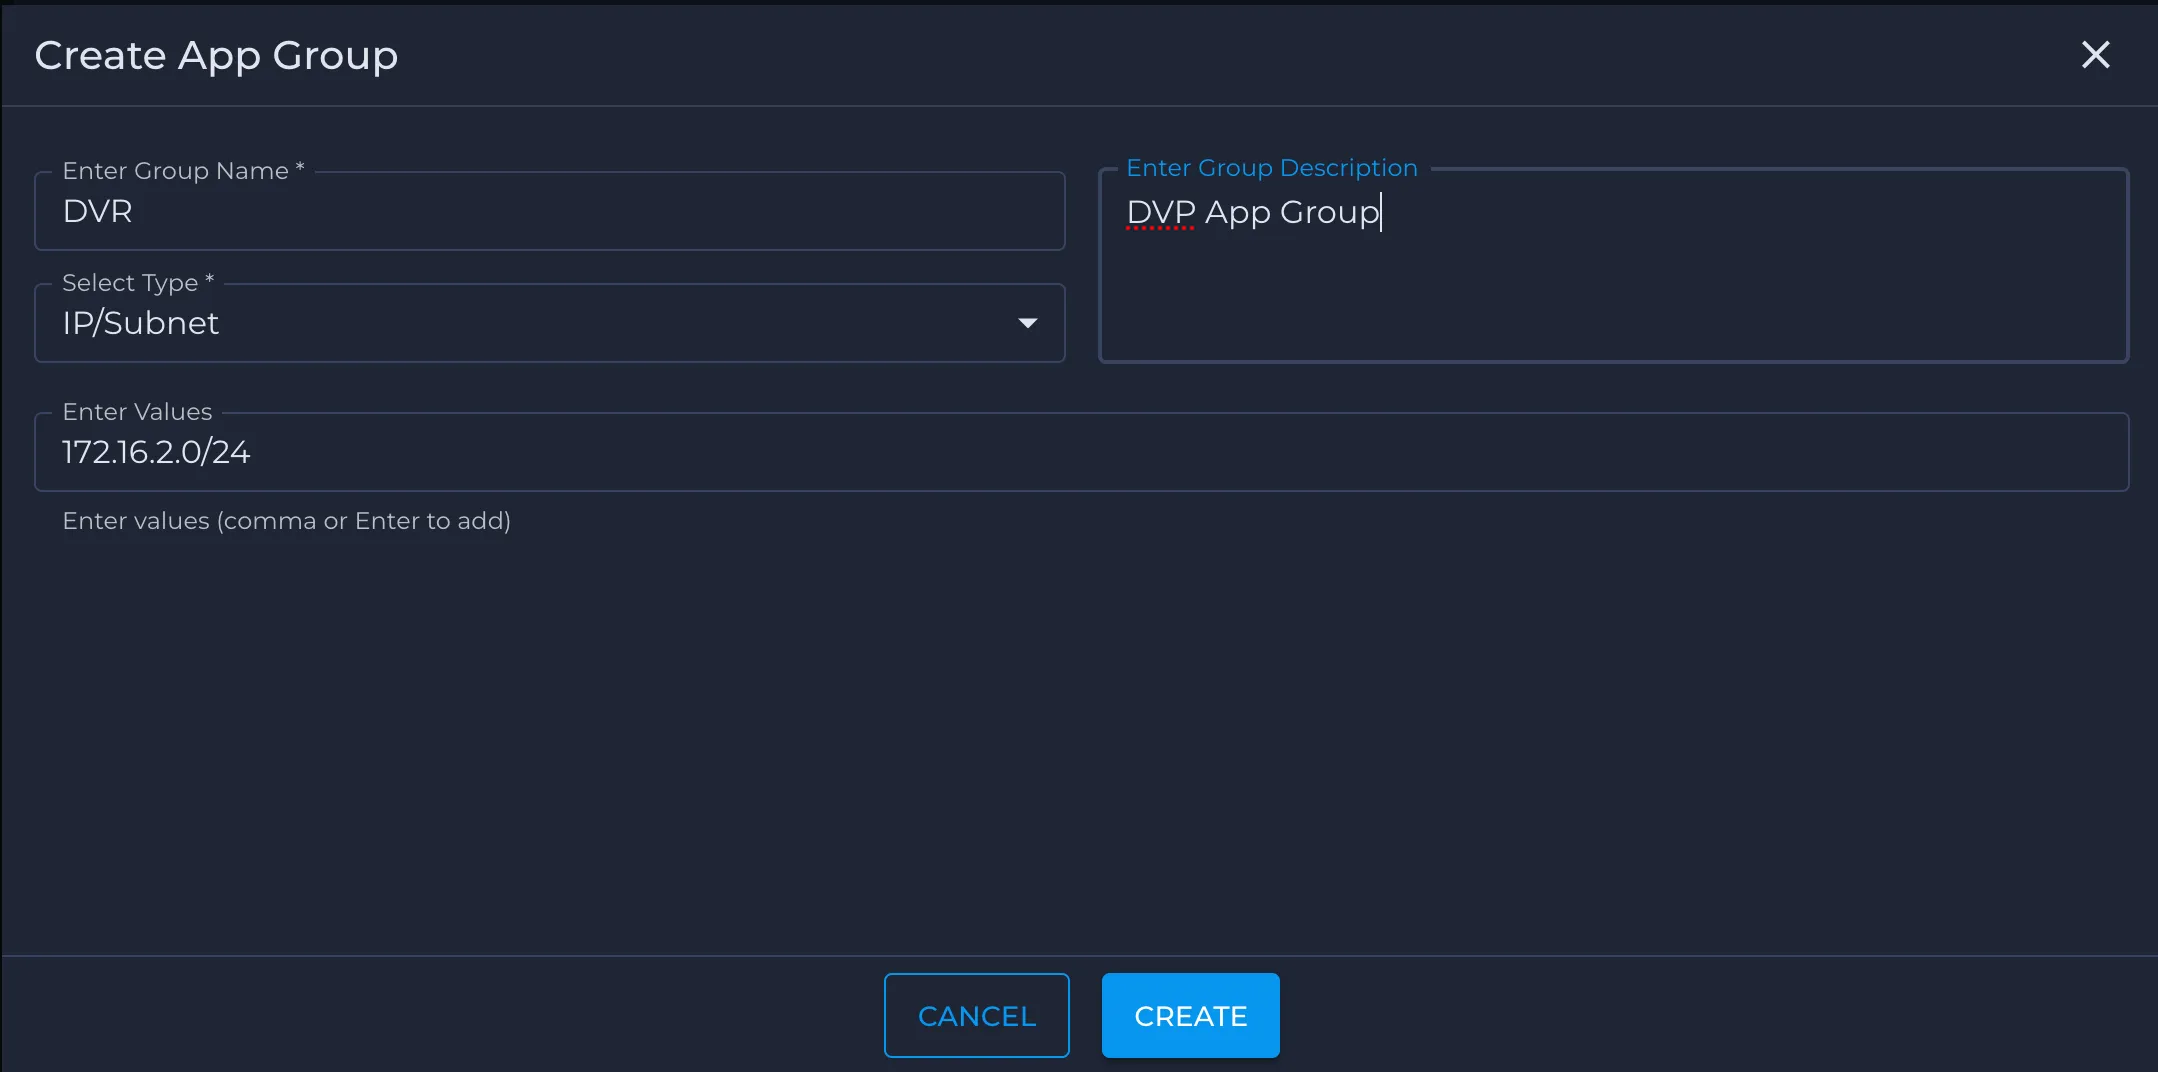
Create a DVR group and use the IP address or subnet as the criterion. In this example, the DVR app group is not connected to Nile
- Log in to the Nile portal.
- In the left navigation, select Security > Policy Groups > App Groups.
- Click the + icon to create a new user group.
- In Enter Group Name, type a descriptive name for the group (for example, Admin).
- In Group Description, add an optional description (for example, Admin Group).
- From Select Match Criteria, choose IP/subnet
- In Enter Values, type or select one or more entries that represent your DVR network (for example, a single IP address such as 172.16.20.10 or a subnet such as 172.16.20.0/24) then confirm the selection. You can also add multiple entries of IP or subent and separate them with commas.
- Click Create to save the App group.
Call Manager App Groups
Similarly, create a Call Manager group and use the IP address as the criterion. In this example, the Call Manager is not connected to Nile
System-Defined Policy Groups
In addition to custom user, device, and app groups, Nile Trust Service provides several system-defined policy groups. These groups are always present and can be referenced directly in policies.
Unclassified
The Unclassified group contains endpoints that do not match any explicit user, device, or app group. Traffic from Unclassified endpoints should be treated as untrusted and given only minimal or onboarding access. Nile recommends that you:
- Allow only essential connectivity (for example, onboarding portals or remediation services).
- Deny access to internal resources until the endpoint is classified into an appropriate policy group.
Quarantine
The Quarantine group is used for endpoints that have failed security checks or have been explicitly placed into an isolated posture by an administrator.
- Quarantined endpoints are typically restricted to a small set of remediation services (for example, update servers, ticketing portals).
- Policies for Quarantine should follow strict least-privilege principles and deny access to production applications and user resources.
Internet
The Internet app group represents all public Internet destinations (non–RFC1918 address space).
- Use the Internet as the destination when defining policies such as Employee → Internet or Guest → Internet.
- Combine this group with a restrictive service profile (for example, HTTPS only) to enforce least-privilege web access.
Intranet
The Intranet app group represents private enterprise networks and internal applications that are reachable through upstream firewalls, data centers, or WAN links.
- Use the Internet as the destination when allowing users or devices to access internal applications that are not directly hosted inside the Nile Service Block.
- Typical examples include line-of-business apps, on-prem data centers, and internal portals.
External
The External app group represents upstream or third-party enforcement points, such as next-generation firewalls, SSE gateways, or partner networks.
- Use External as the destination for policies that intentionally steer traffic to these enforcement points (for example, Local → External with a “forward to firewall” action).
- This allows you to maintain existing security stacks while Nile Trust Service controls which flows are sent upstream.
Step 2 - Create Service Profiles
Service Profiles define which protocols and ports are permitted when traffic between policy groups is allowed. They ensure communication adheres to least-privilege principles by restricting flows to only what is necessary. Service profiles are mandatory for any policy configured to allow or forward traffic, consistent with Zero Trust principles. Rules within a service profile are ordered, and the default rule is to exclude any port and any protocol (i.e., "deny all ports/protocols").
Printing Service Profile
Create a service profile that allows access to TCP 9100 only using the steps below.
- Log in to the Nile portal.
- In the left navigation, go to Security > Service Profiles.
- Click the + icon to create a new service profile.
- In Enter Service Profile Name, type Printing Service.
- In Enter Service Profile Description, type Printing service.
- Click the + icon in the table to add a rule for printing traffic:
- Set Name to TCP_9100.
- Set Protocol to TCP.
- Set Port to 9100.
- Set Action to Include
- Save the rule.
- Add a second rule to deny all other traffic:
- Set Name to Deny All.
- Set Protocol to ANY.
- Set Port to ANY.
- Set Action to Exclude.
- Save the rule.
- Confirm the Service Profile shows both rules in order (allow TCP_9100 first, then Deny All), and save the service profile.
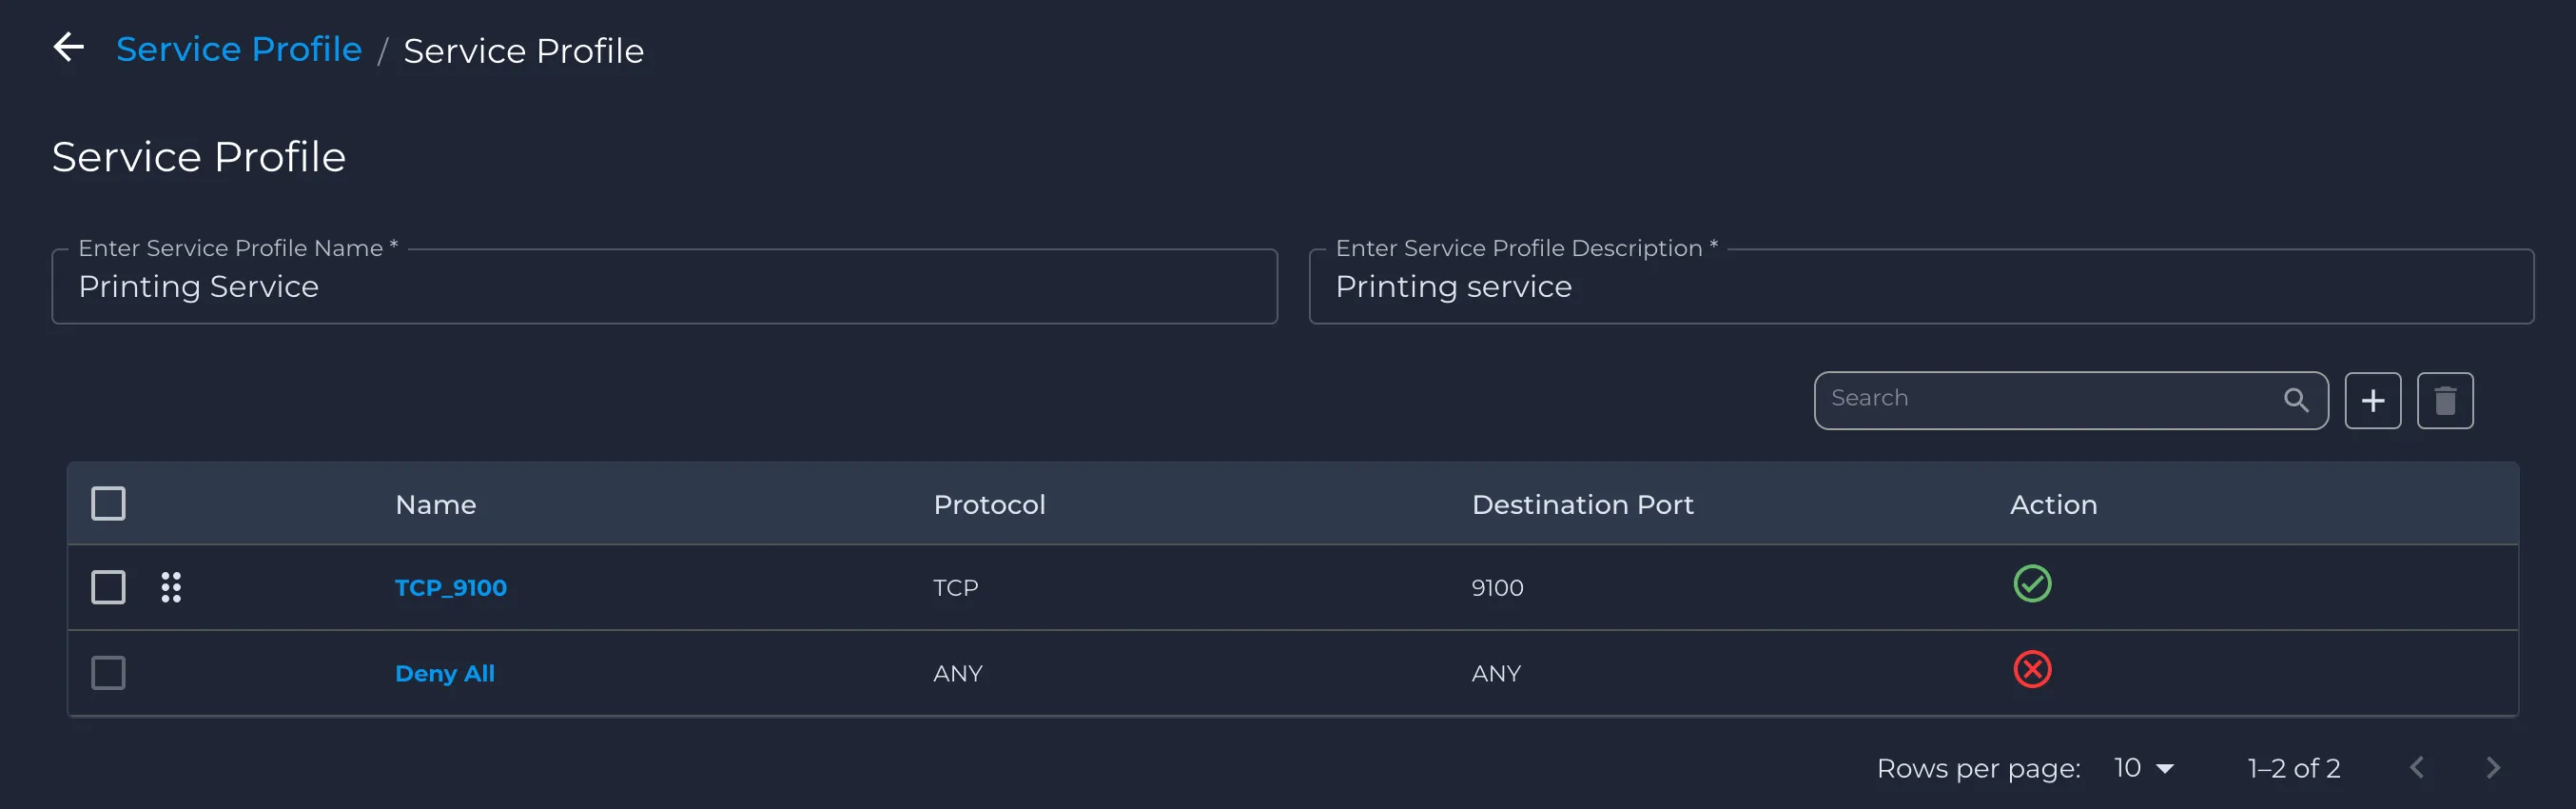
Use this service profile to allow Employees to communicate with and administer the printer.
Printing Administration Service Profile
Create a service profile that allows access to
- TCP 9100
- HTTPS (TCP 443)
- SSH (TCP 22)
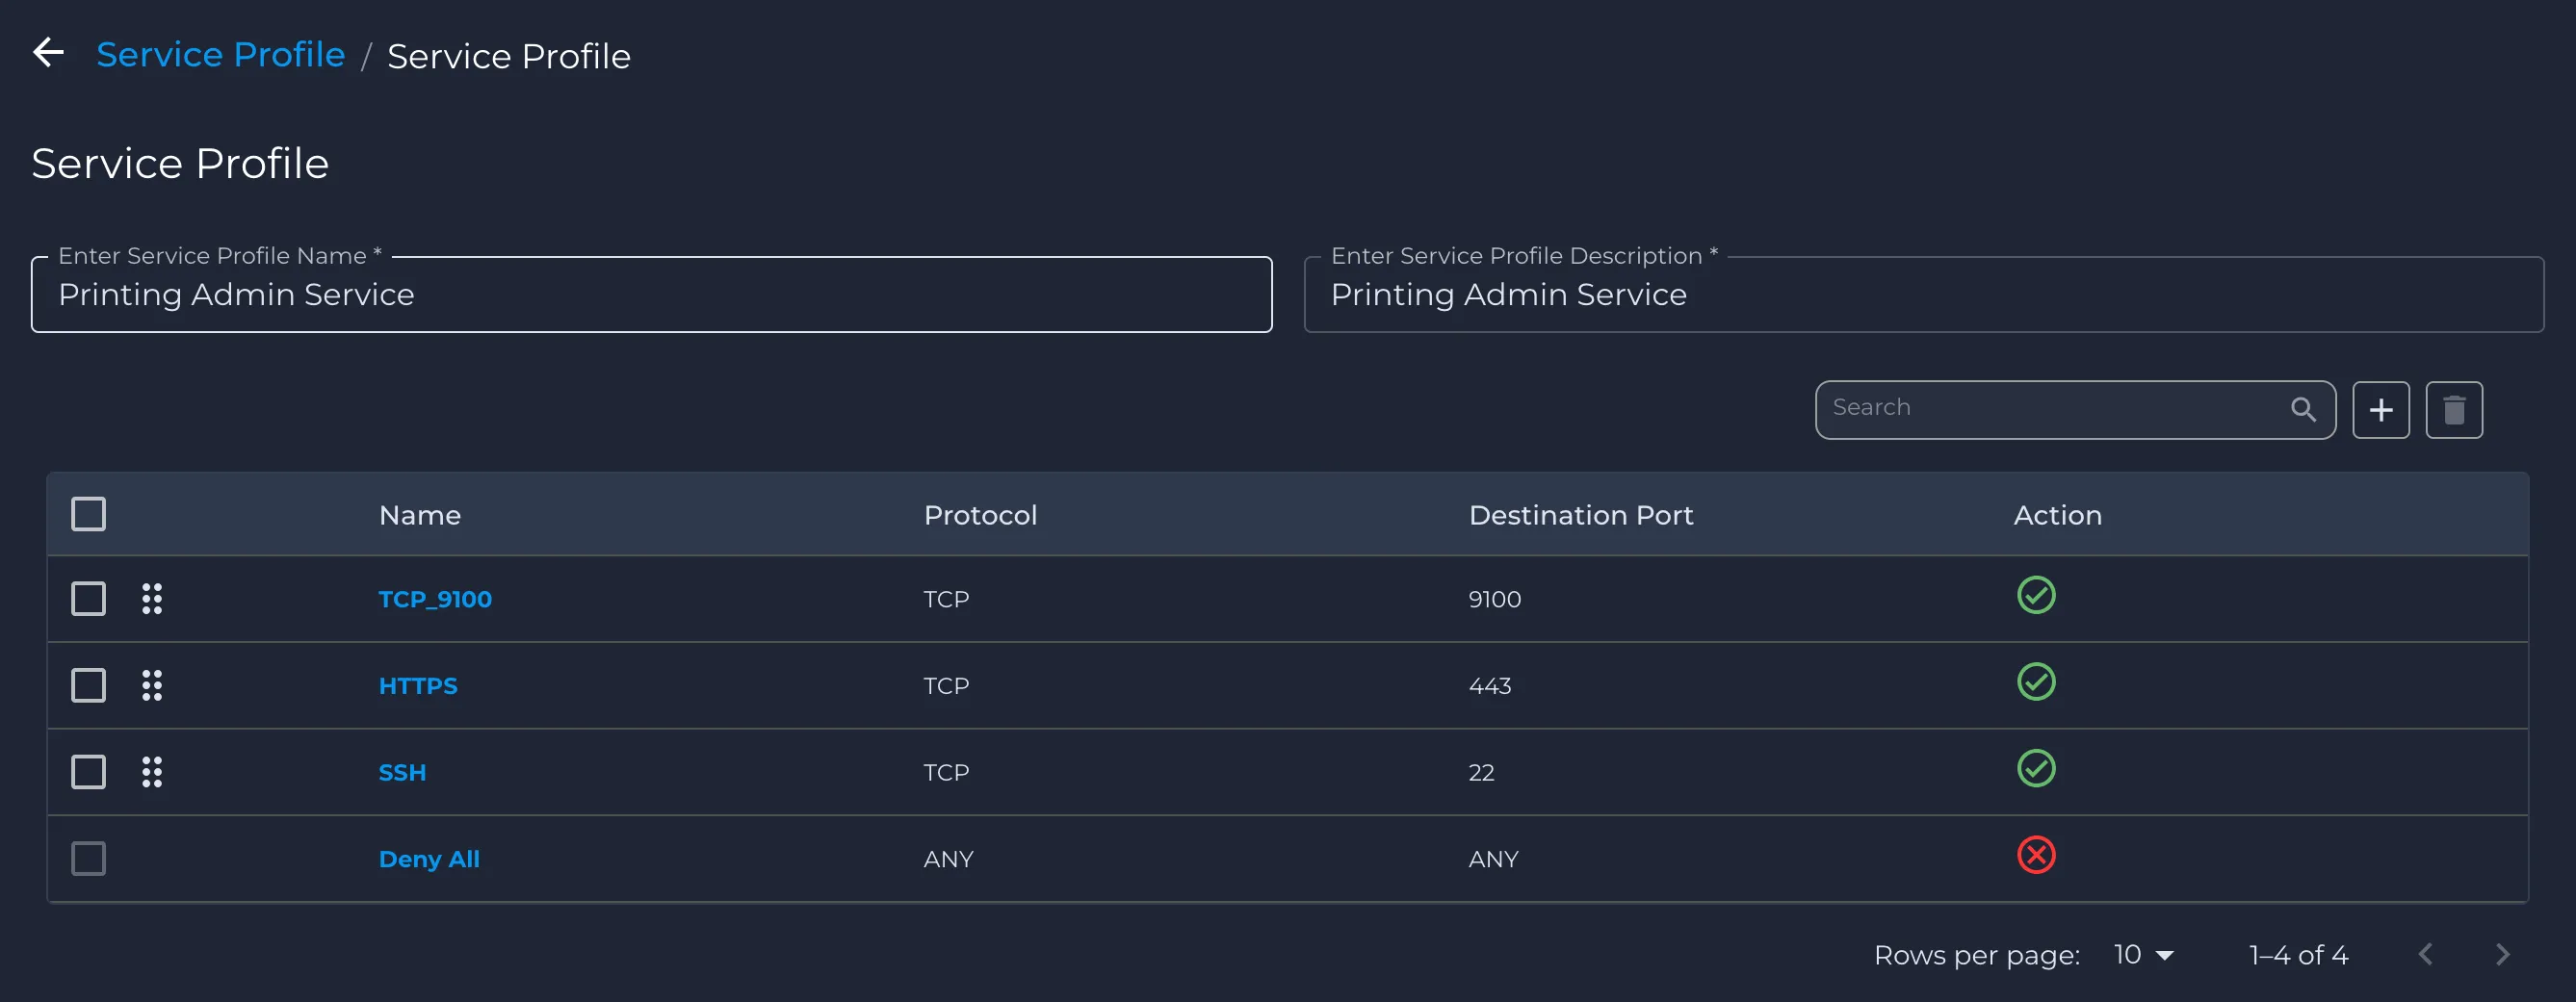
Use this service profile to allow Admins to communicate with and administer the printer.
Internet Service Profile
Create a service profile that allows access to
- HTTPS
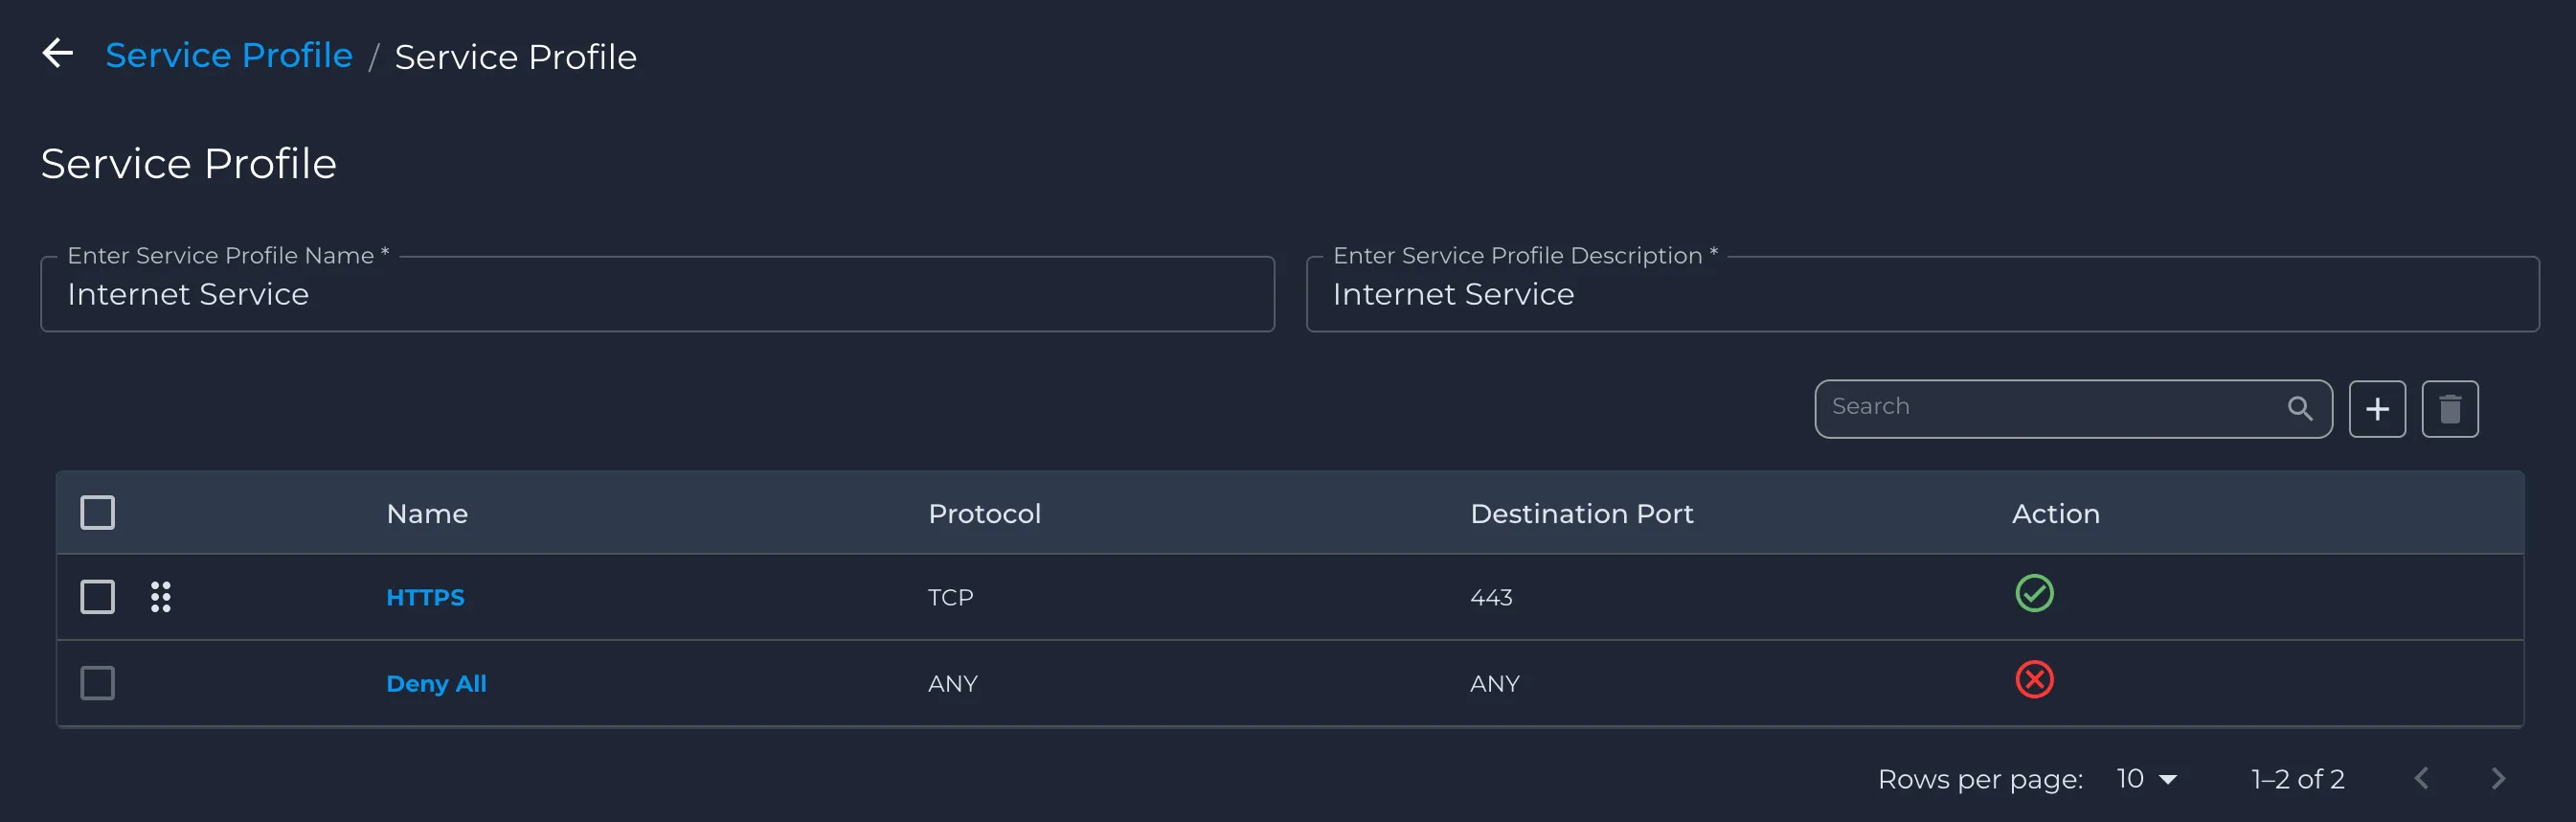
Use this service profile to allow Employees and Guests to access the Internet only via HTTPS.
All Service Profile
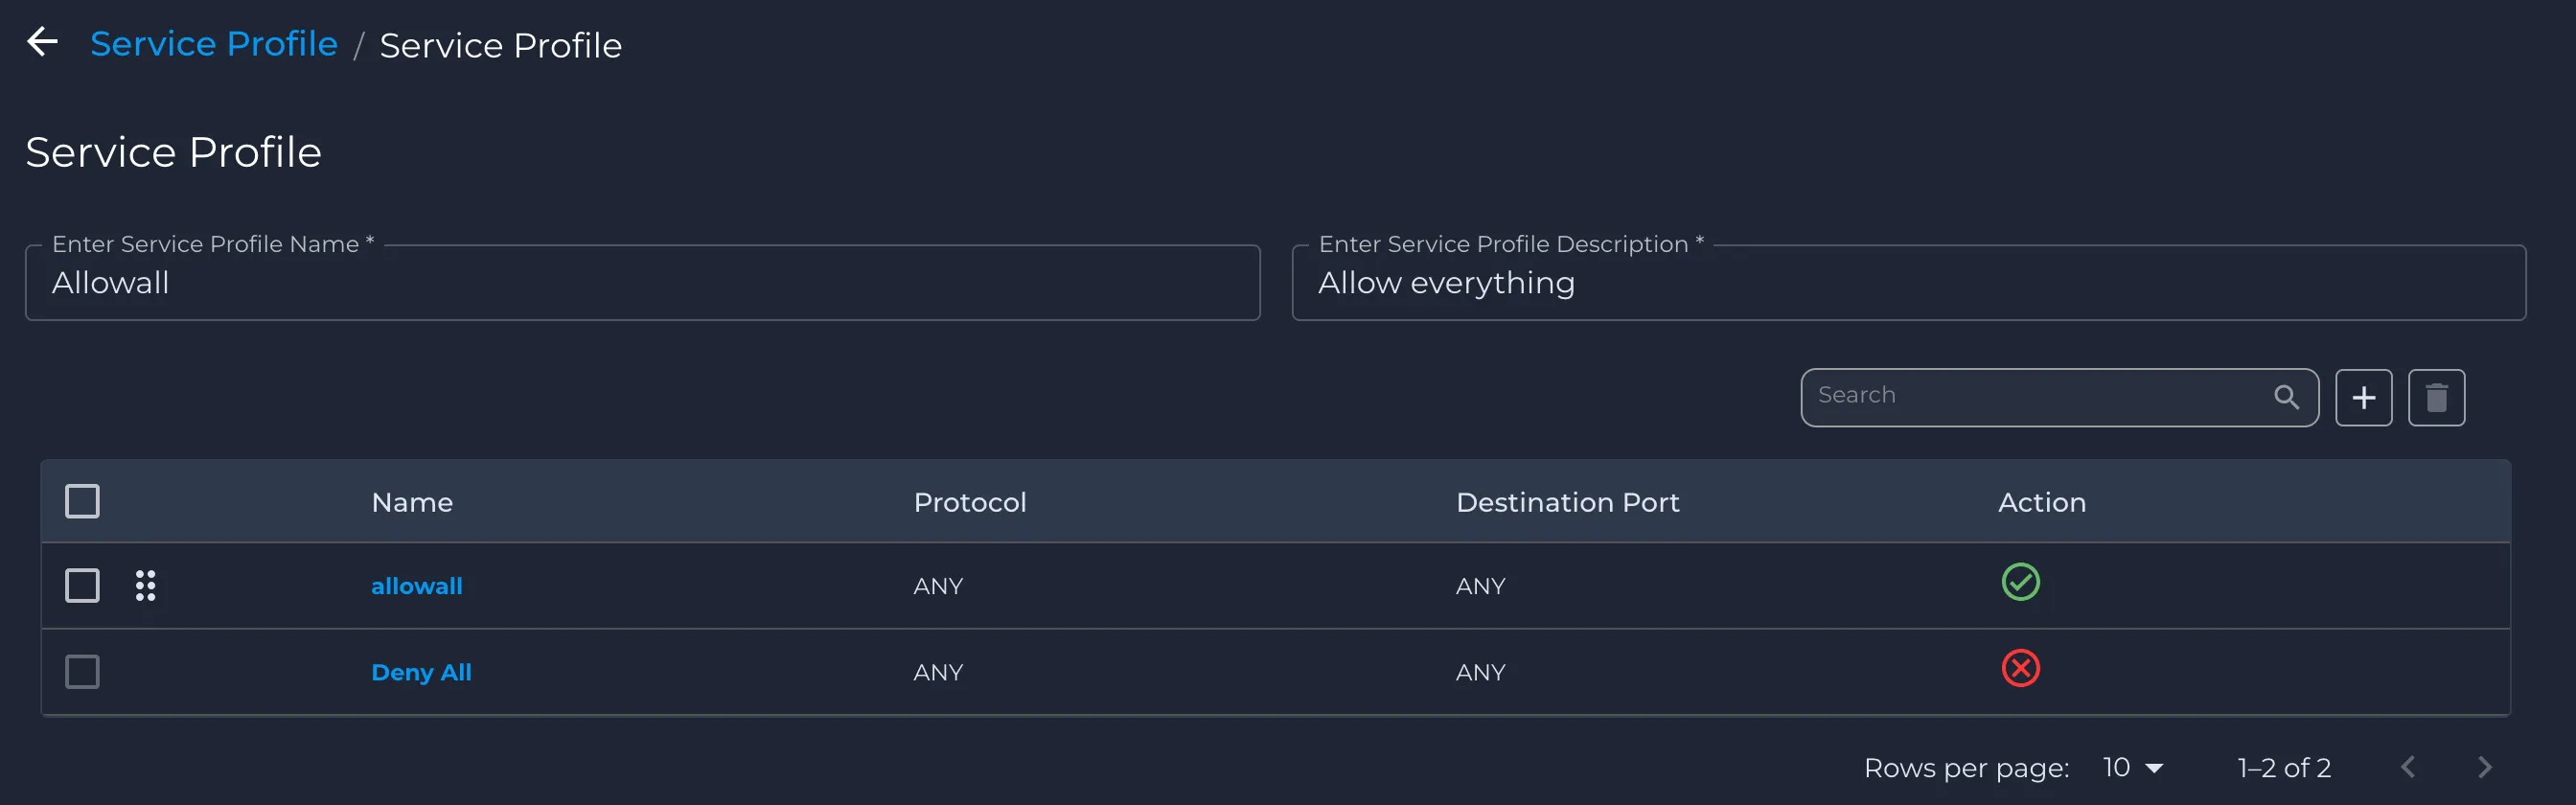
This is a system-defined Service Profile that allows all ports and protocols.
Step 3 - Create Policies
A Policy Set is a collection of policies that together define how access is managed within the network. Each policy specifies a source, destination, service profile, and action.
In this step, you use the user, device, and app policy groups from Step 1 together with the service profiles from Step 2 to define which traffic is allowed, denied, or forwarded. Each policy references: • a source policy group (for example, Employee user group) • a destination policy group (for example, Printer device group or Internet app group) • a service profile (for example, Printing Service or Internet Service) • an action (Allow, Deny, or Forward to firewall)
Source | Service Profile | Destination | Direction | Action |
|---|---|---|---|---|
Admin | Printing Administration | Printer | Uni | Allow |
Admin | All | Zoom Rooms | Uni | Allow |
Admin | All | DVR | Uni | Allow |
Admin | All | VOIP | Uni | Allow |
Admin | All | Call Manager | Uni | Allow |
Admin | All | Internet | Uni | Allow |
Employee | Printing | Printer | Uni | Allow |
Employee | Internet | Internet | Uni | Allow |
Guest | Internet | Internet | Uni | Allow |
Camera | All | DVR | Bi | Allow |
VOIP | All | VOIP | Bi | Allow |
VOIP | All | Call Manager | Bi | Allow |
Zoom Rooms | All | Zoom Rooms | Bi | Allow |
Zoom Rooms | HTTPS | Internet | Uni | Allow |
In the above table,
- Admin refers to the Admin user group created in “Admin User Group”.
- Employee refers to the Employee user group created in “Employee User Group”.
- Guest refers to the Guest user group created in “Guest User Group”.
- Printer, Camera, Zoom Rooms, VOIP refer to the device groups created in the previous section.
- DVR, Call Manager, Internet refer to the app groups created earlier.
- Printing Service, Internet Service, All refer to the service profiles created in Step 2
Configure these policies in a Global Policy Set (example: Employee to Printer) using the following steps.
- Log in to the Nile portal.
- In the left navigation, go to Security > Trust Engine> Policy Groups > Policy Sets.
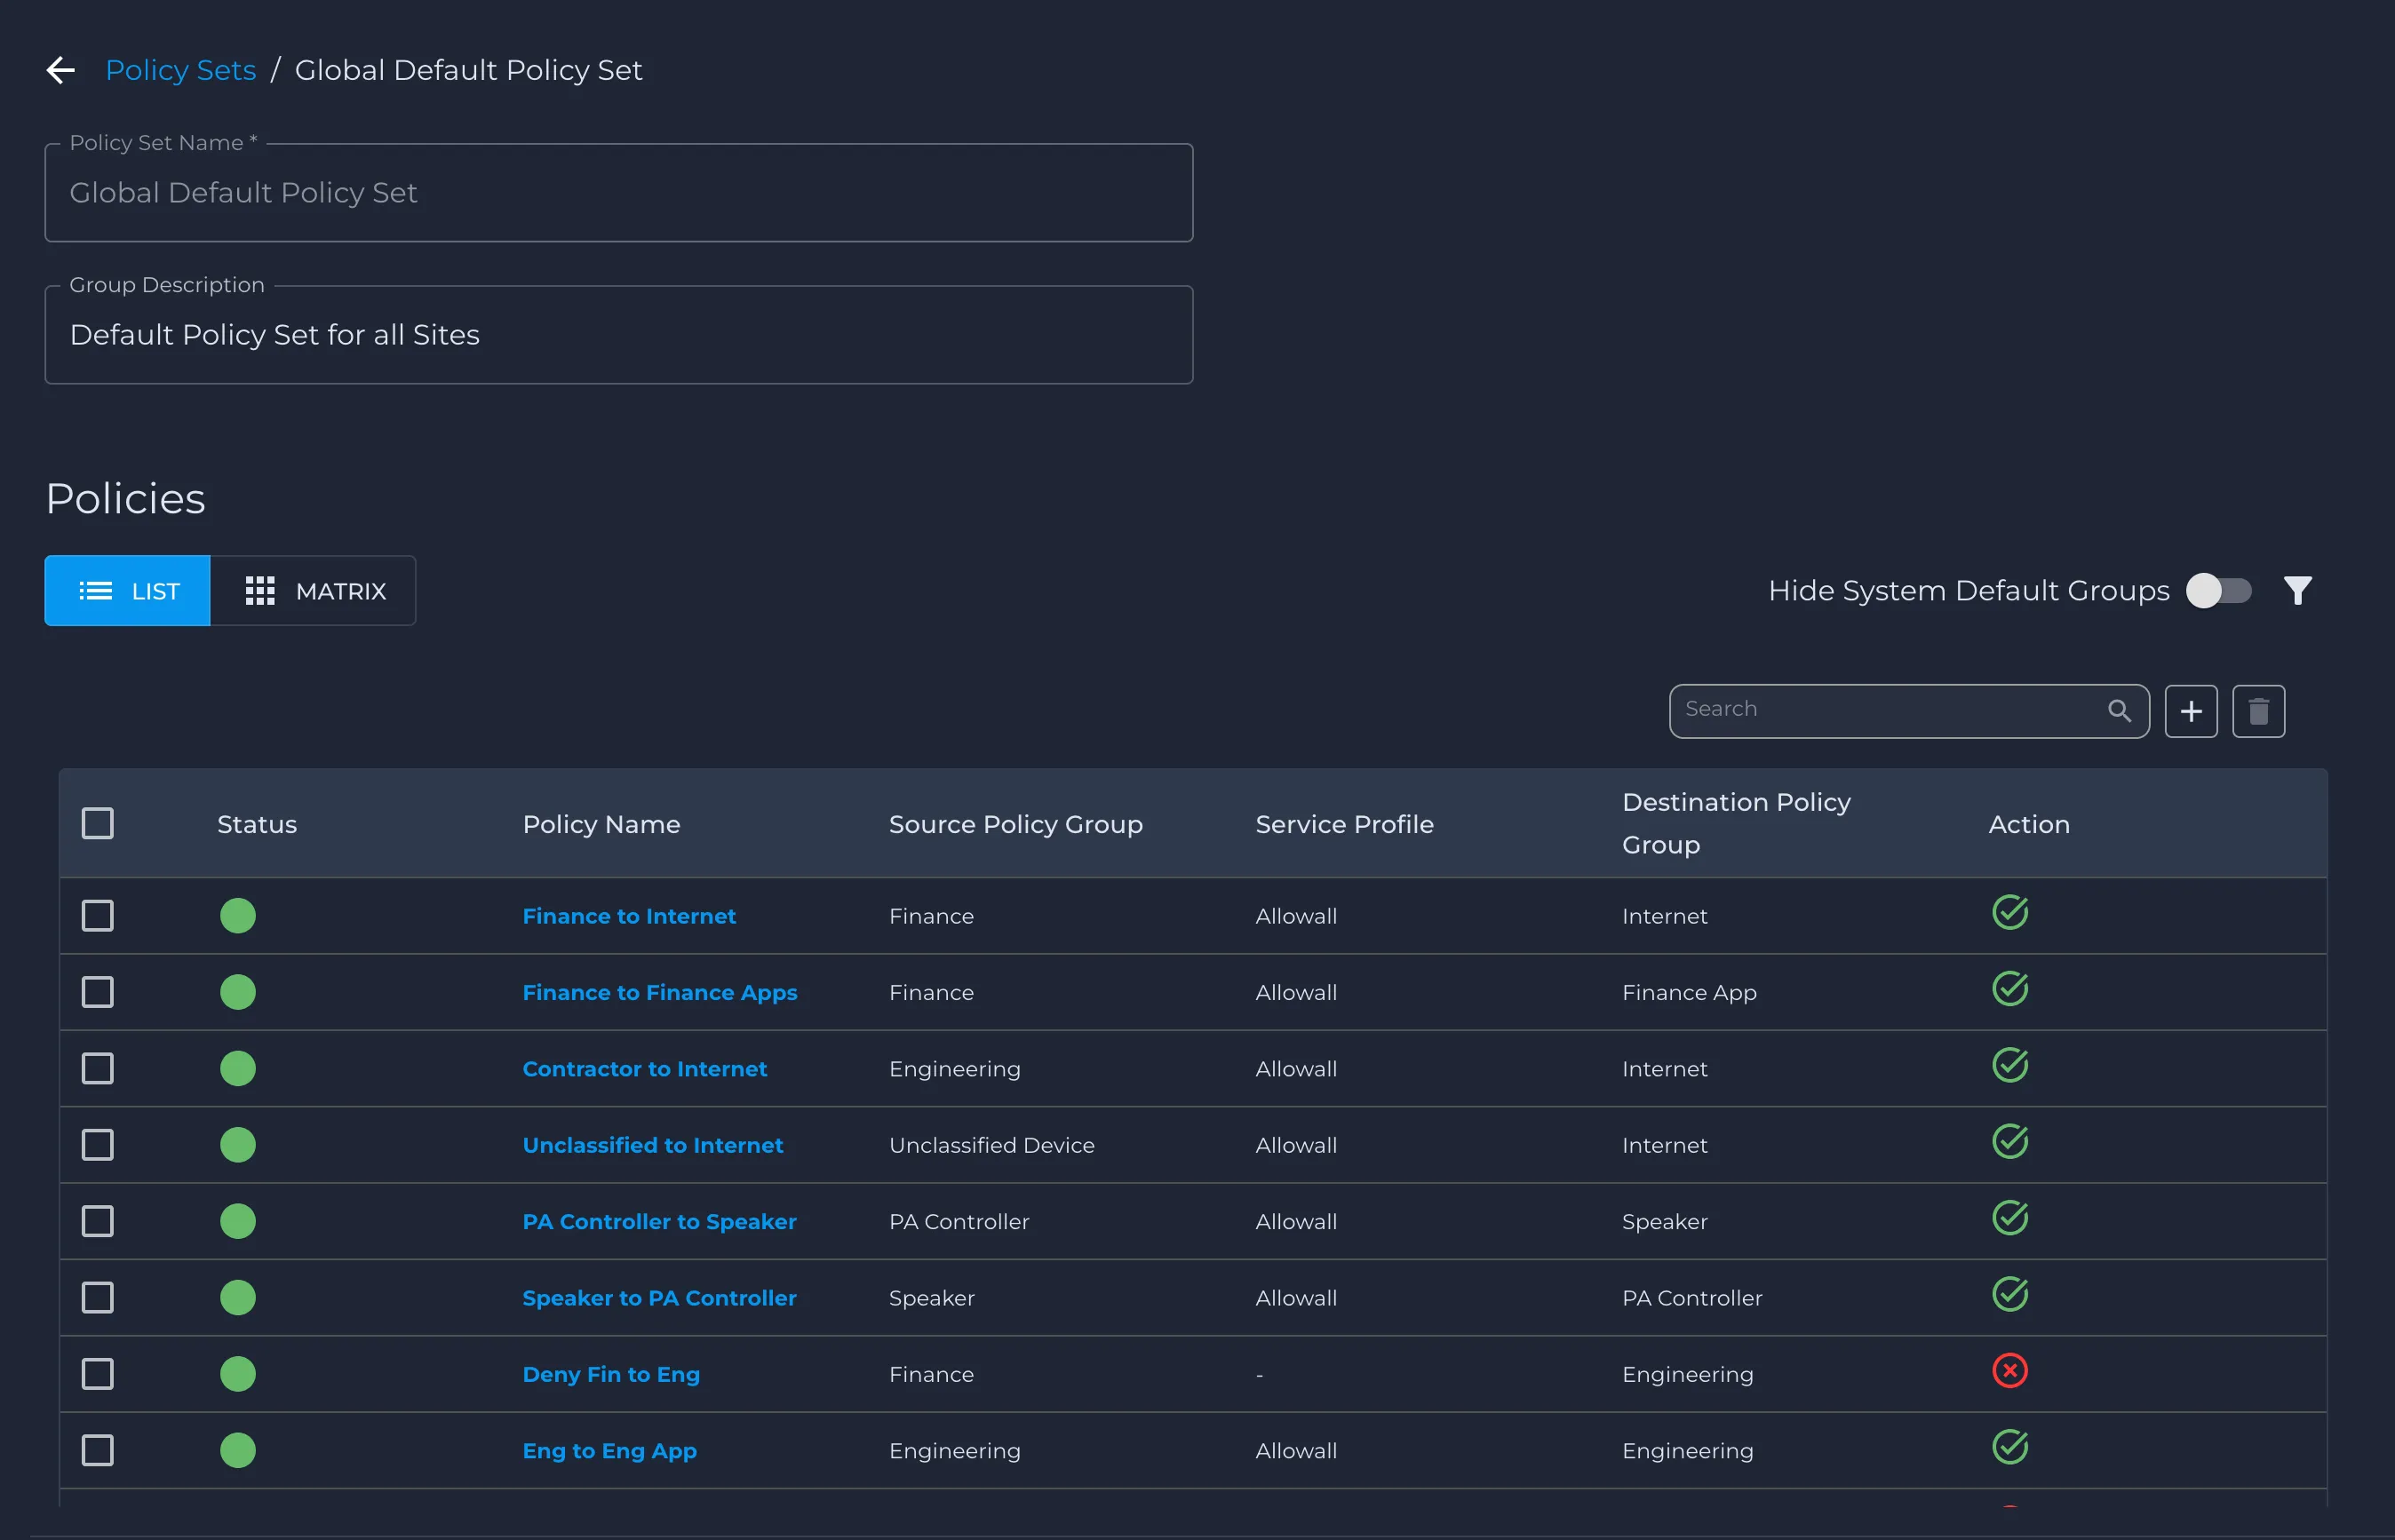
- Click the Global Default Policy Set to open it.
- In the Policies section, click the + icon to create a new policy.
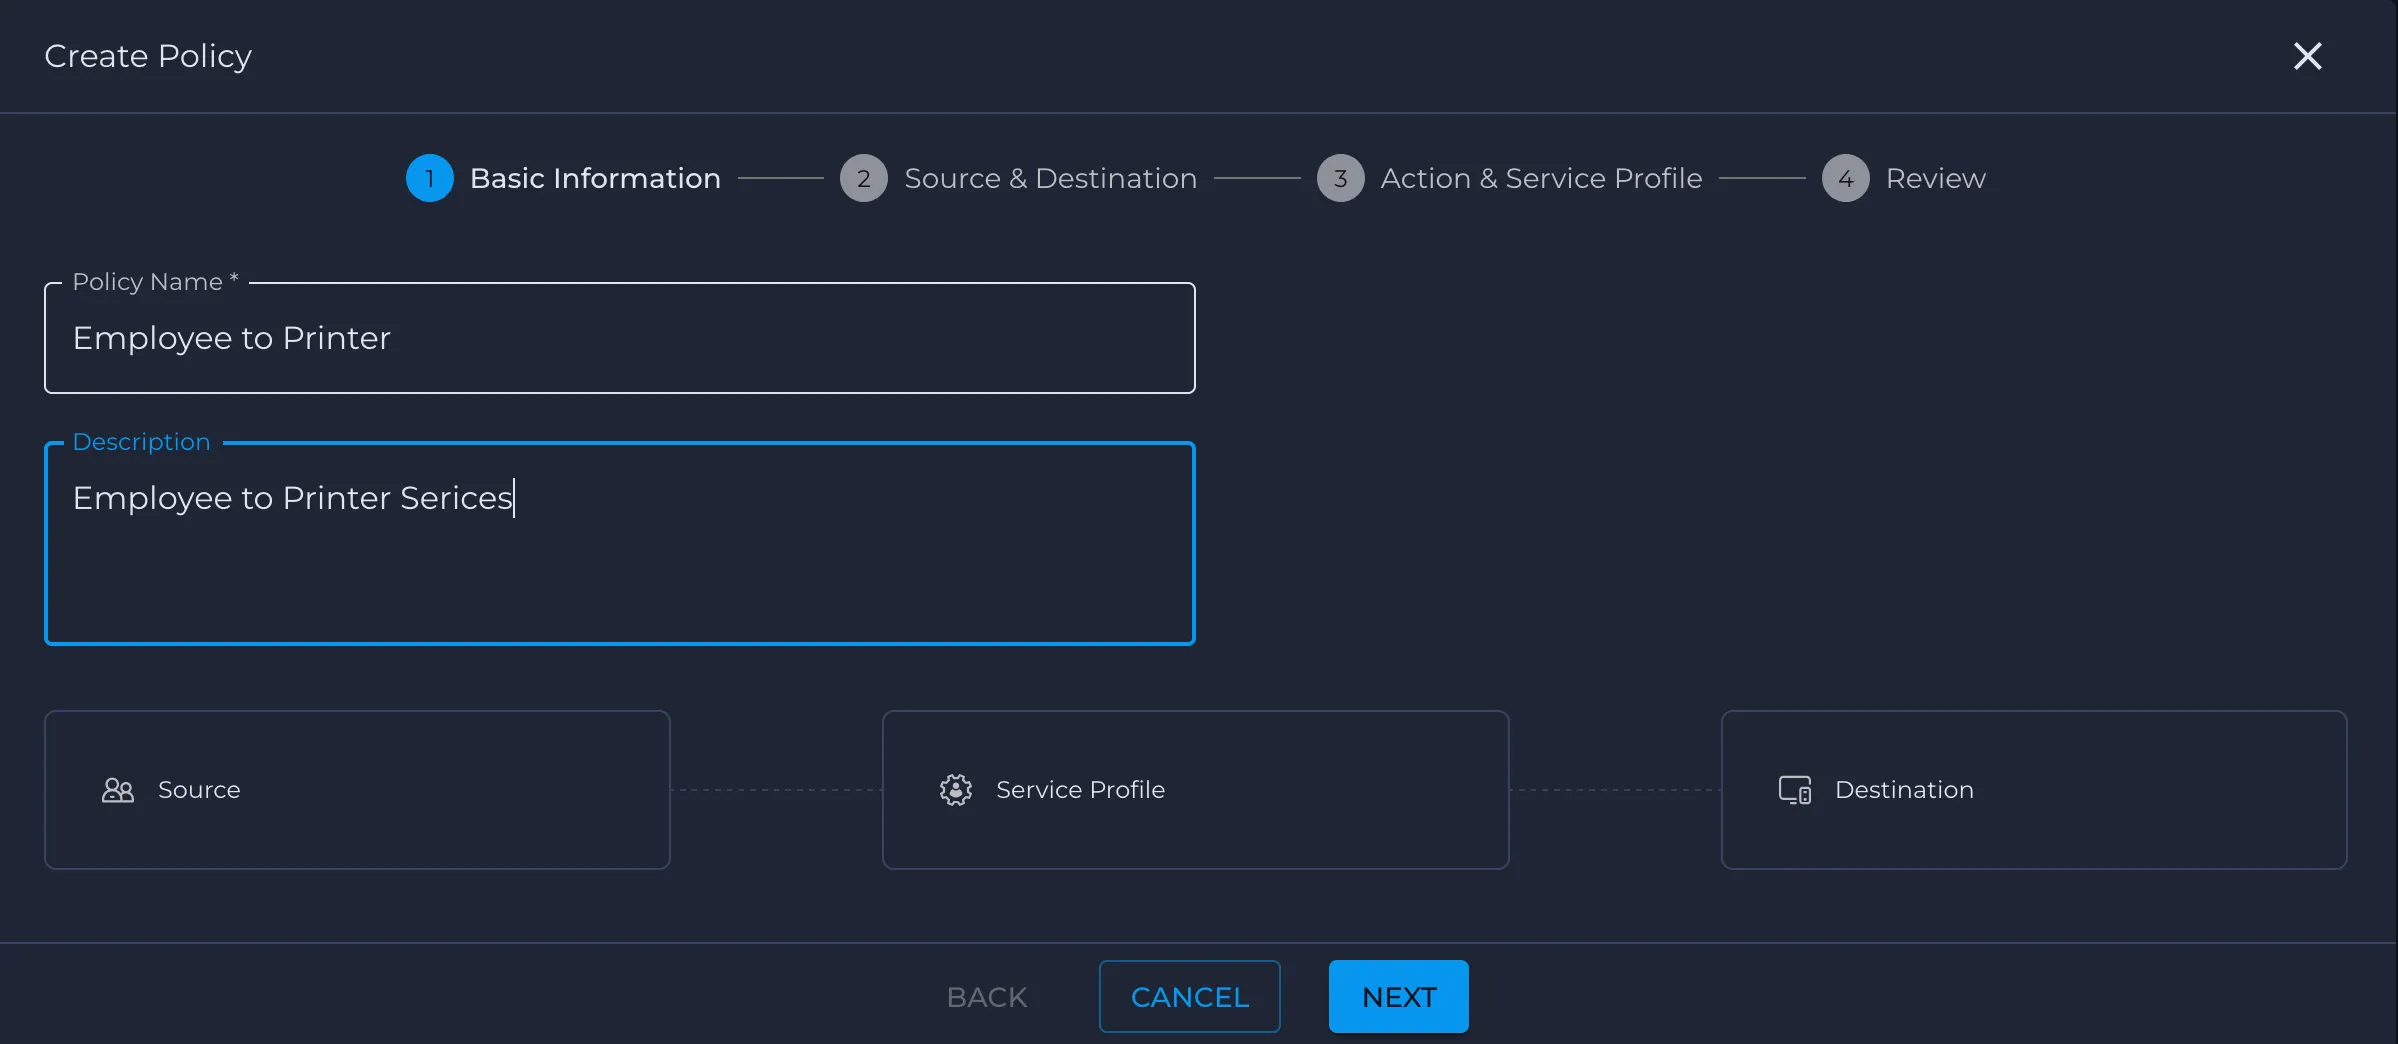
- In Step 1 - Enter the following details.
- In Policy Name, enter Employee to Printer.
- In Description, enter Employee to Printer Services.
- Click Next.
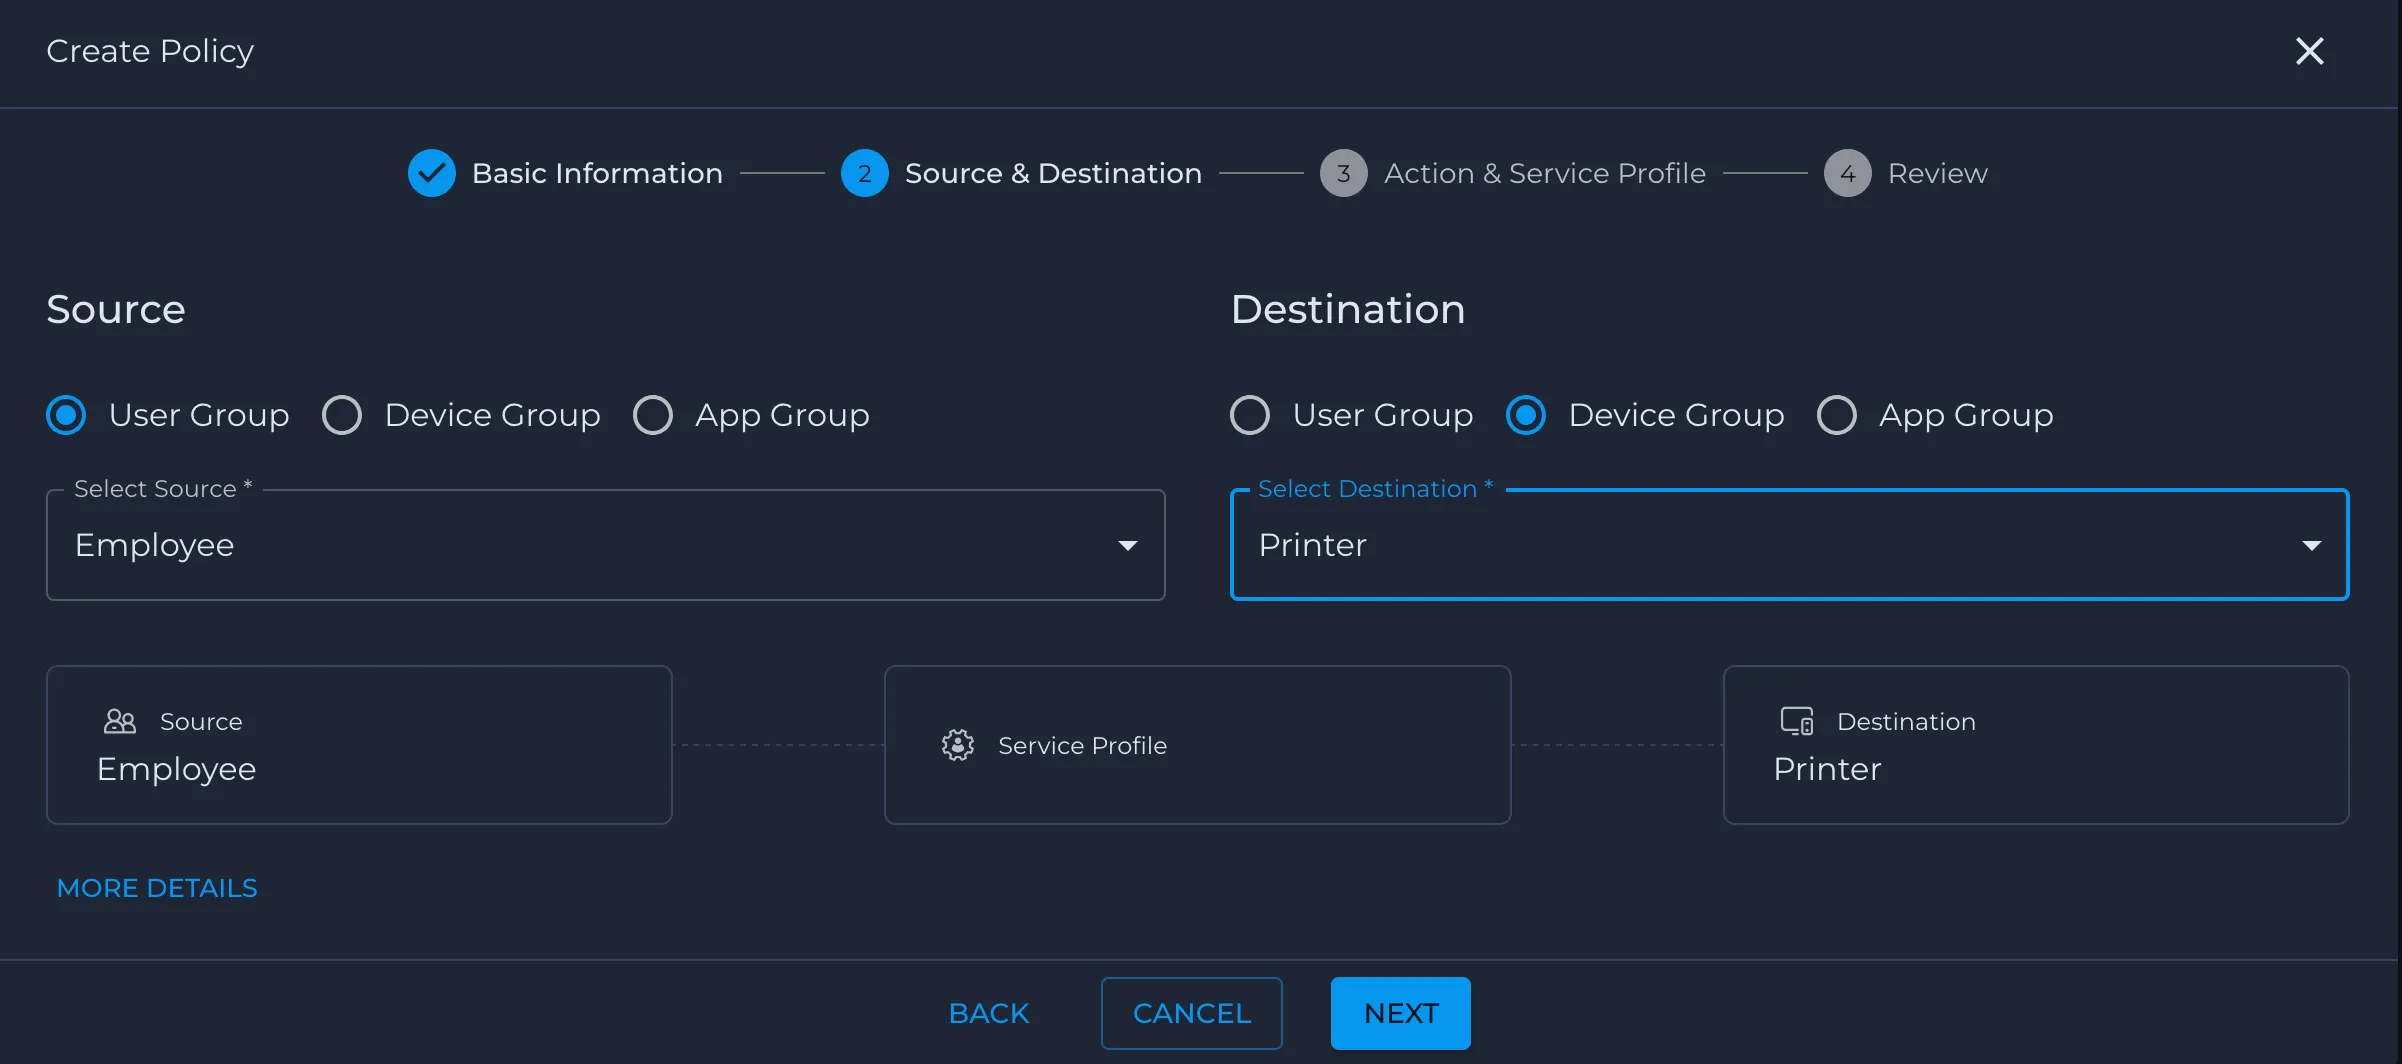
- In Step 2 - Enter Source & Destination.
- Under Source, select User Group and choose Employee from Select Source.
- Under Destination, select Device Group and choose Printer from Select Destination.
- Click Next.
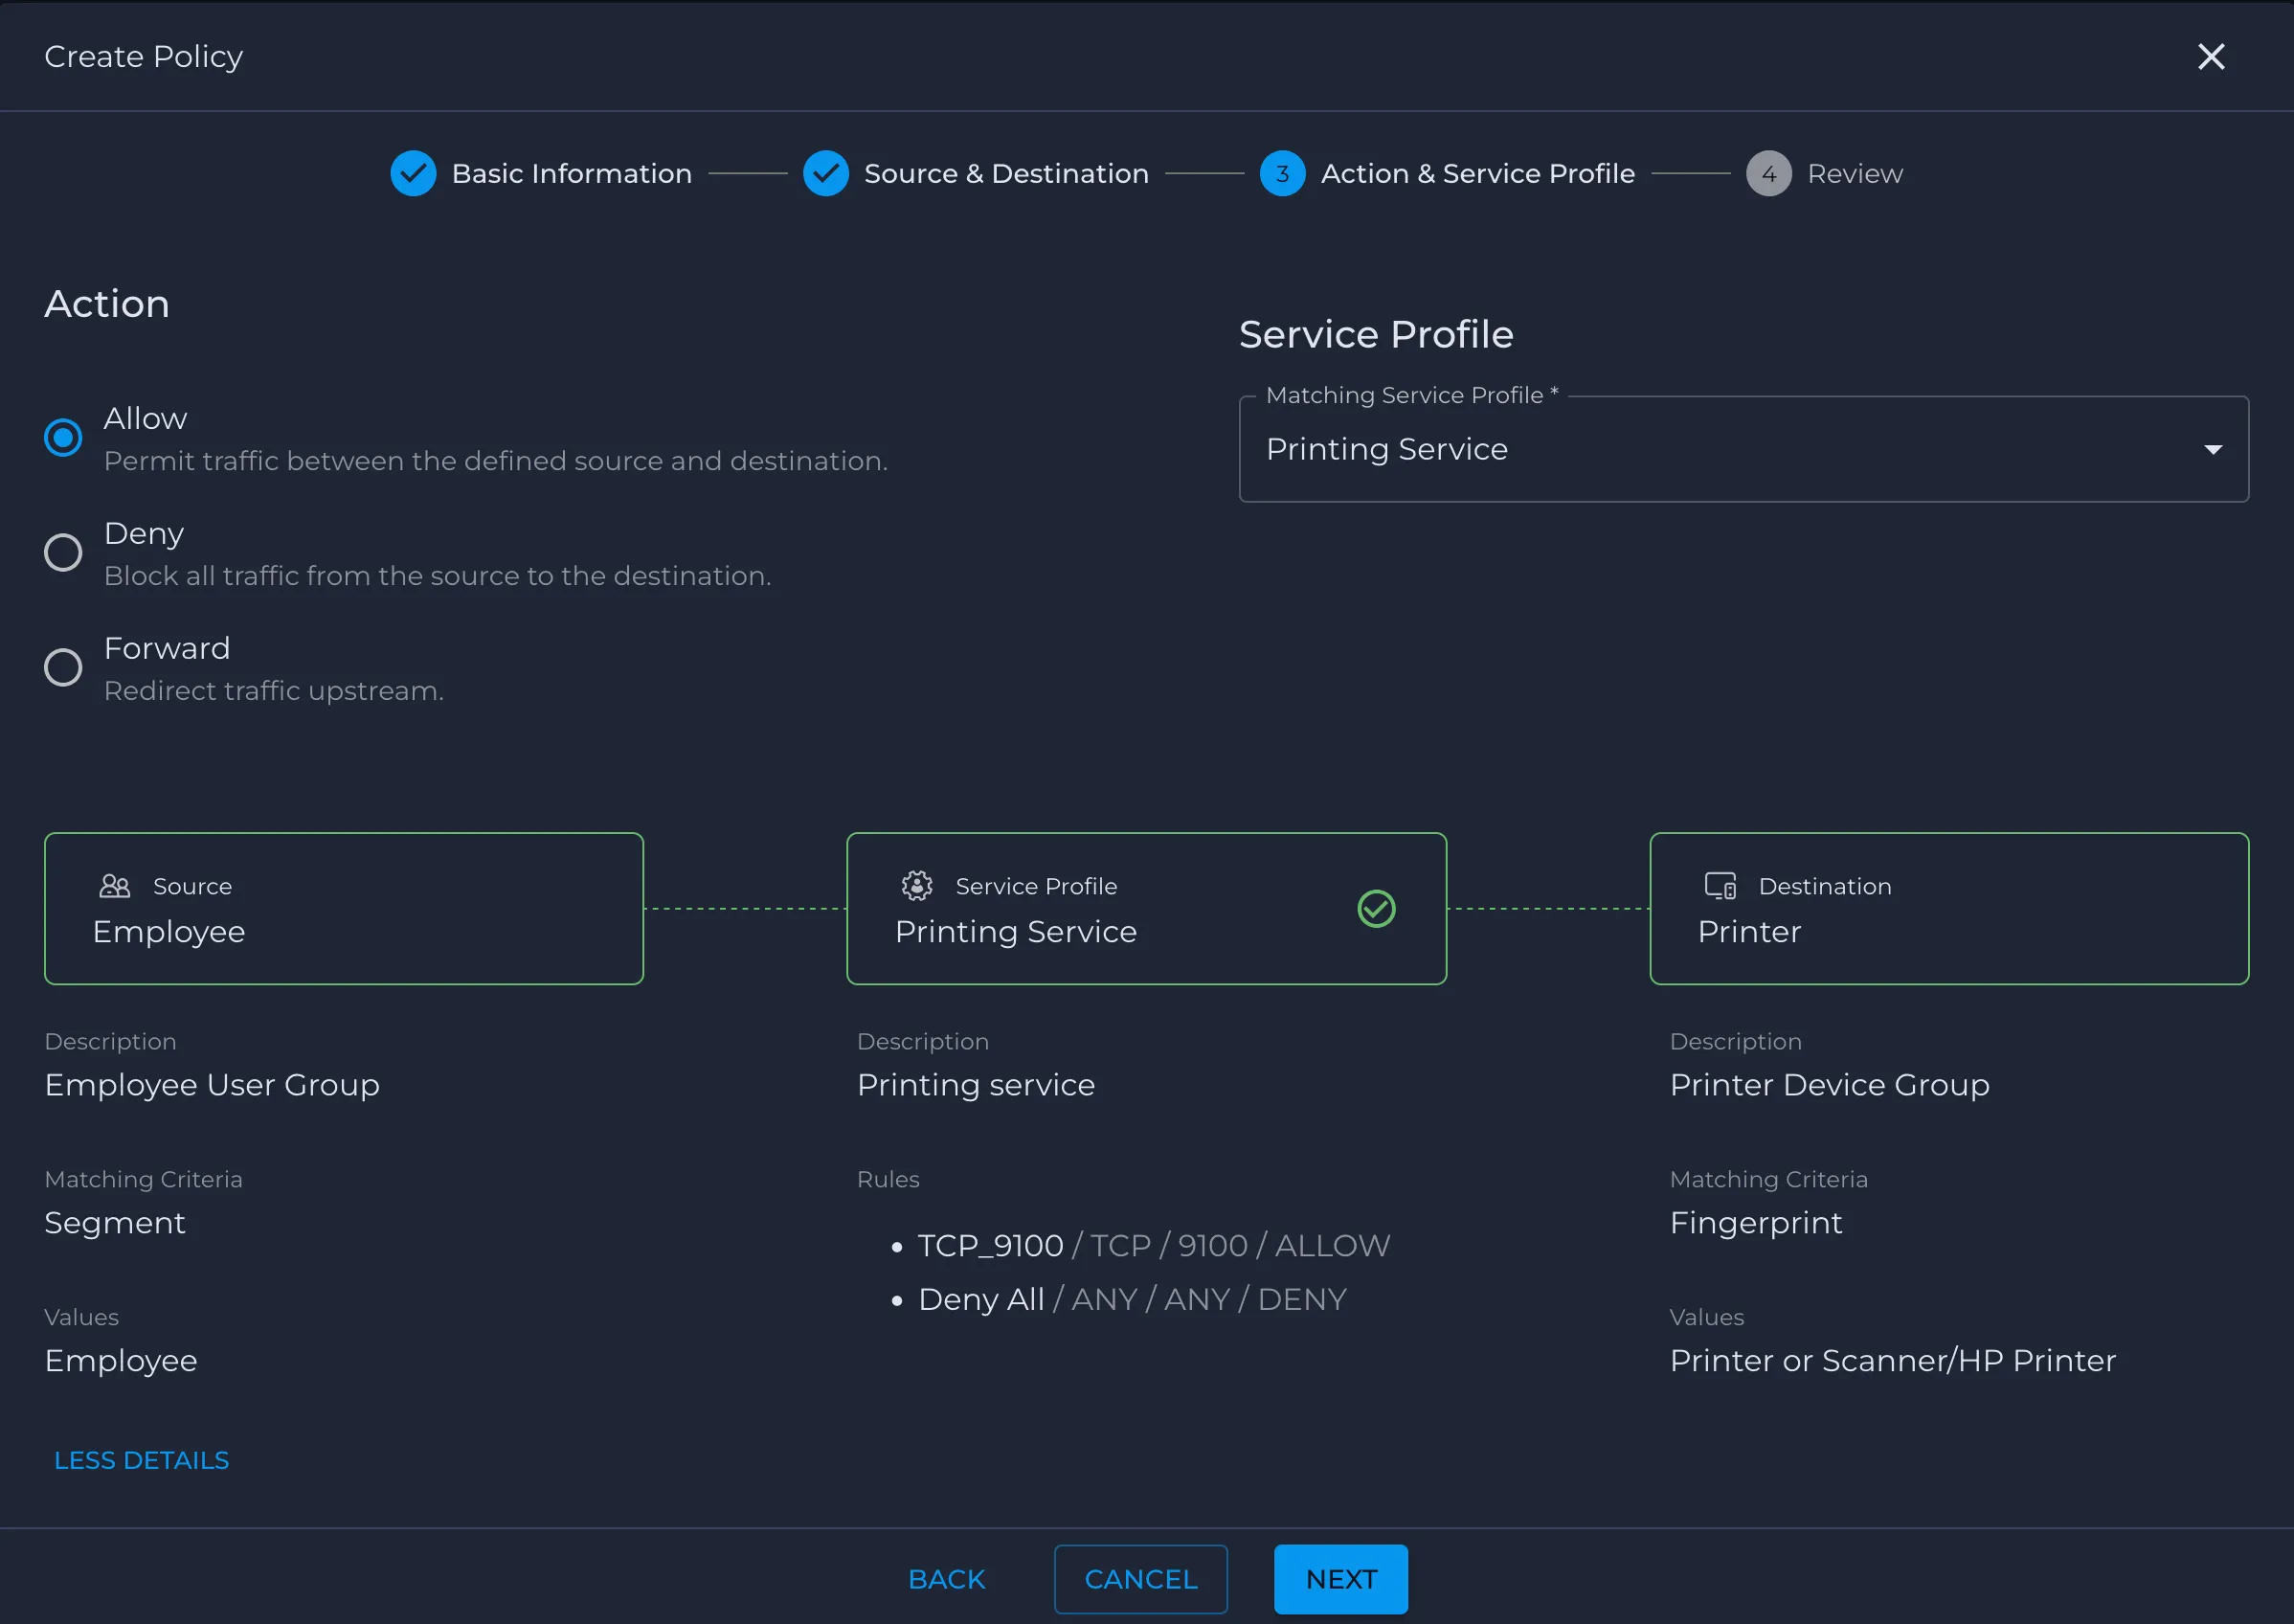
- In Step 3 - Add Action & Service Profile
- Under Action, select Allow to permit traffic between Employee and Printer.
- In the Matching Service Profile, select Printing Service.
- Confirm the visual chain shows Source: Employee → Service Profile: Printing Service → Destination: Printer.
- Click Next.
- In Step 4 - Review and Save
- Review the policy summary to ensure the name, source group, service profile, and destination group are correct.
- Click Create (or Save) to add the policy to the global policy set.
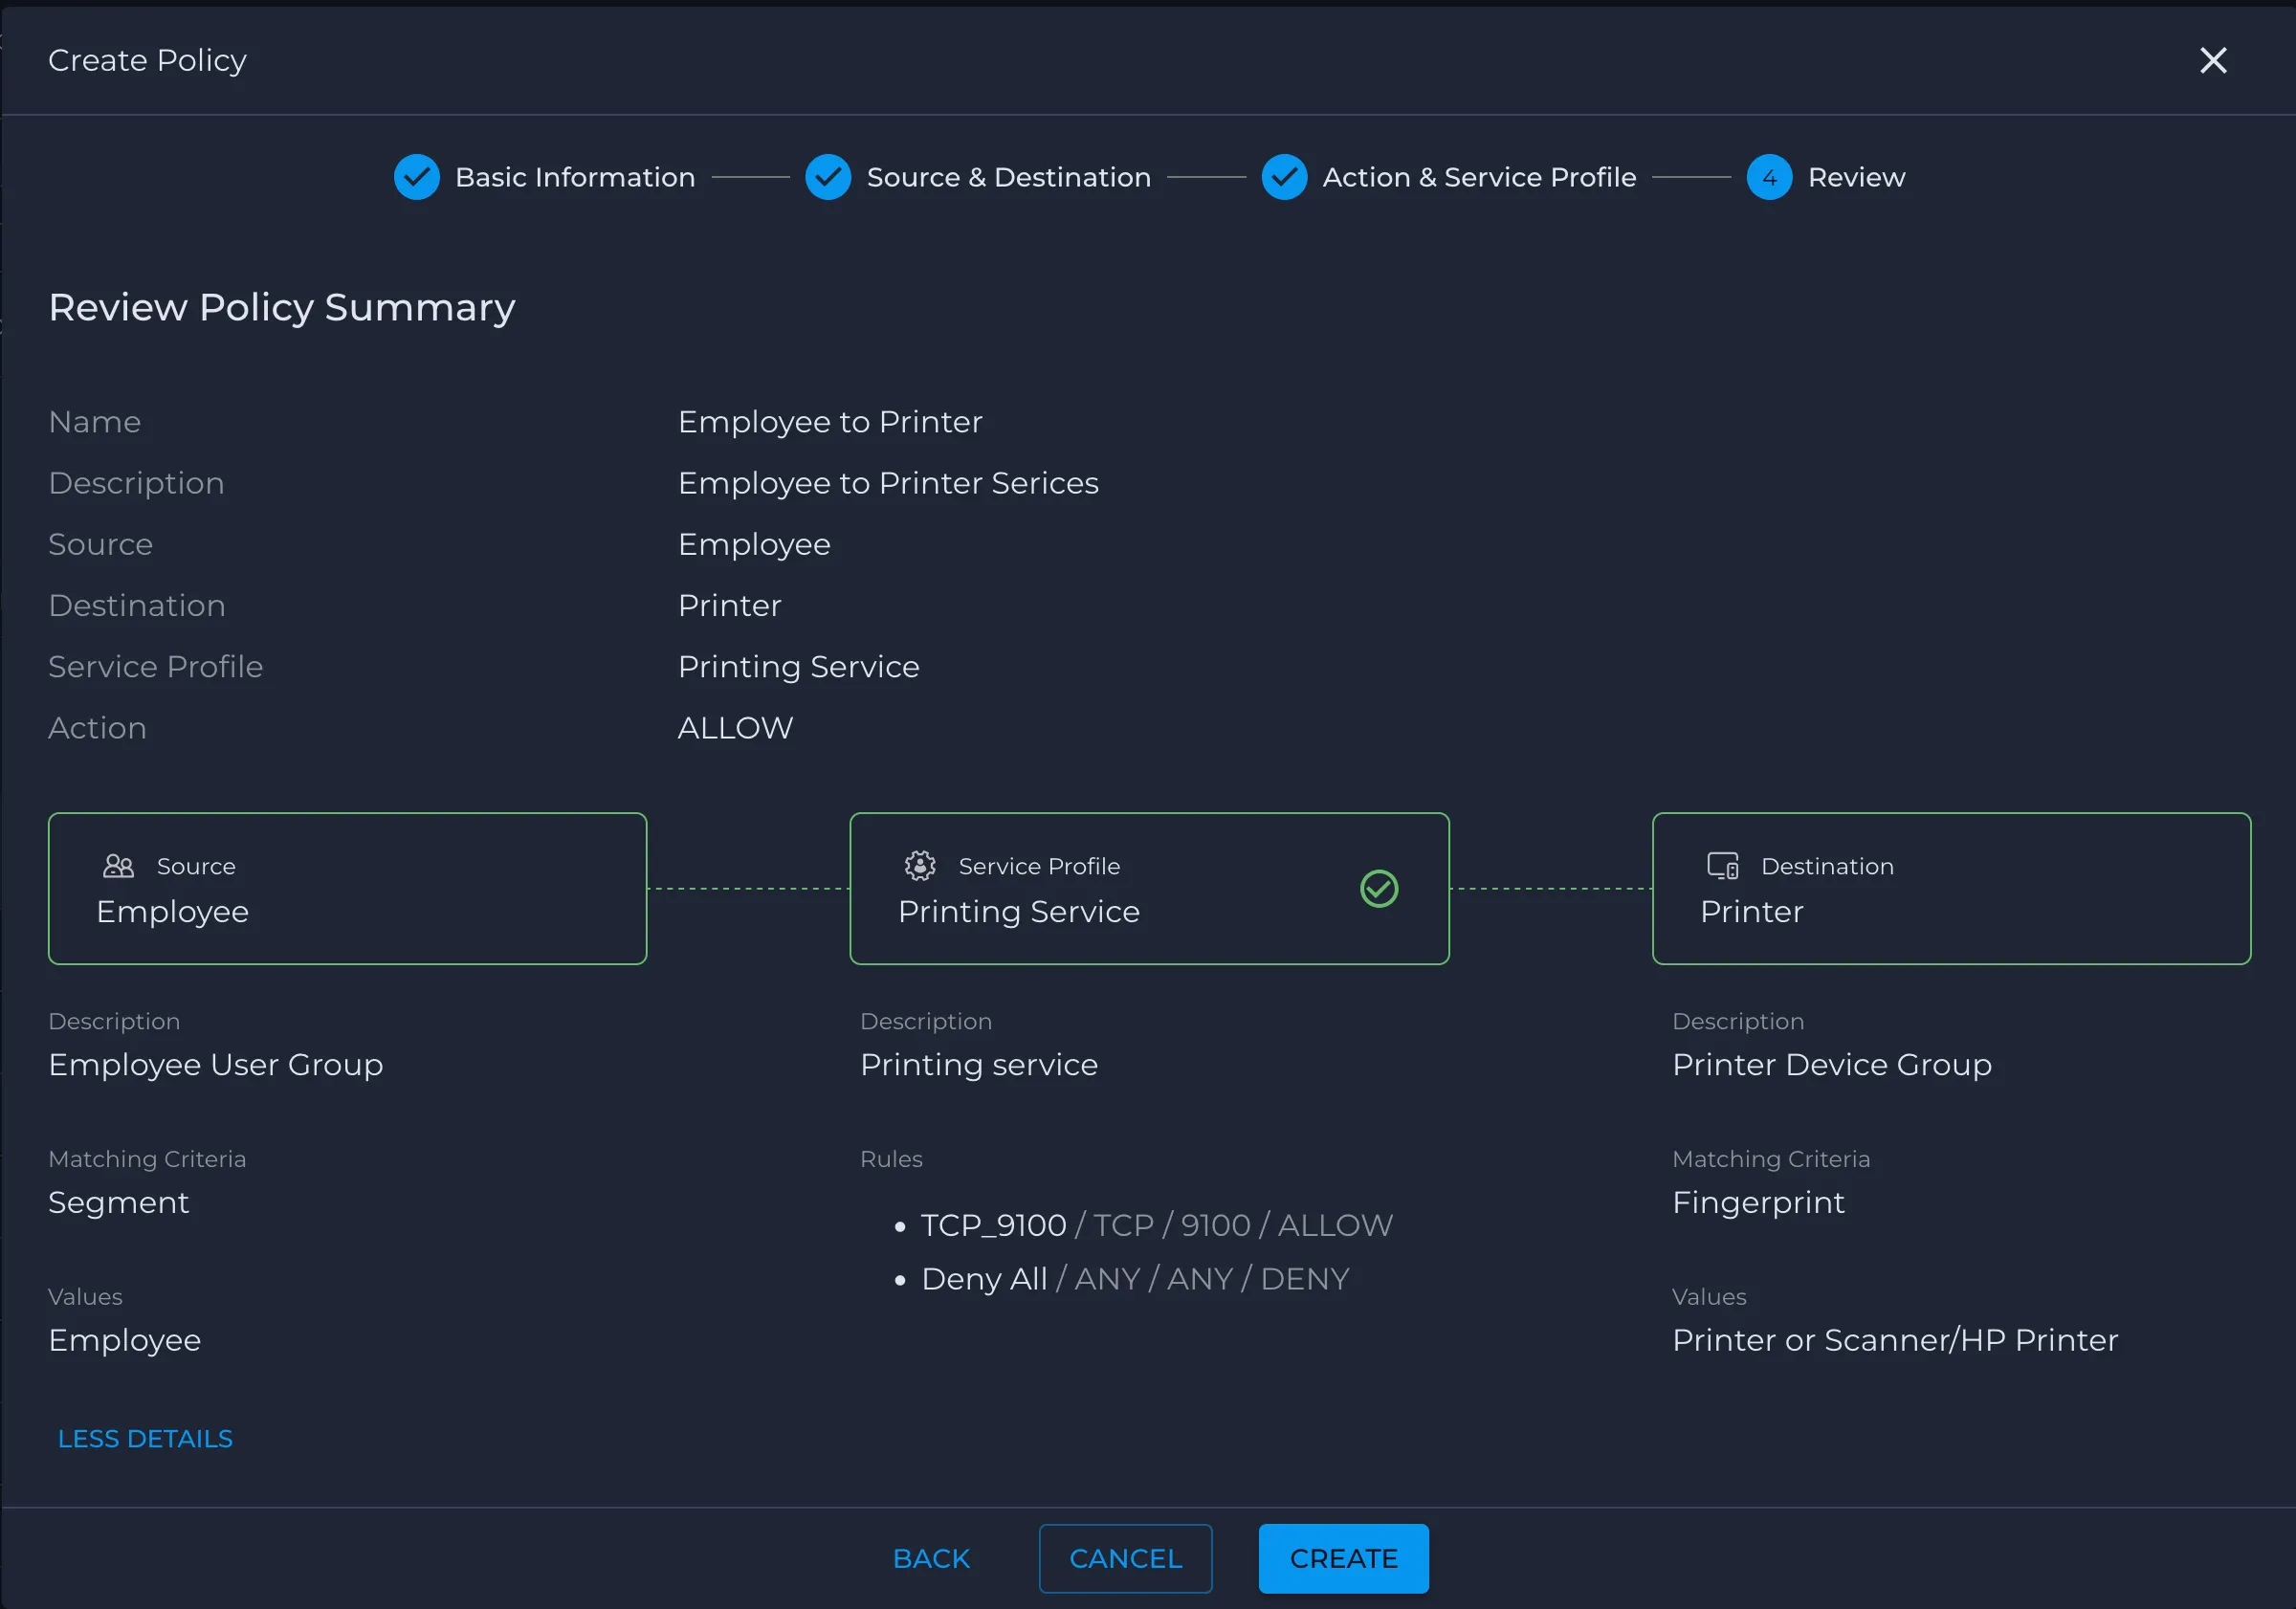
- Back on the Global Default Policy Set page, confirm that the new Employee → Printer policy appears in the Policies list with Action = Allow and the correct Source Policy Group, Service Profile, and Destination Policy Group.
- Use the same workflow to create the remaining policies listed in the table above.
- You can also leverage system-defined groups to support DMZ and upstream-security use cases. For example, consider a ClearPass server that lives in a DMZ subnet behind an upstream firewall and provides a web portal for guests. Guest endpoints are placed in the Guest user group, while the ClearPass server—because it sits in a private DMZ subnet—can be modeled either as its own app group or treated as part of the Intranet system group. You then use Intranet as the destination for policies that permit guest HTTPS traffic from the Guest group to ClearPass, while the Internet system group remains the destination for general guest web access after authentication. If you want Nile to steer specific flows to an upstream firewall or SSE stack in front of the DMZ
Policy Actions:
Each Trust Engine policy defines an action that determines how matching traffic is handled. In addition to Allow and Deny, Nile supports forwarding traffic to upstream enforcement points.
Allow
- Permits traffic between the defined source and destination groups according to the selected service profile.
- Typically used for flows that should remain within the Nile Service Block (local east–west or site-local access).
Deny
- Blocks all traffic matching the policy.
- Nile follows a default-deny posture, so any flow that does not match an explicit Allow or Forward policy is denied.
Forward to Firewall (Upstream Enforcement)
The Forward to firewall action sends matching traffic to an upstream enforcement system, such as a next-generation firewall or SSE platform, for additional inspection and policy enforcement.
Use Forward to firewall when:
- You are in a brownfield migration and want Nile to control which flows are allowed, while retaining existing firewall/SSE capabilities for IDS/IPS, content filtering, or compliance reporting.
- Specific flows must always traverse an upstream security stack—for example, Intranet → Internet, traffic to a cloud security gateway, or regulated applications that require central inspection.
- You want to separate local east–west enforcement (handled by Nile) from north–south inspection (handled by your firewall/SSE).
As a guideline:
- Use Allow for traffic that should be fully enforced and contained within the Nile Service Block.
- Use Forward to firewall when traffic must leave the Nile Fabric and be inspected or logged by your existing upstream security infrastructure
Global Policy Matrix – Policy Creation Guide
Policies in a Global Policy Set can also be created and reviewed using the Matrix view. The sections below explain how to use matrix-specific options, including hiding system default groups and filtering for selected groups.
- Open the Global Policy Set in Matrix view
- Log in to the Nile portal.
- In the left navigation, go to Security > Policy Groups > Policy Sets.
- Click the relevant global policy set (for example, Global Default Policy Set).
- In the Policies section, click MATRIX to switch from list view to the matrix view.
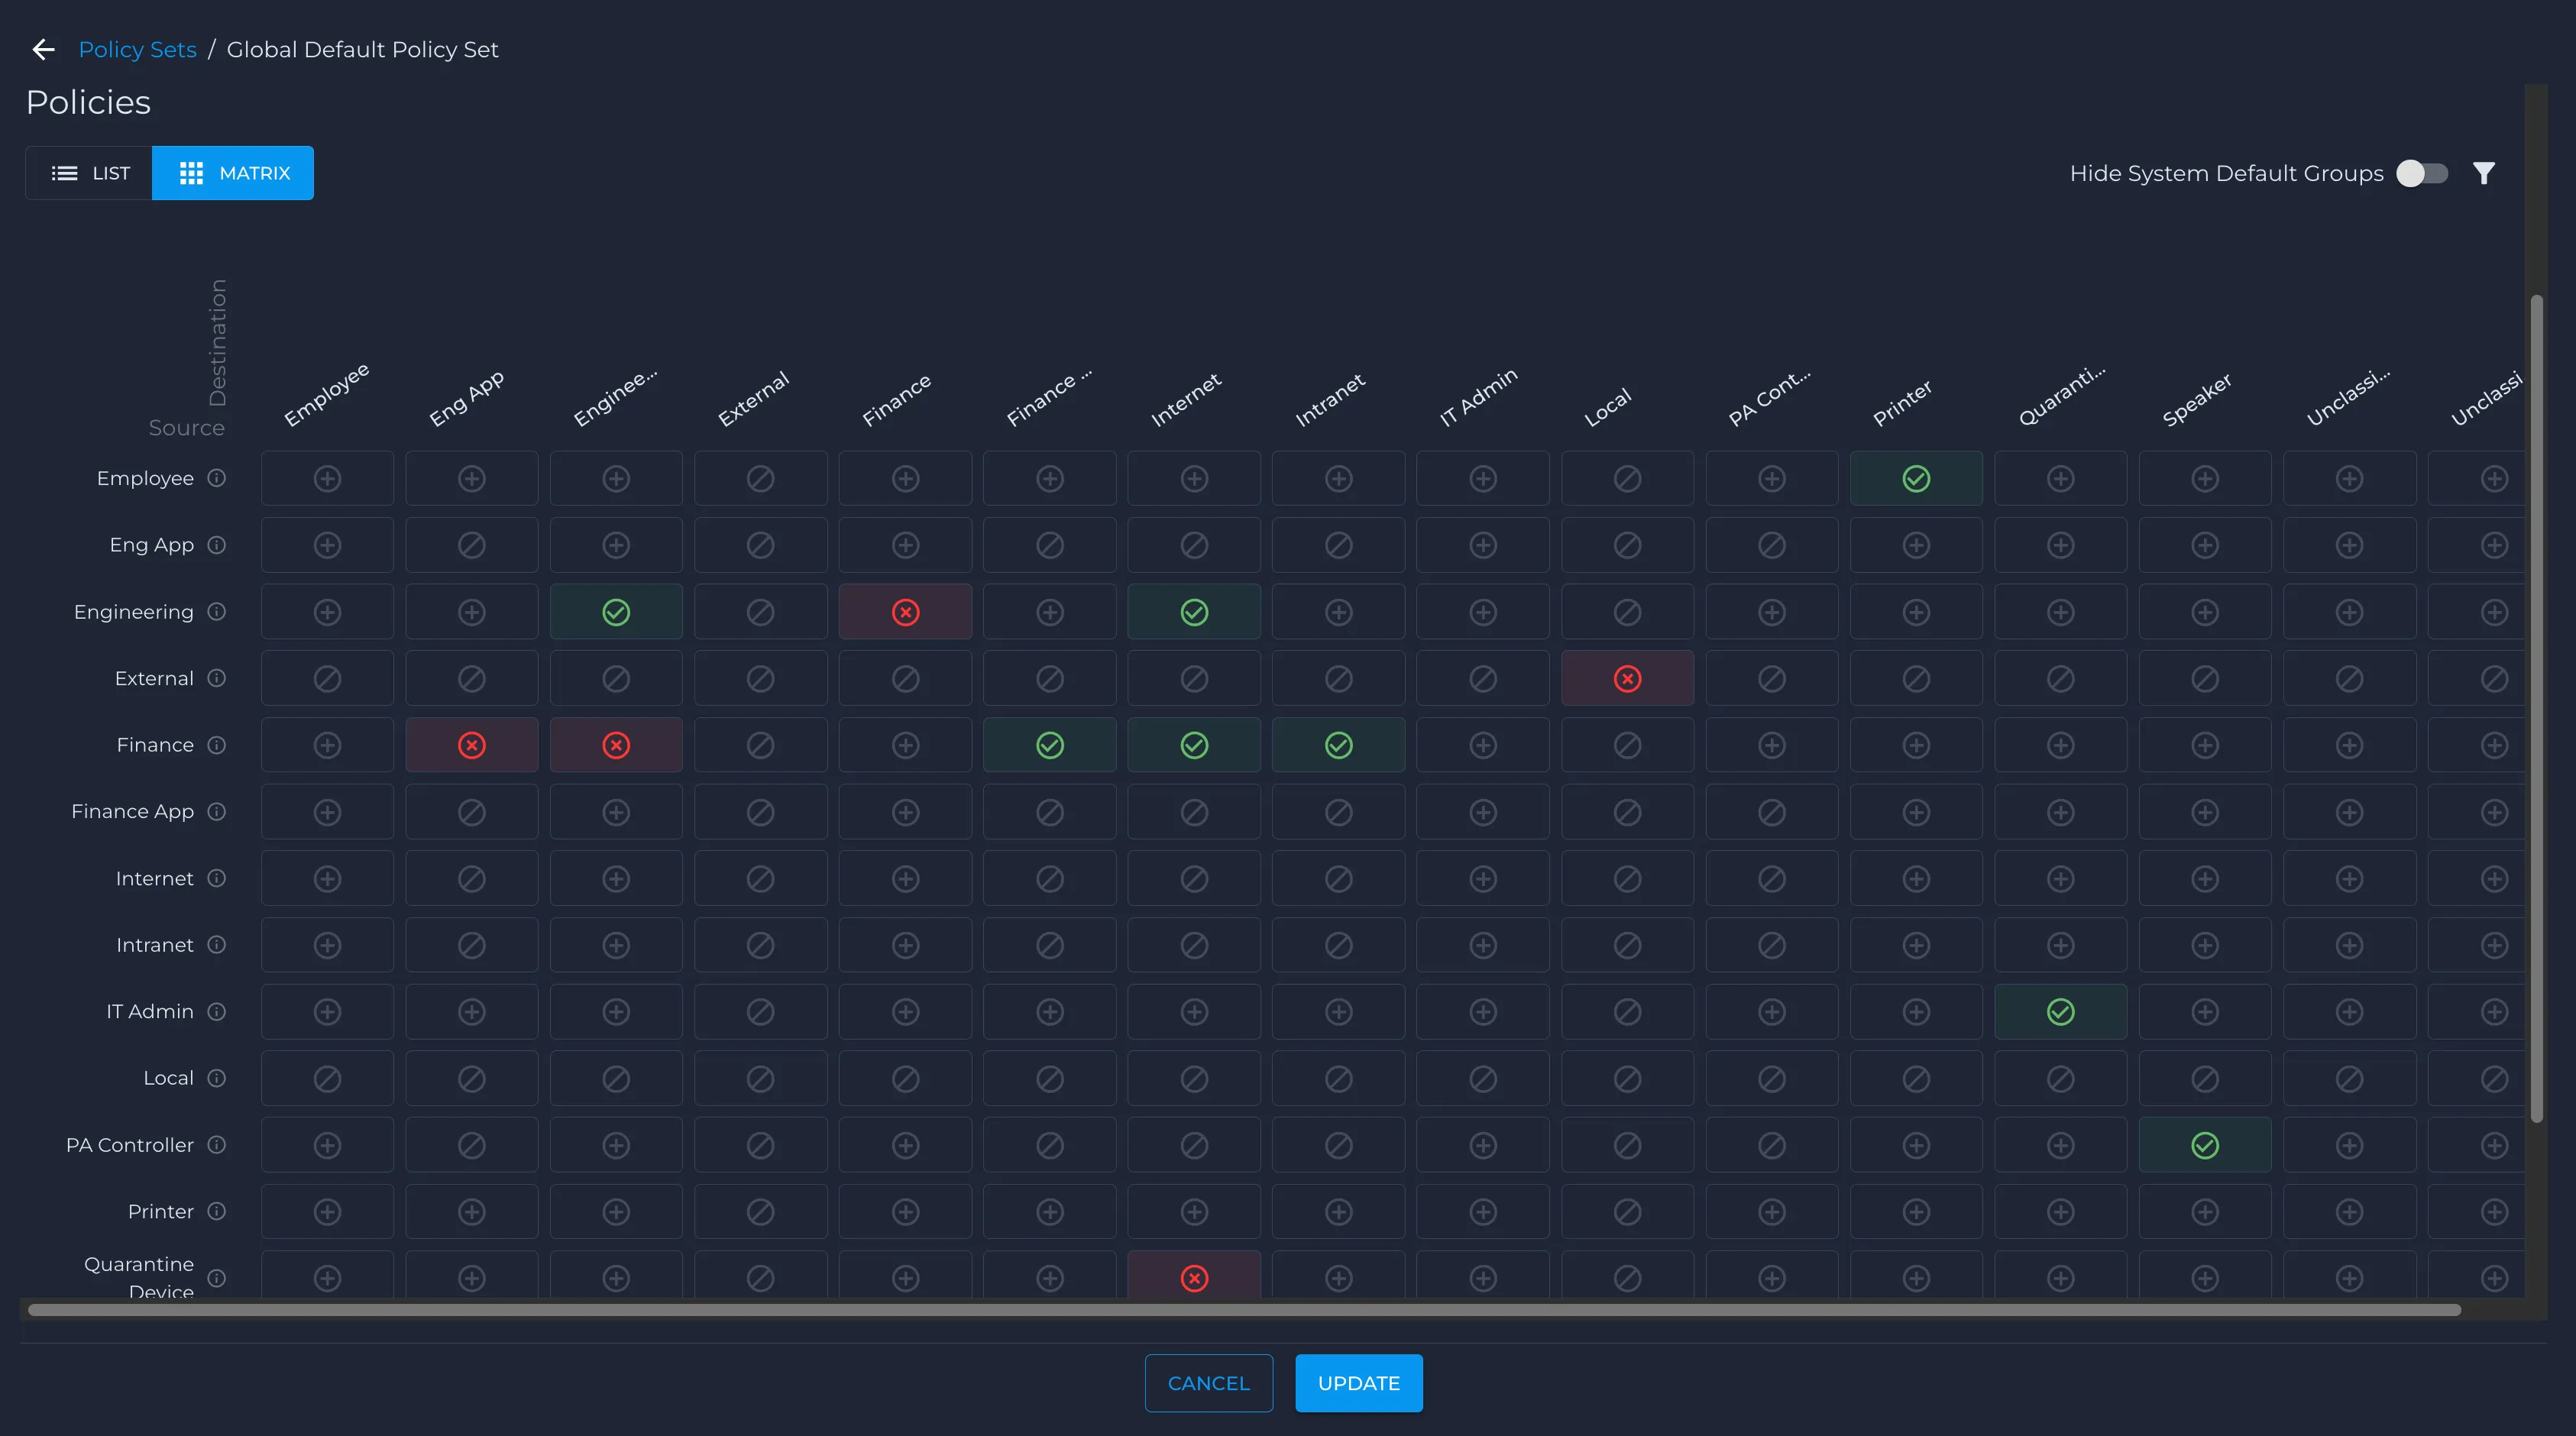
The matrix shows source policy groups on the left and destination policy groups across the top.
Create a policy from a matrix cell
- In the matrix, identify the source row and destination column you want to create a policy for (for example, Employee → Internet).
- Click the + icon in the intersecting cell.
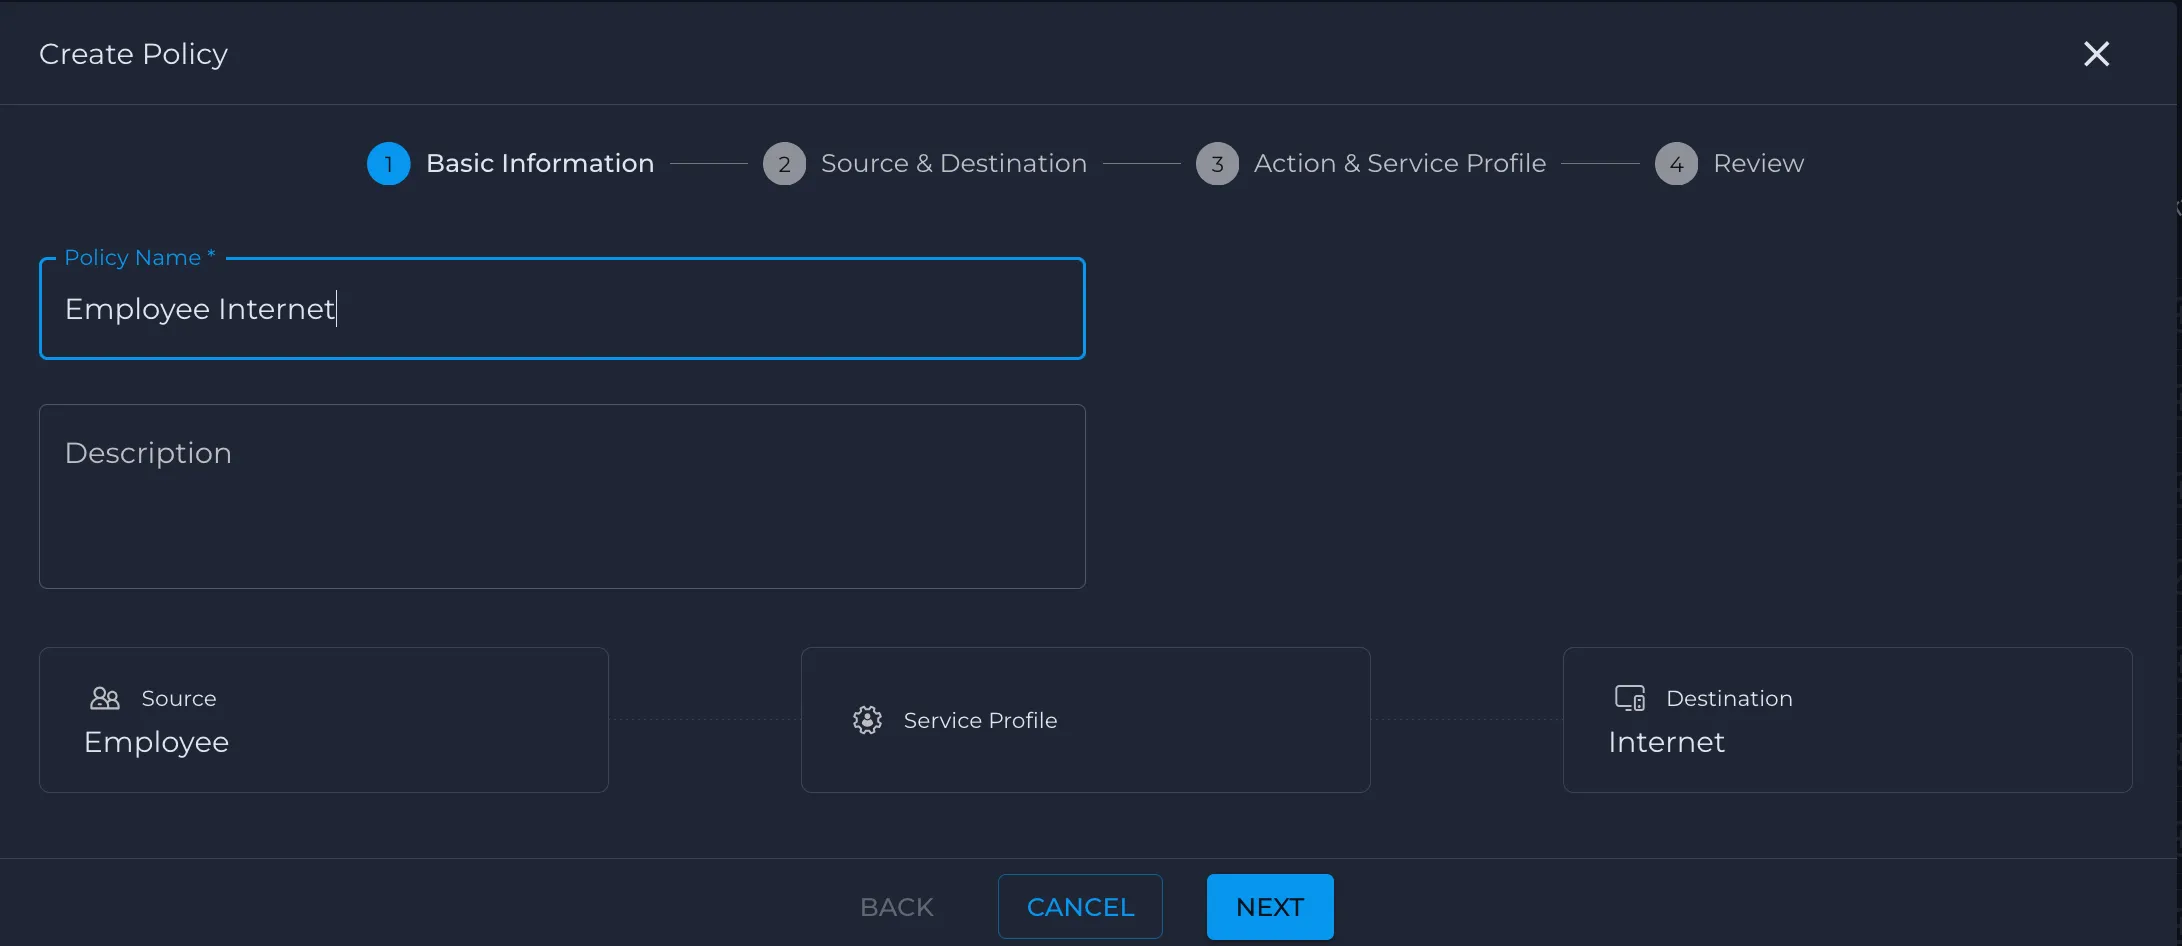
- This opens the Create Policy wizard at Step 1 – Basic Information, with Source and Destination already derived from the matrix selection.
Step 1 – Policy Name
- In Policy Name, enter a name that reflects the traffic flow (for example, Employee Internet).
- (Optional) Add a Description.
- Confirm that Source is set to Employee and Destination is set to Internet (auto-populated from the matrix).
- Click Next.
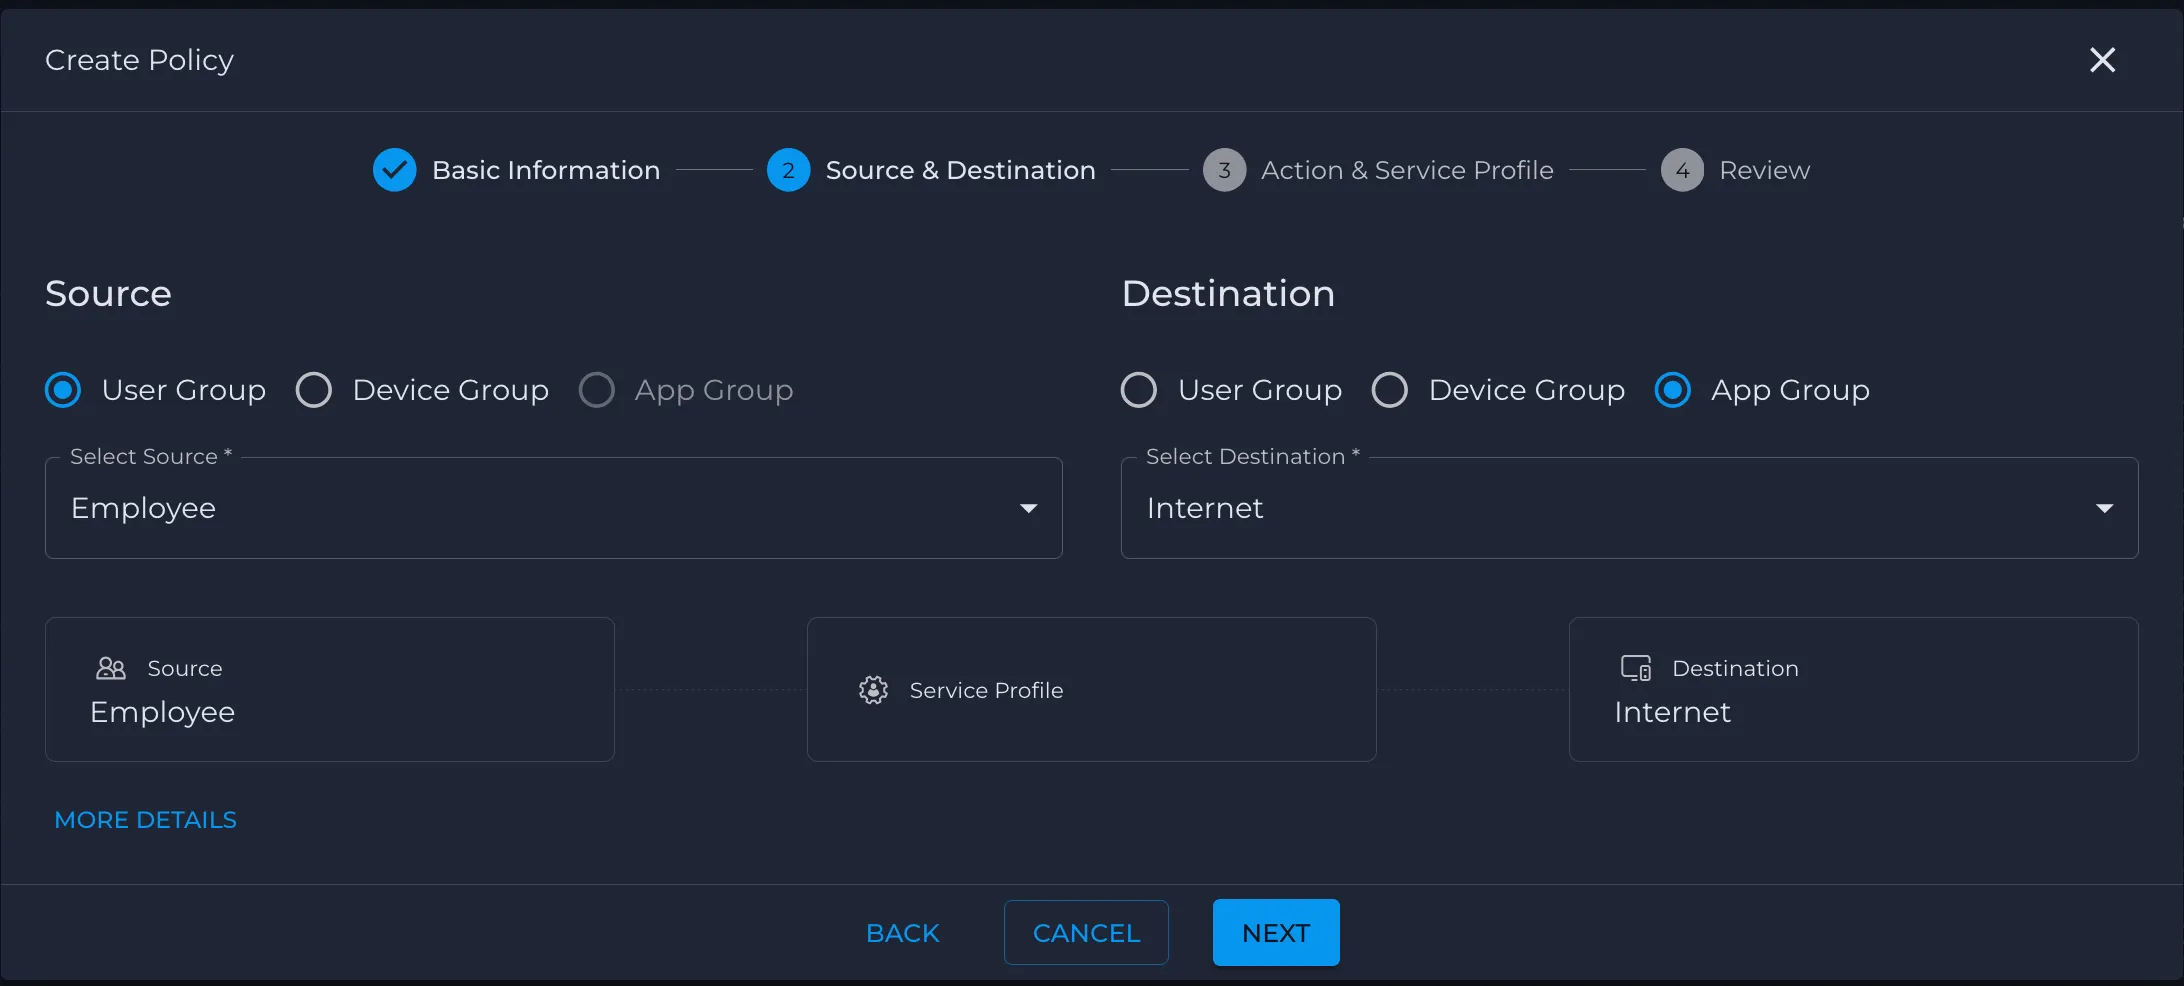
Step 2 – Source & Destination, the fields are populated based on the matrix cell you clicked. For the Employee → Internet example:
- Source:
- Type: User Group
- Select Source: Employee
- Destination:
- Type: App Group
- Select Destination: Internet
- You usually only need to review these values and click Next to continue.
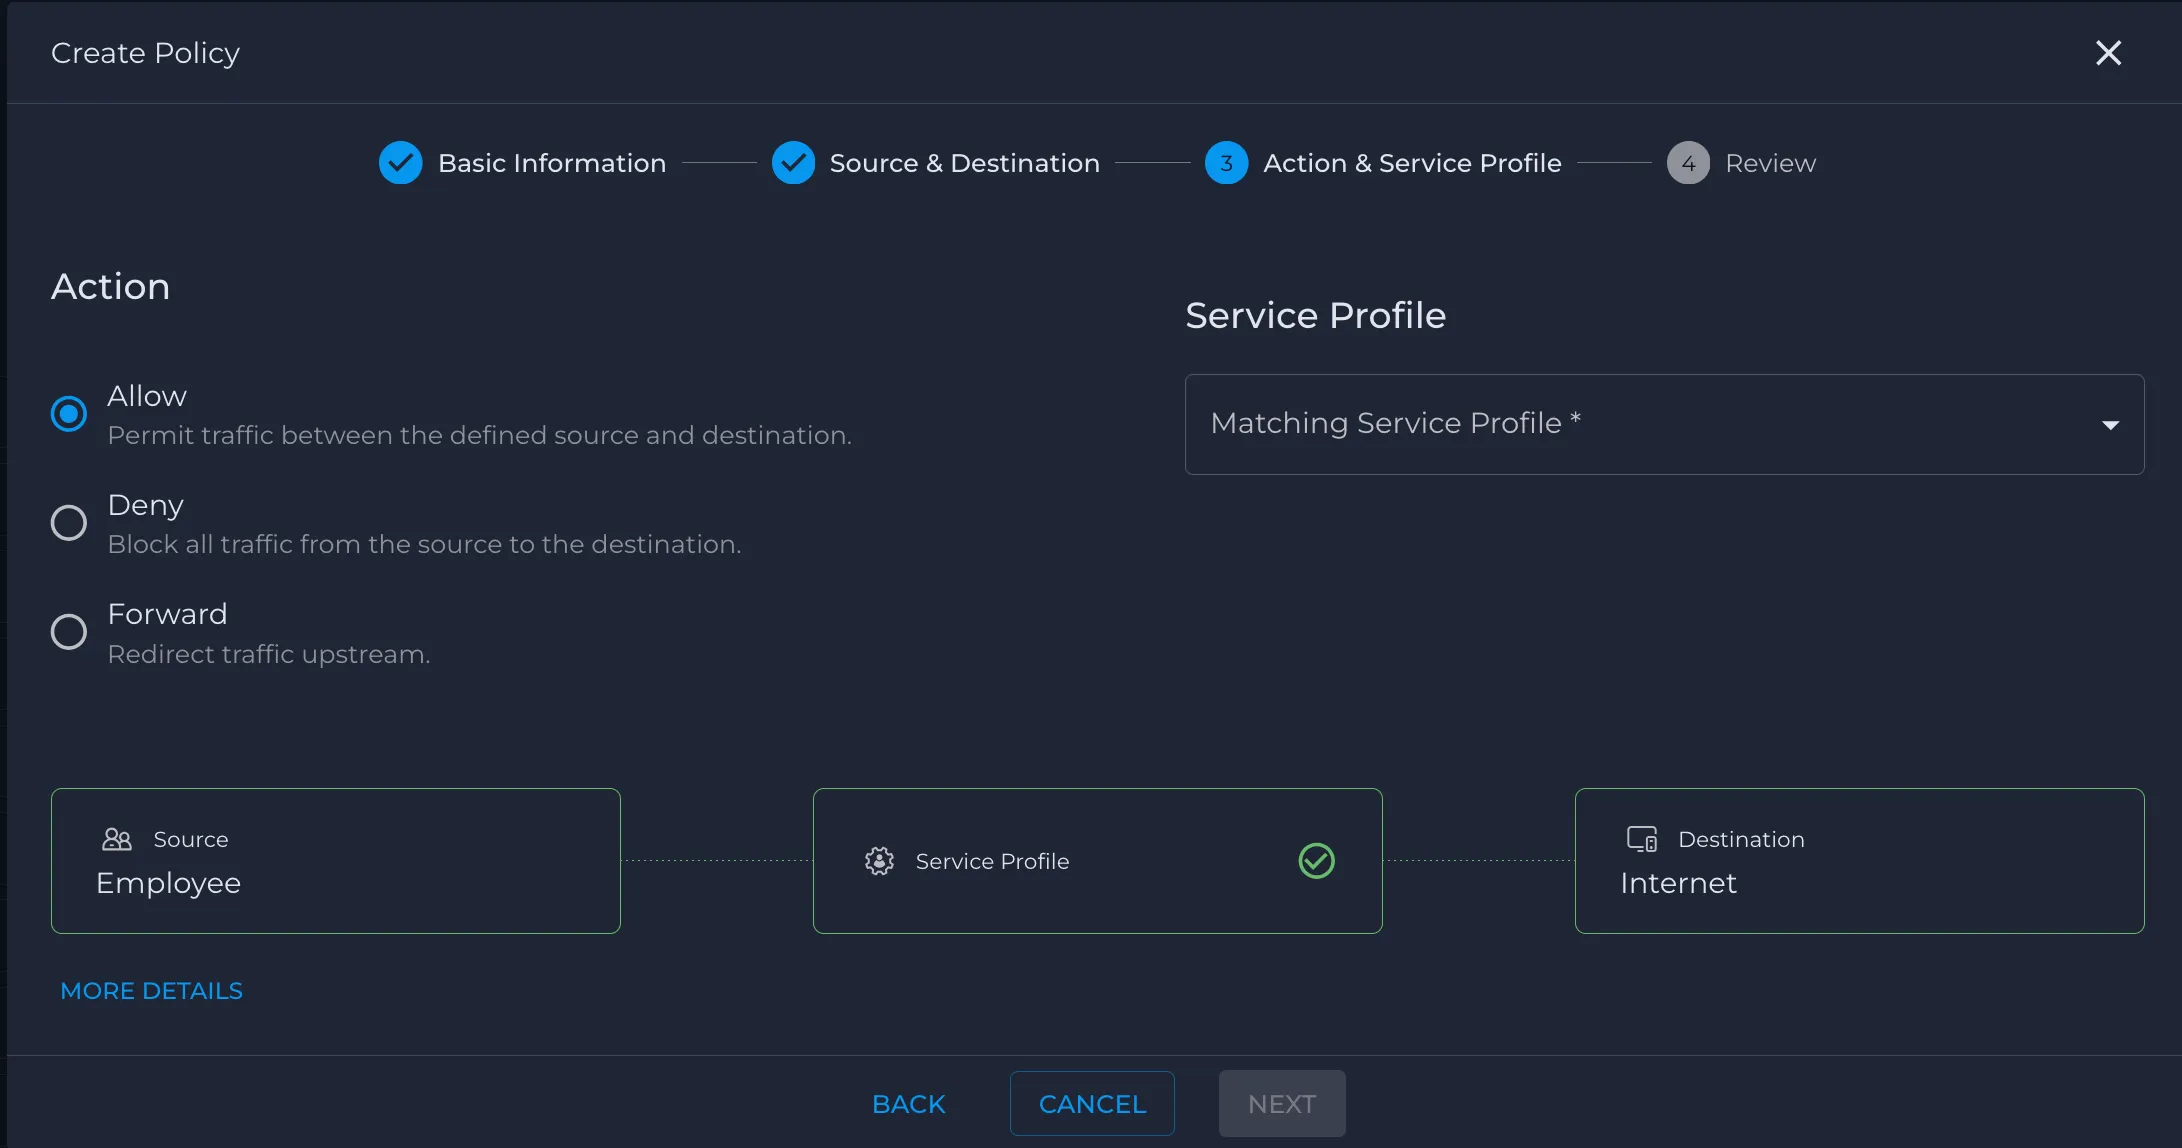
Step 3 – Action & Service Policy, select the desired behavior:
- Allow – Permit traffic between the defined source and destination.
- Deny – Block all traffic from the source to the destination.
- Forward – Redirect traffic upstream.
- For an allow policy, ensure Allow is selected.
- In Matching Service Profile, choose the appropriate service profile (for example, an Internet service profile).
- Confirm the visual chain shows:
- Source: Employee
- Service Profile: (your selected profile)
- Destination: Internet
- Click Next.
Step 4 – Review and save
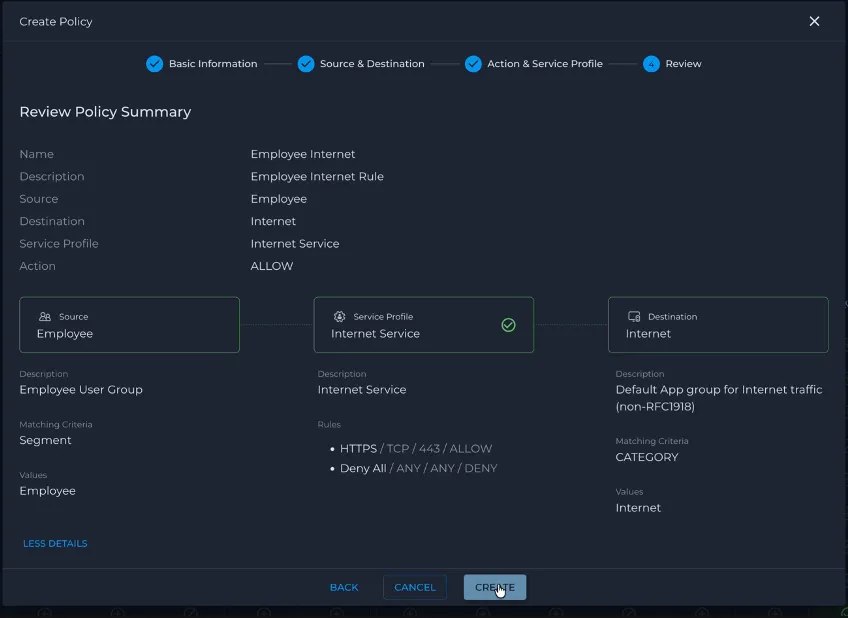
- Review the policy summary, including:
- Policy Name
- Source group
- Destination group
- Action
- Service Profile
- If everything is correct, click Create to add the policy.
- You are returned to the matrix, where the selected cell now reflects the policy status (for example, a green check for an allow policy).
Please note that using the matrix flow is typically faster and more convenient because Step 2 – Source & Destination and much of Step 3 – Action & Service Profile are auto-populated from the matrix selection.
Matrix display and filter options
Hide system default groups
At the top-right of the matrix, you can simplify the grid by hiding built-in policy groups:
- Use the Hide System Default Groups toggle to show or hide system default groups from the matrix.
- When the toggle is on, only your custom user, device, and app groups are shown, making it easier to focus on tenant‑specific policies.
Filter the matrix by specific groups
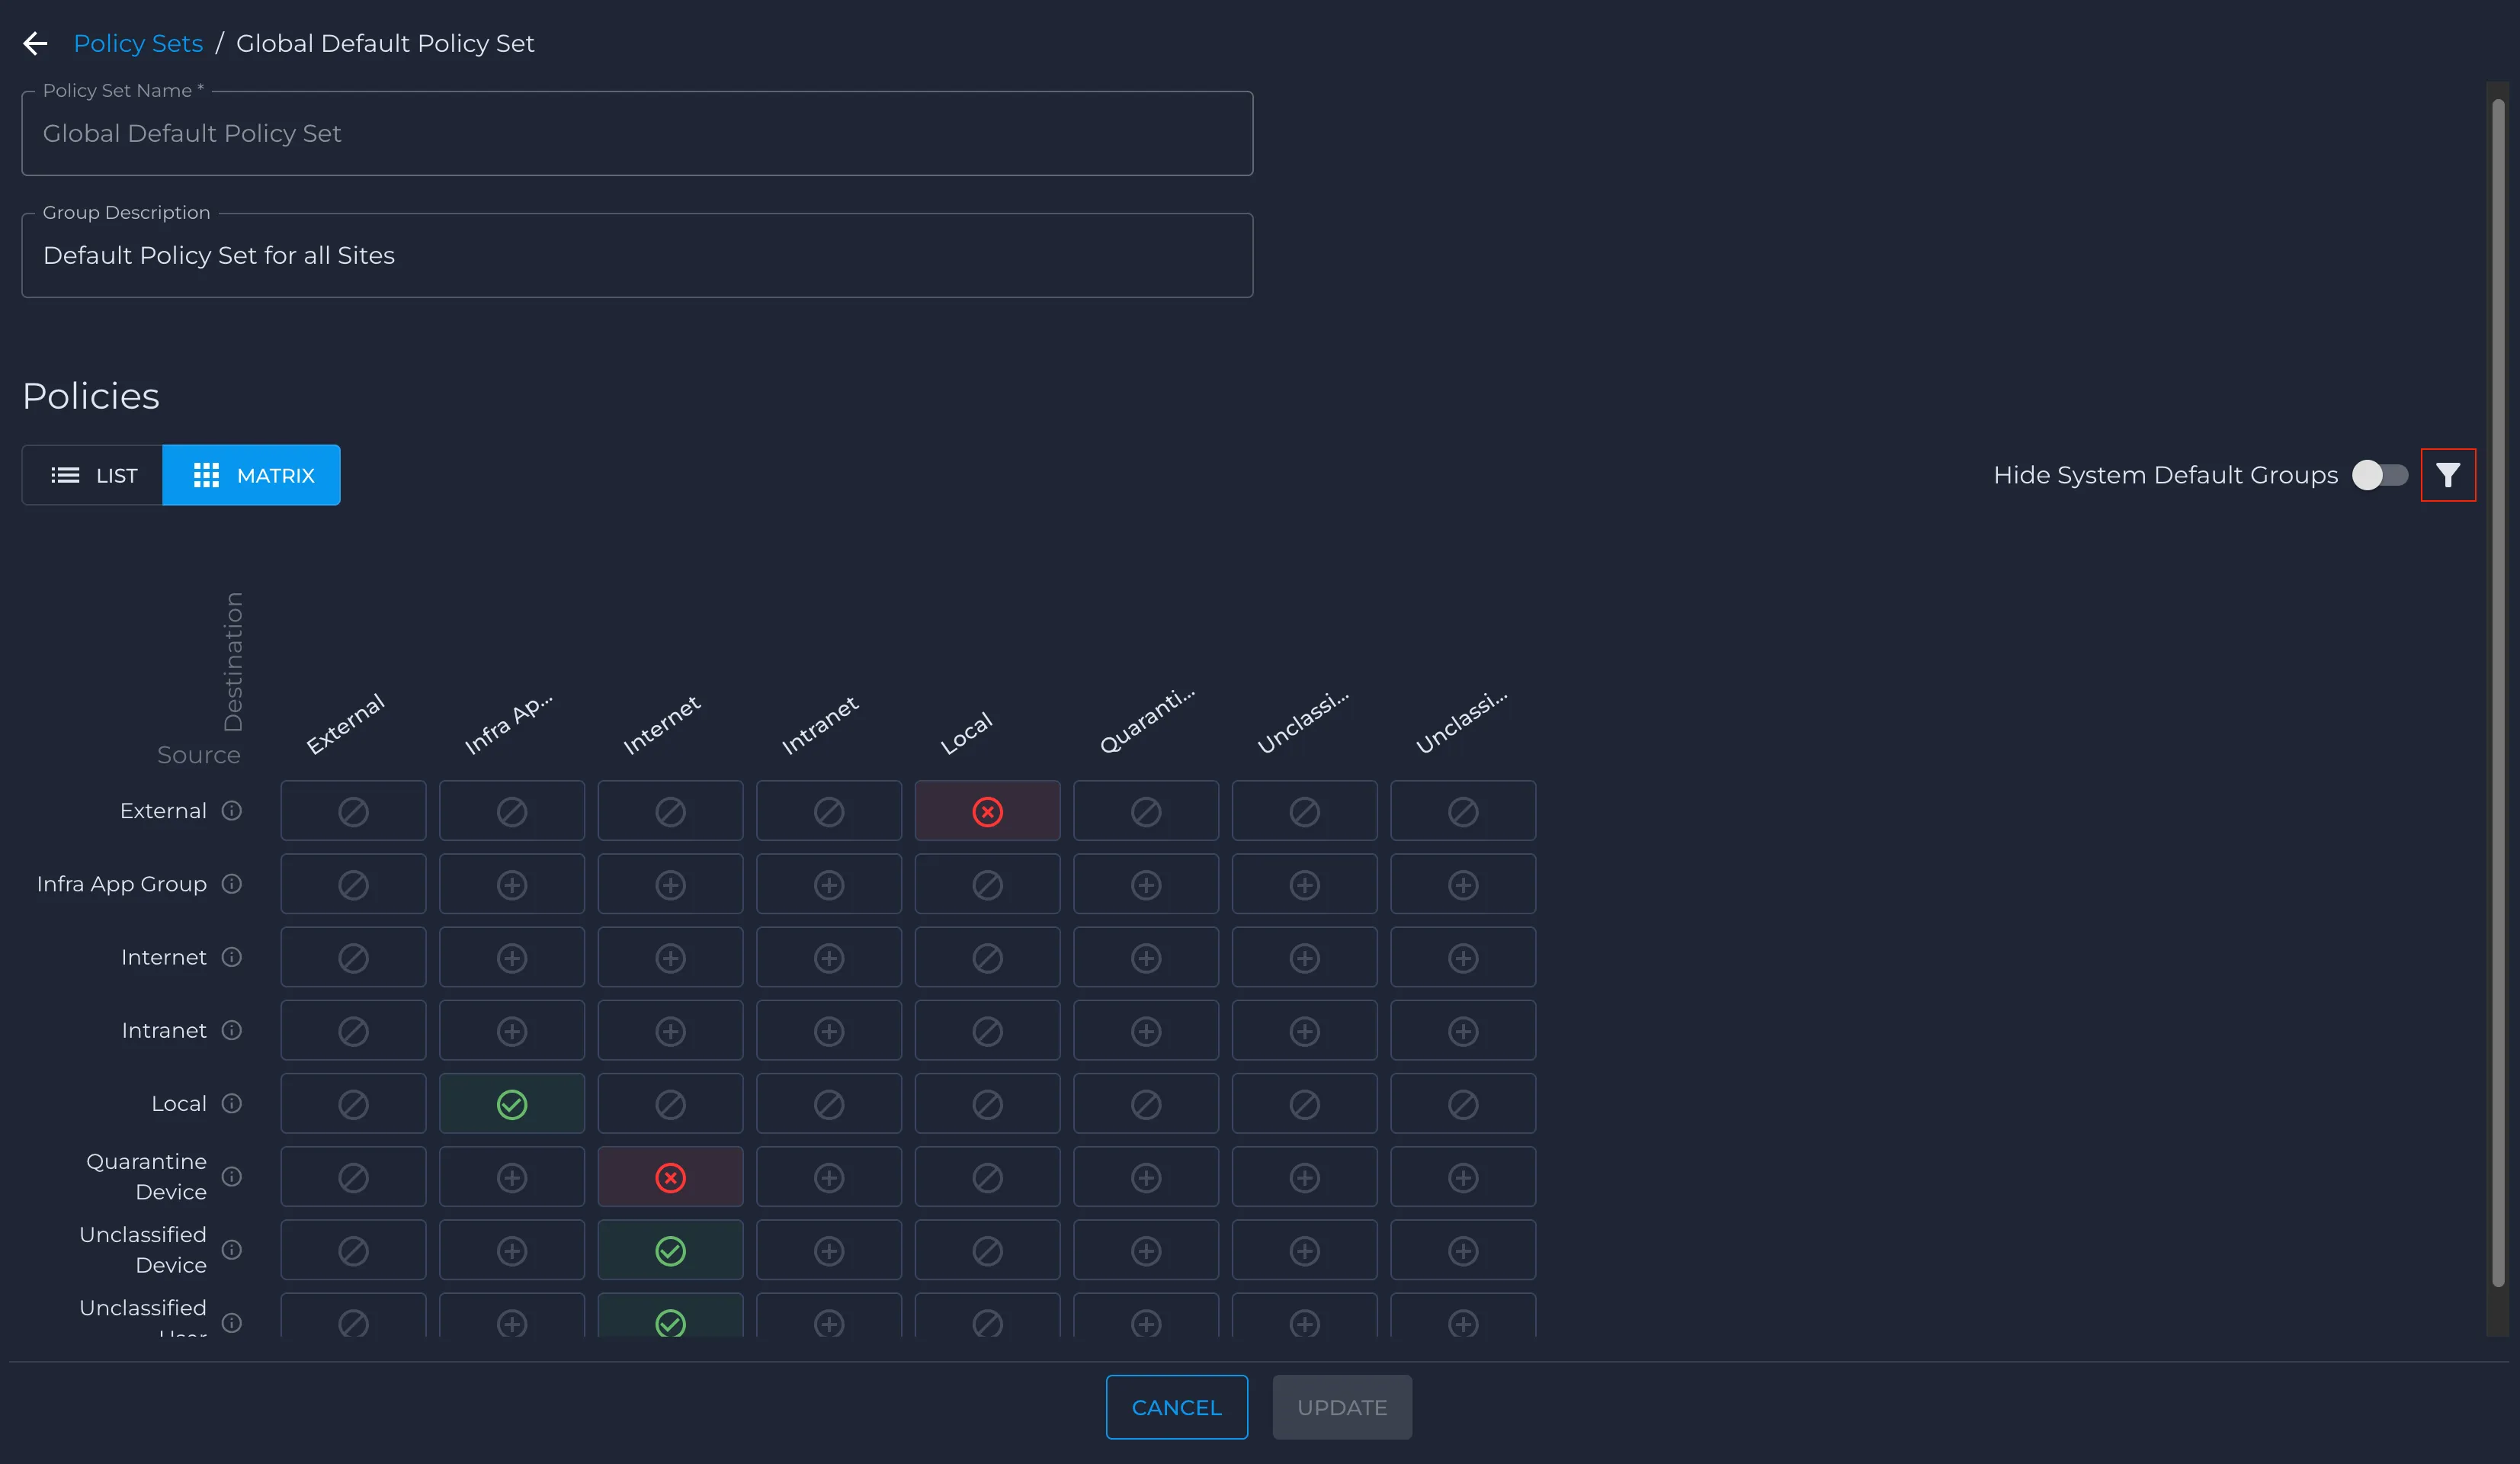
You can further narrow the matrix to only the groups that matter for the policy design you are working on:
- In the matrix header, click the filter icon
- In the Filters panel, choose a Category on the left:
- User Groups
- Device Groups
- App Groups
- System Default Groups
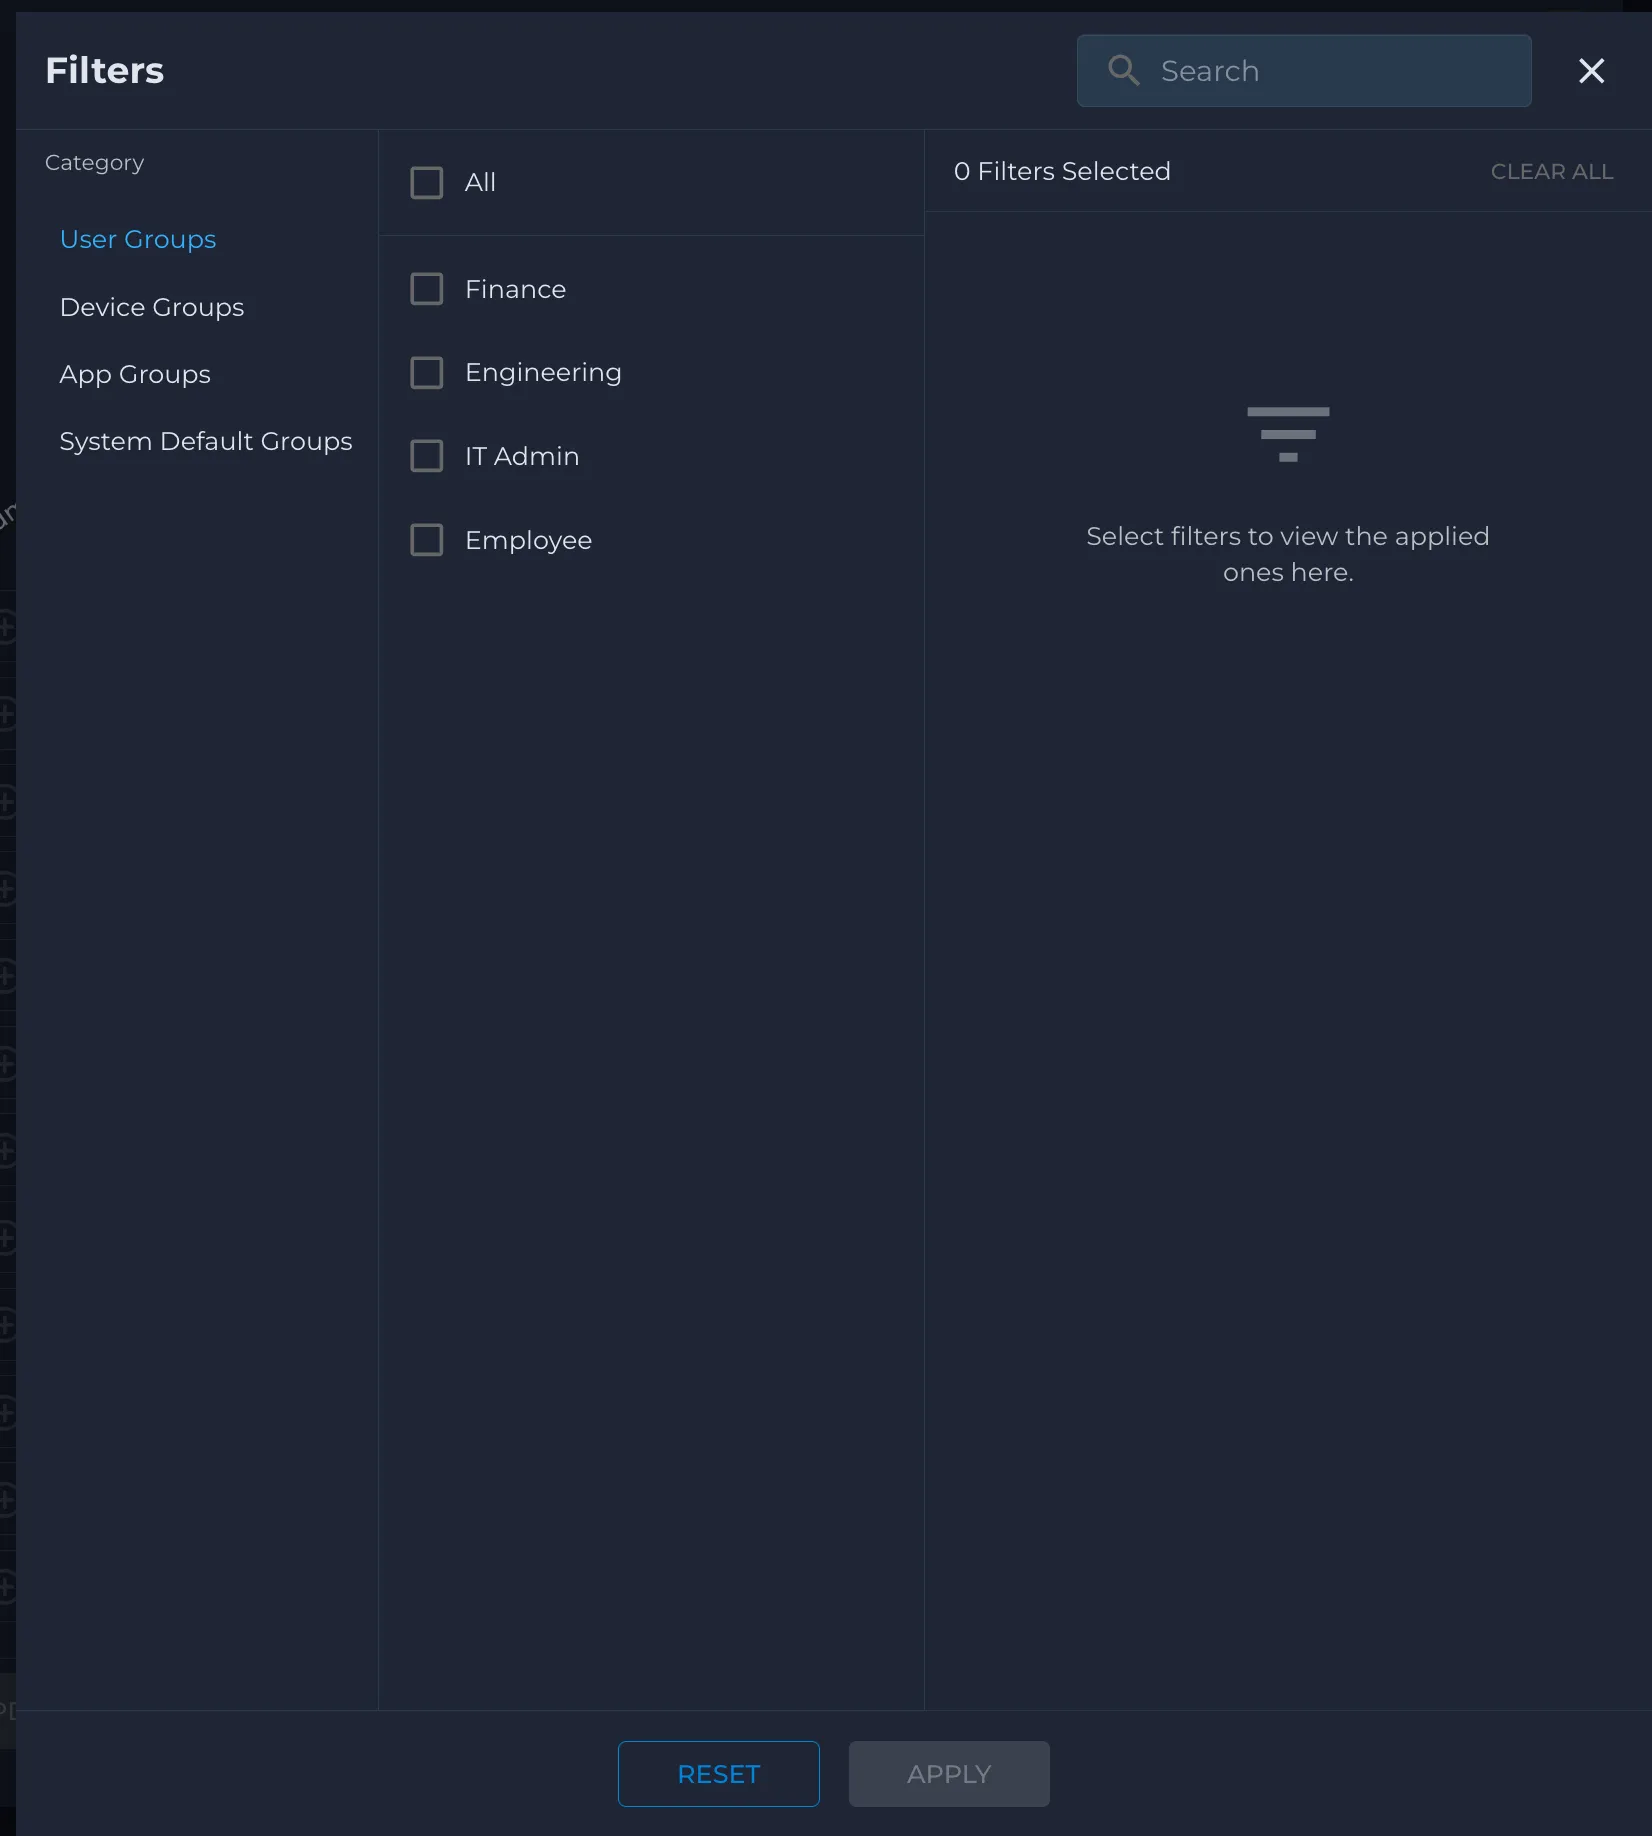
- In the middle column, select one or more groups to focus on (for example, Finance, Engineering, IT Admin, Employee).
- Click Apply to update the matrix. Only the selected groups will be shown on the source and destination axes.
- To reset to the full view, click Reset (and then Apply if required).
These options make the matrix an efficient way to both visualize and configure policies, especially in larger environments with many groups and flows.
Policy Logs and Validation
Policy logs are critical for validating policies and troubleshooting unexpected behavior. After creating or modifying policies, always use the logs to confirm that traffic is being evaluated and enforced as intended.
Where to view policy logs
From the Nile portal, open the Security / Trust Engine area and navigate to the policy logs view. This view shows each evaluated flow along with:
- Source/destination policy groups (user, device, app, system groups such as Internet, Intranet, External)
- Service profile matched (for example, Printing Service, Internet Service)
- Action taken (Allow, Deny, or Forward to firewall)
- Direction (east–west or north–south) and basic flow metadata (IPs, ports, timestamp)
Troubleshooting with policy logs
When users report access issues:
- Locate the corresponding flow in the policy logs.
- Check which source/destination group, service profile, and action were applied.
- Adjust the relevant policy group membership, service profile, or policy action (Allow vs Forward vs Deny), then re-test and re-verify via logs.
Regularly reviewing policy logs during and after migration helps ensure that the new Trust Service policies match your intended access model and that the default-deny posture does not introduce unexpected outages.